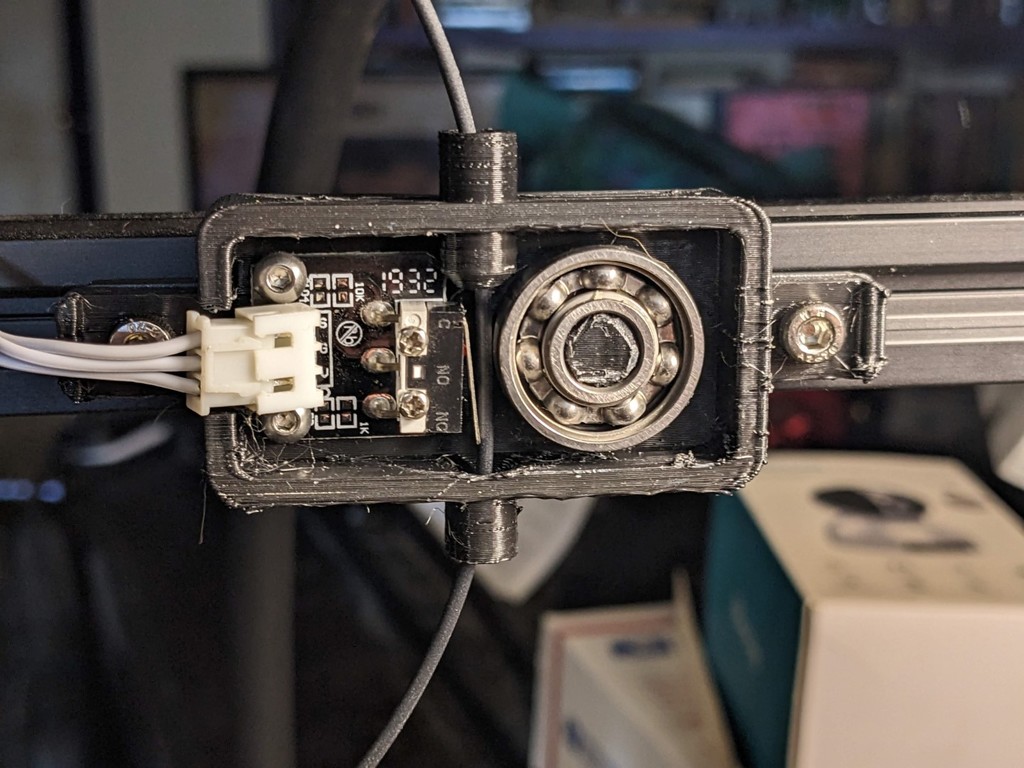
JWS - Filament Runout Sensor
thingiverse
<iframe width="560" height="315" src="https://www.youtube.com/embed/xJ65YS31Mug" title="YouTube video player" frameborder="0" allow="accelerometer; autoplay; clipboard-write; encrypted-media; gyroscope; picture-in-picture; web-share" allowfullscreen></iframe> YouTube - JWSmythe - https://youtu.be/xJ65YS31Mug This is a filament runout sensor. It is remixed from 3djpco's "Filament Runout Sensor w/ Creality Limit Switch. He deserves most of the credit for this. I made some important changes, which you may desire. Go read his instructions for using it. Then read my changes below. https://www.thingiverse.com/thing:4547442 I made it for my Ender 3, but it should work on almost anything with a port available. Since it uses the old Z limit switch, you probably already have most of the parts for it. The original version was fine, if your machine is slow. After I made some upgrades, and could do 150mm/s, the filament would get yanked by the extruder, and trip a false runout. For the last year, I've just left it on the top of my machine, because it was also an easy way to hold onto the filament without it being in the extruder. Like, so the filament roll didn't get tangled. His original instructions were to glue in some pieces of bowden tube. I just couldn't get them to stay glued. So it just made a mess. Here's my changes. I left the switch assembly itself, and the outer shell alone, so you can use those as points of fixed reference. * I added the vertical tube sections. There's no real resistance in there, so the material doesn't matter. It does put the filament in the right spot, and keeps it aligned. * I added funnels at the top of the upper tube, and both ends of the lower tube. I also chamfered the bottom of the top tube, so it wouldn't interfere with the switch and bearing. This really helps with loading it, even if the filament is curled pretty hard. If you can't get it to load, twist the filament a little. It'll fall in. * I moved both the top and bottom holes 2mm to the left. He had a little slide thing there. It was just in the way. And now with the vertical tube sections, the filament can only be on the switch. * I moved the bearing assembly 2mm to the left. That's almost in contact with the switch, but not quite. So the switch has to be pressed if there is any filament there. Just like we need. It should be wide enough for the 1.75 and 2.85/3mm filaments. * I removed the need for the switch guide. Because of the vertical tubes guiding the filament better, you don't need the bearing either. You could just put a wall there instead. The bearing is pretty when it's turning, so I kept it on mine. In the sketch, there is a section on the bottom sketch, that you could extrude walls up to. The bearing footprint is also present on the sketch, so you can extrude as desired. The original has a second bar to put under the assembly, if you need to space it out a little. Print his if you need it, the overall length of the body is the same. Thing: https://www.thingiverse.com/thing:4547442 File: adjpco-filamentsensor-spacer.stl I have provided this in several forms. I did the editing in Fusion 360. You only need *one* file. There's only one thing to print. It's a waste to download all of them. Model editors: .f3d .iges, or .step Printable: .3mf or .stl If you're just printing it, use the .3mf file. If you use the .stl, you'll need to import it at mm scale, not inches.
With this file you will be able to print JWS - Filament Runout Sensor with your 3D printer. Click on the button and save the file on your computer to work, edit or customize your design. You can also find more 3D designs for printers on JWS - Filament Runout Sensor.
