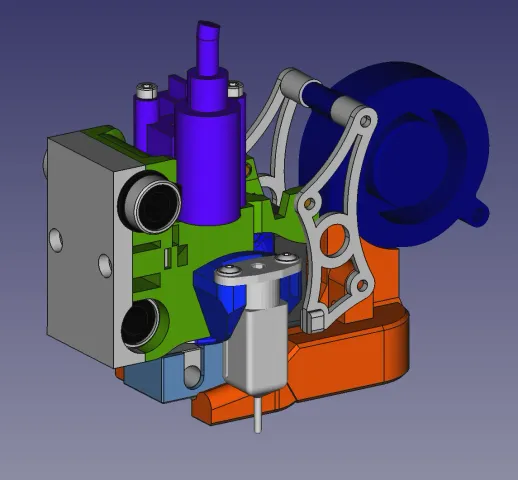
JG Aurora A5 printhead with E3D V6/Revo Six Hotend and either bowden or Zesty Nimble extruder
prusaprinters
This model allows to mount a E3D-V6 or E3D Revo Six all-metal hotend to the JGAurora A5. It offers to either use the existing bowden setup on that printer or alternatively mount a Zesty Nimble Remote Direct Extruder V1.2 (mounting a V2 is principally possible but requires an adapter plate that is not yet finished). See my JGA5 E3D slim-twin fan duct for a matching part-cooling solution and the optional JGAurora A5 E3D drag knife mount [vinyl cutter].If you're looking for a similar solution with a direct extruder, check out my E3D V6/Revo Six Hotend with The Orbiter v1.5 140g Dual Drive Direct Extruder (not yet published). Required PartsBasic Model:2x M3x6x4.2-3.6 threaded insert2x M3x4x4.2-3.6 threaded insert4x M3 quadratic nut (DIN562)2x M3x30 hexagon socket head cap screw (ISO4762)2x M3x12 hexagon socket head cap screw with low head (DIN7984)2x M2x8 hexagon socket head cap screwOptional for 3D-Touch/BL-Touch bed-leveling sensor:2x M2 hex nut2x M2x8 countersunk flat-head screwOptional for Nimble Remote Direct Extruder v1.2:2x M3 hex nut2x M3x40 hexagon socket head cap screw Print InstructionsFor best performance, choose a material that endures higher temperatures. I've printed mine in extrudr GreenTec Pro, which worked fine for years now, without any warping.All parts were designed for a layer height of 0.1 mm. Print with at least 3 wall lines and some infill (density not critical). AssemblySome tolerances are tight, so some light sanding, filing or drilling out bores might be necessary. Especially the surfaces that grab around the linear bearings and the E3D-V6 hotend's groove mount need to be taken care of. Make sure to not allow a loose fit, either.Basic ModelInstall the two M3x6x4.2-3.6 threaded inserts and quadratic nuts to the BearingSeat; the threaded inserts will later accept the two M3x12 flat-head bolts to attach the toothed belt:If the optional sidemount for the 3D-Touch/BL-Touch bed-leveling sensor is to be used, the M2 hex nuts should be glued in while the pockets are still accessable.Same is advised for the two M3 hex nuts for mounting the Nimble Remote Direct Extruder.The end-stop micro switch is attached with two M2x8 bolts (threading directly into the material; the two attached cables can be carefully threaded through the conduit after temporarily removing the contacts from the shroud:After installing the two M3x4x4.2-3.6 threaded inserts to the Clamp, test-fit the part and the two M3x bolts to the BearingSeat and the E3D-V6 heatsink: Before final assembly, the E3D-V6 fanshroud and fan must be added:For a mathing part-cooler, check out my JGA5 E3D slim-twin fan duct: Optional bedlevel-sensorUse the two M2x8 countersunk flat-head screws to fix the Sidemount to the BearingSeat.The sensor itself is fixed to the Sidemount with two M3x8 screws threading directly into the material. Pre-cutting the threads carefully with either a thread cutter or a bolt is advised.The nozzle-probe-offset is 30mm in X, 0 in Y.Optional Zesty Nimble Remote Direct Extruder V1.2To switch from the bowden setup over to the Zesty Nimble Remote Direct Extruder V1.2, simply place the provided groove adapter over the E3D-V6, add the required bowden tube stub…… and mount the Nimble on top:
With this file you will be able to print JG Aurora A5 printhead with E3D V6/Revo Six Hotend and either bowden or Zesty Nimble extruder with your 3D printer. Click on the button and save the file on your computer to work, edit or customize your design. You can also find more 3D designs for printers on JG Aurora A5 printhead with E3D V6/Revo Six Hotend and either bowden or Zesty Nimble extruder.
