Jewelry box
prusaprinters
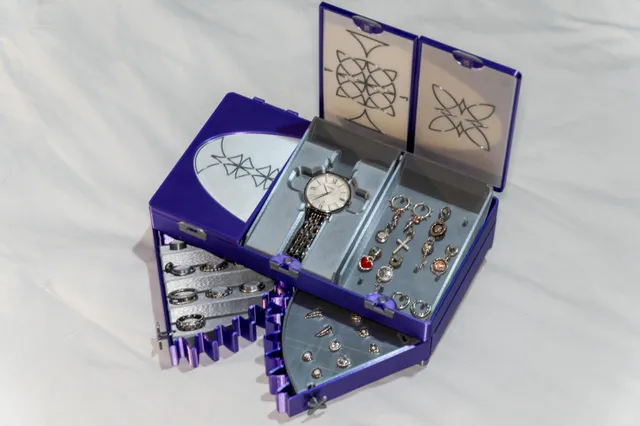
3D printed jewelry box Print instructionsOptimized for 0.4 nozzle with layer height 0.2, the decoration panels require specific slicers settings (color change, top layers = 0, and 0% infill), I added a .3mf file with the setup for Stock MK3S Prusa. For the other stl files you can use the stock 0.20mm Quality profile. Assembly materials: CA Glue 5x3mm neodymium magnets (x6) Assortment of M3 screws, (it is not necessary to use the exact lengths): M3x6 Screws (x2) M3x12 Screws (x4) M3x8 Screws (x4) Assembly notes: Pressure fit the magnets on the 5mm holes of the three Lids and the LidBox, sometimes you may need to add a little bit of CA glue. Use M3x6 Screw to attach the Knob to DrawerLeft. Repeat this is step for DrawerRight Screw the rear Foot to DrawerBox using M3x8 screws. Use a M3x12 screw to sandwich a Foot the DrawerBox and DrawerLeft. Repeat the step for DrawerRight Place LidBox on top of DrawerBox and use M3x8 screws to fasten the parts using the corner holes at the rear. Use a M3x12 screws to attach LidBox to DrawerLeft and DrawerRight. For the hinge insert a piece of filament in the hole so it works as a pivot, if the filament is wobbly use a little bit of CA glue on the outer parts of the hinge so the filament will not fall off. If the filament does not fit, try to narrow it down with a drill and sandpaper. The other parts of the box are just glued, (just don´t glue the trays).
With this file you will be able to print Jewelry box with your 3D printer. Click on the button and save the file on your computer to work, edit or customize your design. You can also find more 3D designs for printers on Jewelry box.