James Webb Space Telescope LED Wall Art.
prusaprinters
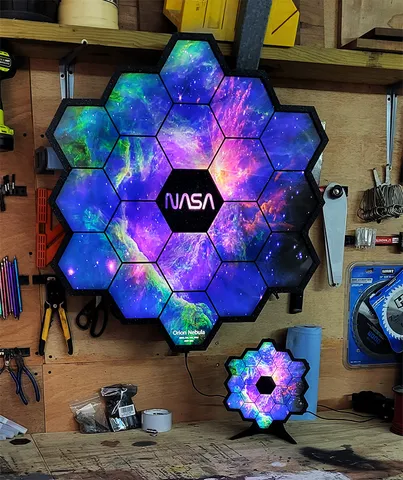
Available fully built on my Etsy Shop: Etsy.com/shop/VegaWoodworks 6/13/23 - Added cut files for smaller build plates. This is a simple lightbox made into the JWST mirror shape with a backlit print illuminated by LEDs. Everything can be printed with no supports. Use about 15% infill and 1mm walls for strength and easy top bridging. Prints great at .2mm layer height. Keep it at 100% size or things wont fit. It is around 30"x28" when finished. It can be printed on a 300mm bed, or use the files labeled "SMALL PLATE" with the parts cut to fit on a 200mm bed(and maybe even smaller). The instructions are roughly the same for both, but with the “small parts” files you will have to glue more pieces together.You will need to print:(5) Sides(1) Plug side(6) Tops(6) Guides You will need to purchase:(2) pieces of 0.093"/2.4mm acrylic at least 30"x30" (or a large one you can cutto make 2) https://www.homedepot.com/p/OPTIX-36-in-x-72-in-x-093-in-Acrylic-Sheet-MC-10/202038046(1) piece of 3/8"(~10mm) plywood, at least 30"x30". This is for the back.(1) LED 16ft light strip with remote. Most of the brands are the same thing, so the plugshould fit into the 3dprinted "Plug-Side" piece.amazon.com/gp/product/B07DS2DDBM(1) Backlit print. The print needs to be a really high quality image printed onto "Backlit Film".I get mine from PosterPrintShop.com. The shape needs to be printed at 29.5" tall x 27.5" wide,this will give you just enough extra to trim to fit. Here are the imagespictured. Purple Galaxy: https://i.imgur.com/Dsnfwyo.jpg (edited image by Graham Holtshausen).Carina Nebula: https://imgur.com/x7kmKVp (James Webb)Orion Nebula: https://imgur.com/v9fmQPU (James Webb) You will also need:CA/superglue (24) ½" to ¾" small screws(for back and top ring)Jigsaw with high tooth metal cutting blade(cuts acrylic easy).--------------------------------------------------------------------------------------------Rough instructions:-Print (5)side and (1)plug-side and superglue them together to form the side ring.-Glue all 6 “guide” pieces together and use it to trace the outline for the plexiglass(outer edge), and the wood back(inside edge). Cut and place wood back inside and secure with small screws as marked from the back. (I recommend painting the inside bright white to help the leds reflect more). -Carefully cut the acrylic. I've found a jigsaw with a high tooth count metal cutting blade will cut the acrylic rather easy. Just go slow and make sure to support the acrylic where you are cutting or it will crack. You can use an orbital sander to refine the edges and corners to get a good fit. Don't worry about it being perfect, the top ring will cover and hide about ½" of the acrylic all the way around.-Place the LED string along the inside sides making two full loops, make sure to start with the plug inserted into the "plug side" piece. You may need to use some glue to help the led string stick to the walls if the adhesive is weak.-The image goes between the 2 pieces of acrylic, and the acrylic fits onto the top lip on the side ring. You will have to trim the image to fit as its a bit oversized. Use the acrylic as a guide to trace where you need to cut).-Glue the top ring together and place it on the top, secure it with 6 small screws. -Use double sided tape to attach a middle hex.-Hang it by one hook/d-ring from the very top and it will self level when you hang it.If everything is good after this I recommend taking it apart and spraying it with a texture spray paint to mask 3d printing layers. Pictured is black granite texture spray. Visit my Etsy Shop: Etsy.com/shop/VegaWoodworks
With this file you will be able to print James Webb Space Telescope LED Wall Art. with your 3D printer. Click on the button and save the file on your computer to work, edit or customize your design. You can also find more 3D designs for printers on James Webb Space Telescope LED Wall Art..