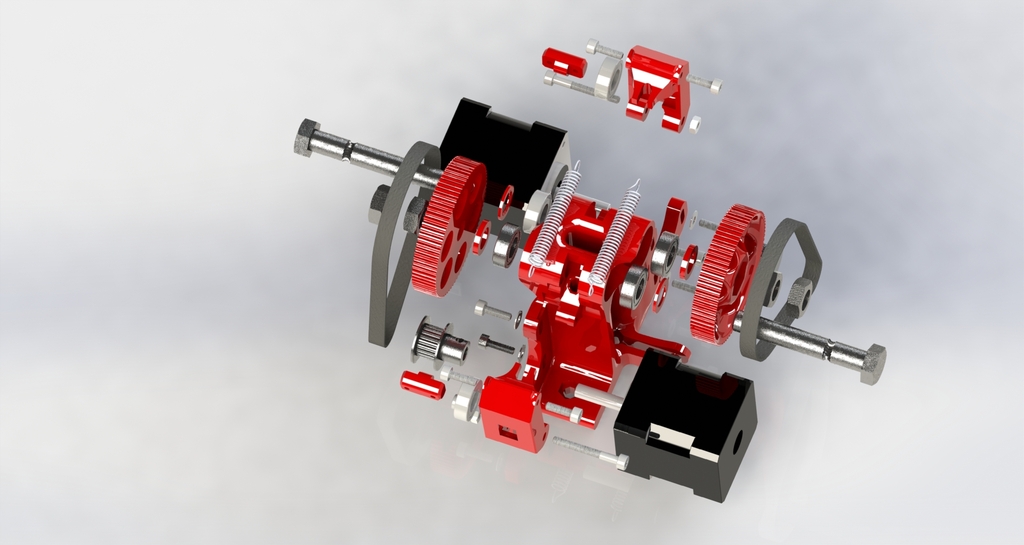
Itty Bitty Double Extruder (with mount for MakerFarm Prusa i3v)
prusaprinters
<p>*<strong>UPDATE: a hardware kit is now available!</strong>* <a href="http://clough42.com/product/itty-bitty-double-extruder-hardware-kit/">click here</a></p> <p>I am proud to present the Itty Bitty Double Extruder, a two-material belt-driven extruder with mounting hardware for MakerFarm i3v printers.</p> <p>Versions are provided for 3mm and 1.75mm filament.</p> <p>The extruder should be easily mountable on any printer that can accept a standard Hinged Accessible Extruder.</p> <p>Features:</p> <ul> <li>For Original Hexagon hot ends on 20mm centers (NOTE: NOT Hexagon AO)</li> <li>NEMA 14 motors</li> <li>GT2 belt drives with printed pulleys</li> <li>Integrated servo Z probe</li> <li>Cam-lock idler bearing pins</li> <li>Uses standard hobbed bolts <a href="http://clough42.com/go/product/hobbed-extruder-bolt/">available here</a></li> <li>2mm narrower and 2g lighter than the stock MakerFarm extruder</li> <li>Includes mounts for Prusa i3v with integrated hot end cooling</li> </ul> <p>Discussion thread: <a href="http://3dprintboard.com/showthread.php?8848-Itty-Bitty-Double-Extruder">http://3dprintboard.com/showthread.php?8848-Itty-Bitty-Double-Extruder</a></p> <p>See the instructions for a list of vitamins.</p> <p>Note: You will want to use firmware that will lift the Z axis when deploying and stowing the probe to keep it from hitting the bed. If you're using Marlin, you may wish to check out this thread: <a href="http://3dprintboard.com/showthread.php?6165-Marlin-firmware-fork-for-MakerFarm-i3v-w-auto-bed-level-amp-Roxy-s-enhancements">http://3dprintboard.com/showthread.php?6165-Marlin-firmware-fork-for-MakerFarm-i3v-w-auto-bed-level-amp-Roxy-s-enhancements</a></p> <h3>Instructions</h3> <p>Detailed, step-by-step assembly and calibration instructions can be found here: <a href="http://clough42.com/instructions/ibde-assembly/">http://clough42.com/instructions/ibde-assembly/</a></p> <p>Files are provided for 3mm and 1.75mm versions of the extruder. You can print all of the pieces separately, or you can print the provided plates of multiple parts. You will need to print:</p> <ul> <li>IttyBittyDoublePlate1.STL</li> <li>IttyBittyDoublePlate2-1.75mm.STL or IttyBittyDoublePlate2-3mm.STL</li> <li>Two copies of Parametric-Pulley-80-8-hex.STL (these will fit on Plate 1 if your printer can print a whole bed of parts cleanly without oozing or warping)</li> </ul> <p>In addition to the printed parts, you will need the following vitamins:</p> <ul> <li>Hobbed bolts with nuts (2)<ul> <li>Available here: <a href="http://clough42.com/go/product/hobbed-extruder-bolt/">http://clough42.com/go/product/hobbed-extruder-bolt/</a></li> </ul> </li> <li>Hexagon hot ends (NOTE: NOT Hexagon AO) (2)</li> <li>NEMA 14 stepper motors (2)<ul> <li>Available here: <a href="http://clough42.com/go/product/nema-14-stepper-motor">http://clough42.com/go/product/nema-14-stepper-motor</a></li> </ul> </li> <li>HXT-900 servo <a href="http://clough42.com/product/hxt900-servo/">available here</a></li> <li>Z probe switch</li> <li>25x25x10mm Fan<ul> <li>for hexagon cooling</li> <li>recommended: <a href="http://www.digikey.com/product-search/en?KeyWords=259-1570-ND">http://www.digikey.com/product-search/en?KeyWords=259-1570-ND</a></li> </ul> </li> <li>40mm fan<ul> <li>for print cooling</li> </ul> </li> <li>RAMPS fan extender<ul> <li>if using software fan on RAMPS</li> </ul> </li> <li>Stepper driver<ul> <li>if your RAMPS board only has four</li> </ul> </li> <li>Hardware kit <a href="http://clough42.com/product/itty-bitty-double-extruder-hardware-kit/">available here</a>:<ul> <li>GT2 20-tooth Pulleys with set screws (2)</li> <li>GT2 200mm Belts (2)</li> <li>688ZZ 8x16x5mm Bearings (6)</li> <li>Extension springs (2)</li> <li>Fiberglass/Polyimide insulator</li> <li>M2.5x10 socket head cap screws (2)</li> <li>M4x.7 hex nuts (2)</li> <li>M4x20 button head cap screws (2)</li> <li>M3 flat washers (6)</li> <li>M3x.5 hex nuts (11)</li> <li>M3x25 socket head cap screws (3)</li> <li>M3x16 button head socket cap screws (10)</li> <li>M3x12 flat head socket cap screws (10)</li> <li>M3x8 socket head cap screws (6)</li> <li>M3x6 button head socket cap screws (2)</li> </ul> </li> </ul> <p>Assembly notes:</p> <ul> <li>Heat new Hexagon hot ends to temperature and tighten both the nozzle and the down tube into the heat block before installing in the printer. If you do not do this, they will leak.</li> <li>Remove the support material from the bottom of the filament channels</li> <li>You can install the double groove mount either side up, depending on how your printer bridges the bottom of the hot end pockets. It should hold the hot ends firmly and be flush to the bottom of the block.</li> <li>The 25mm fan should be installed with the air blowing up (drawing air in over the hot ends)</li> <li>Make an insulator with some fiberglass and Kapton tape to install above the hot end heat blocks. If you don't the hot end cooling shroud will melt.</li> <li>You can feed all of the wires up through the channel in the center of the block. Force in some scraps of 3mm filament and zip tie as a strain relief.</li> <li>You will need to orient the heat blocks properly for the wires and Z probe to clear. See photos.</li> <li>You may need to adjust your X carriage so the extruder tips are at the same height. As long as you're using auto-bed-leveling, you can usually get enough adjustment by turning one of the Z motors by hand to tilt the whole X axis.</li> </ul> Category: 3D Printer Extruders
With this file you will be able to print Itty Bitty Double Extruder (with mount for MakerFarm Prusa i3v) with your 3D printer. Click on the button and save the file on your computer to work, edit or customize your design. You can also find more 3D designs for printers on Itty Bitty Double Extruder (with mount for MakerFarm Prusa i3v).
