iRobot Barrier Wall Mount
prusaprinters
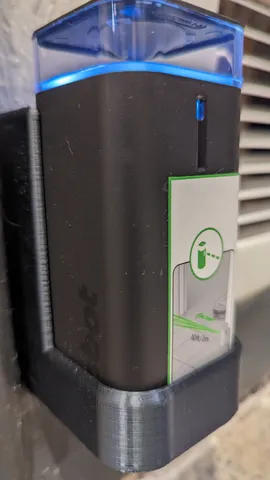
InformationA simple wall-mounted holder for Roomba virtual barriers to keep our Roomba “Jeff Goldbroom” from ending up in places he shouldn't be. Evidently some of the barrier emitters are irresistible to a cat (for some inexplicable reason) because I kept finding tiny crime scenes with the unit knocked over and the battery door open, batteries rolling away. Some of the barriers keep Jeff out of a cat litter box area, so I threw this design together to mitigate the risk of future disasters.InstallationDesigned to allow the emitter to be stuck to a hard floor (using double-sided adhesive) or a wall (using a single screw or 3M command strips, etc). I mounted ours right above the baseboard, and it's still sufficiently close to the floor to prevent the vacuum from going rogue (any more than it did with the sensors on the floor, at least).If using a screw/drywall anchor, you can get the screw started then slot the holder over it and finish tightening the screw with it in place. Any normal household drywall screw should fit just fine, provided that the shaft is less than 5mm outer diameter, and the head is less than 20mm OD across and less than 5mm deep.CompatibilityWorks with the “Dual Mode Virtual Wall® Barrier”https://www.irobot.com/en_US/dual-mode-virtual-wall-barrier/4636429.htmlPrint SettingsNothing special here--PrusaSlicer will throw a print stability warning about a floating bridge anchor if you don't enable supports, but I didn't have any major issues printing it with supports disabled. The top of the screw slot may end up a bit droopy, but shouldn't interfere with functionality at all and won't ever be visible while it's in use. If you're concerned about bridging, just enable non-organic supports everywhere and it will add a negligible amount of print time/material that should remove very easily.FilamentI used PETG but I can't imagine why any type of filament would be a problem. Printing on a MK3 at .2mm with a .6mm nozzle and 15% gyroid infill gets it done in around 3 hours @ 70mm/s, but you could really get away with faster settings/taller layers. As you can see up close, mine wasn't the prettiest print, and it still fit perfectly and looks nice from realistic normal viewing distances.Dimensions/Test FitIf your printer is well-calibrated and produces accurate dimensions, the emitter should slide right in perfectly with only a tiny amount of friction. Just in case, I added a hole at the bottom of the object to prevent a vacuum from forming so there shouldn't be any need to force it at all.If you're worried about the dimensions, you could always print a quick test by putting a negative volume on the build plate to cut off most of the print above a few millimeters of the outer wall, then print with draft settings and check it against the actual device, but this is probably overkill unless your printer is in dire need of calibration.
With this file you will be able to print iRobot Barrier Wall Mount with your 3D printer. Click on the button and save the file on your computer to work, edit or customize your design. You can also find more 3D designs for printers on iRobot Barrier Wall Mount.