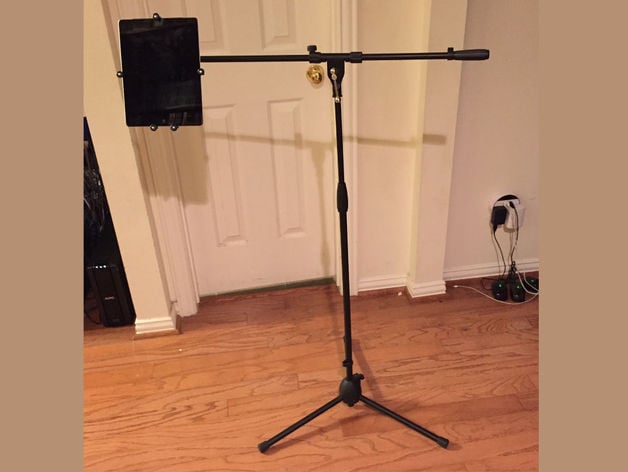
iPad or Tablet Microphone Stand Mount with 3 Degrees of Freedom
thingiverse
Note the remix link, which links to an improved design for a few of the pieces! Assemble these 5 pieces to produce an iPad or other tablet mount for a microphone stand with arm that will allow you to tilt, rotate and spin (portrait/landscape) the iPad easily. With simple modifications to one of the 5 pieces, it can accommodate pretty much any tablet/phone quickly. You take no responsibility if your prints are insufficiently solid and drop the tablet on the floor! (see instructions for tips). You will obviously need a printer with a sufficiently large print bed for the holder_main part. The OpenSCAD file for holder_main is parametric, so you can adjust it for the dimensions of your tablet to get optimal results. Instructions DISCLAIMER - While I haven't had any problems yet, if a piece breaks and drops your iPad onto the floor, don't bother trying to hold me responsible! Instead, take some steps to ensure that it doesn't happen in the first place. To do this project successfully, you need to print the parts in the correct orientation for optimal part strength, and have your printer settings well tuned. Instructions: I purchased an iPad stand from Amazon so I could play games and read in bed without neck strain. Unfortunately, it only permitted the iPad to be in landscape orientation, which was not ideal. I wanted to try a different solution that would allow me to switch between portrait and landscape orientations seamlessly. Note that the main part that holds the iPad is iPad-sized, so you will need a printer with a large print bed to do it as-provided. However, there's good news: I've provided a parametric .scad file for this part now! You can simply adjust the tablet width, height and thickness, then regenerate (F6) with OpenSCAD to get perfect results every time. This project includes 5 pieces that you'll need to assemble in sequence. When connected, they produce a mount which can rotate with respect to the support bar ~45 degrees, can tilt up and down (with fixed increments), and can spin freely from landscape to portrait mode easily. In addition to the 5 printed pieces, you will also need some basic hardware, including M4 screws (preferably with wing nuts for better grip) and rubber grommets. If you're new to printing, don't worry! You should be able to print all of these parts without much trouble using an external support. However, keep in mind that you may still need a high-quality printer with the ability to use thick supports. If you have experience printing, feel free to print without external supports if desired. Once your pieces are assembled, follow these steps for optimal results: Print each piece on its correct orientation as noted above (don't skip this step or things might break easily!) Use an M4 screw with wing nut to attach the lumpy disk on the previous part and the disk with depressions together. This is how you'll tilt the iPad up and down. Make sure to sand the sandwiching surfaces of all the pieces before assembling so they can rotate smoothly without any sticking. Now it's time for some advanced assembly: Insert holder_spindle through holder_main into holder_adaptor, and use a rubber grommet between the two parts to create friction in landscape/portrait rotation. This is where most people have problems with assembly, so take your time here! Attach holder_spindle securely to holder_adaptor using paper clips as needed for temporary grip. This part was made by hand but still requires attention. To install it: drill small holes through all four layers at their corners; place these over pins held onto the bed or vice of another fixture during construction so each corner points inward from its top when not aligned exactly right side up! Now gently press against bottom flat until fully seated; pull off remaining clips then finish by gluing anything that may have been exposed along edges due loose fit inside. So now you know what all those different components were for - aren't they impressive? But wait... How does this new contraption actually attach itself securely without giving any play or even coming undone randomly mid-day while walking past a store shelf without warning?! Here lies yet another little detail few folks probably realized initially because quite naturally their assumption (and rightly so!) would simply have been: after careful inspection of our "instructions", then applying general principles based solely upon logic applied toward problem solving rather than blindly adhering strictly only known procedures as per standard rules... we see here something entirely novel, but quite easy indeed once someone demonstrates how things go together!
With this file you will be able to print iPad or Tablet Microphone Stand Mount with 3 Degrees of Freedom with your 3D printer. Click on the button and save the file on your computer to work, edit or customize your design. You can also find more 3D designs for printers on iPad or Tablet Microphone Stand Mount with 3 Degrees of Freedom.
