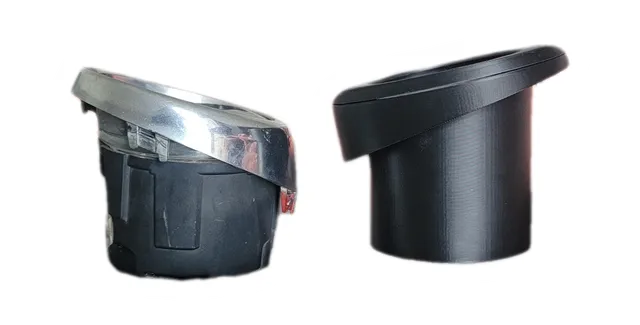
Infiniti G37 Fog Light
prusaprinters
These are 3D printable fog light assembly for Infinti G37, G35, G25, and similar models. It is a direct replacement for the OEM fog light assembly. This model mounts with OEM hardware and light bulb. Just as the OEM assembly, this model accepts the same light bulb and is installed in the same fashion. NOTE: A more detailed build guide with pictures will be coming out soon. This is just a rough outline for those who can improvise and figure some stuff out for themselves. ----------------------------------------------------------------------------------------------------------------Build Materials:Size 4-32 1/2in machine screws : x4Size 4-32 nuts : x81/8 in Polycarbonate Sheet : Enough to Cut 2 87mm OD lenses ~~~(PC Sheet is recommended for best durability, but any clear plastic sheet will work.)~~~~~3M Double Sided Automotive Trim Tape : Approx 200mmTemporary Adhesive (Hot Glue) Permanent Adhesive (Clear Quick Setting Epoxy) : JB ClearWeld Epoxy----------------------------------------------------------------------------------------------------------------Build Instructions:Step 1) Print out Left and Right Assembly Housing. x1 Each (Support ; Only on Build Plate.) Print out Top lenses housing. x2 (Flat part Down , Support on Build Plate Only) Print out Bottom lenses housing. x2 (Flat part Down , Support on Build Plate Only) Print out lenses template. x1 ~~Print parts with ABS or PETG for best durability. ~~0.4mm Nozzle ; 0.2mm Layer Height ; Walls/Infill -> More = Better ; Speed -> Slow Step 2) Remove supports from parts. Step 3) Using a dab of super glue or epoxy, glue nuts into inserts on TOP and Bottom lenses housing. Step 4) Using template, cut out the lenses from the 1/8 in plastic sheet. >>>>>STEPS 5 - 10 will be Completed Twice for Both Left & Right Fog Lights<<<<< Step 5) Place lens into bottom lens housing and apply trim tape around the top perimeter of the lens. Apply tape all the way around to create a good seal when the lens housing is assembled. NOTE 1 : This should be a thing strip of tape such that you cannot see it when looking thru the assembled lens housing. NOTE 2 : When the lens is placed in the bottom housing, you should be applying the tape on the side of the lens that is facing towards you. Step 6) Take 2 of the 4-32 1/2in screws and trim them down to approx. 5.6mm using belt sander of hack saw. NOTE: Should sit flush in lens housing. The other 2 screws will fit as is into lens housing. Step 7) Place the light housing onto car and secure with OEM screw. Next take the bottom lens housing and place it onto the car (on top of light housing) and adjust until you get optimal fitment. Step 8) Using TEMP adhesive, secure the bottom housing to the light housing (While on car). Adhesive should be applied thru the front of the light housing, such that it secures the lip of the light housing to the bottom lens housing. Preferably use hot glue or something similar so it is viscous enough to drip down but dries fast enough to not drip out of housing. Use only enough adhesive to prevent movement of bottom lens housing in next step. MAKE SURE the fitment is as desired before moving on to step 9. Step 9) Once TEMP adhesive has dried, remove screw holding in light housing and remove the part (with bottom lens housing temp glued on in prev. step) from car. Now apply your permanent adhesive on top of the TEMP adhesive, to permanently attach the bottom lens housing to the light housing and wait till fully cured.Step 10) Completely assemble the lens/light housing by sandwiching the lens between the top and bottom lens housing. Then use the screws to put the lens housing together. Then put completed assembly back onto car, insert fog light into assembly (same as OEM), and plug in light. >DONE<
With this file you will be able to print Infiniti G37 Fog Light with your 3D printer. Click on the button and save the file on your computer to work, edit or customize your design. You can also find more 3D designs for printers on Infiniti G37 Fog Light.
