Induction Probe Auto-Level Mount for Printrbot Simple 2013
thingiverse
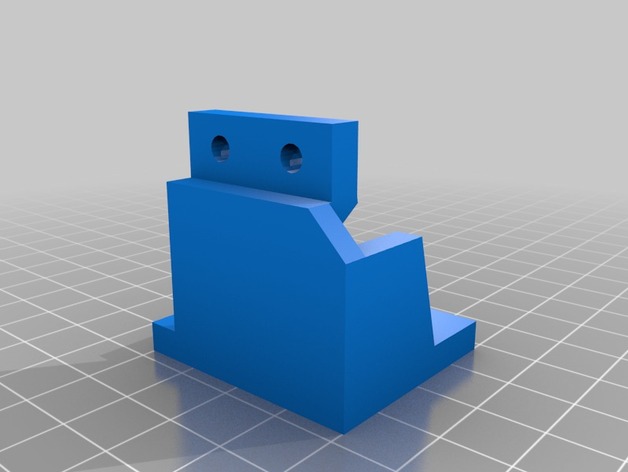
Modify your Printrbot Simple 2013 with an induction probe mount that supports larger probes, shipped free with two-day delivery. Follow the same setup as for Printrbot's autolevel probe; however, be cautious not to hit the screw at the home corner of the bed. This solution fixes unlevel print beds and resolves issues like Simple Y-axis Sag, ensuring a smooth first layer. The mount was designed using Tinkercad and can be edited online. For installation, use 0.4mm layer height and 30% infill, attaching it to the existing hot end screws. The aftermarket induction probe requires wiring; follow instructions for connecting the black-brown-blue wires with the clip facing down, using components from DigiKey. Replace the Z-stop on the printrboard and use a metal bed like Printrbot's aluminum beds. Install the mount next to the hot end, adjusting the probe's height 5mm above the nozzle. Save your firmware settings using M501 before installing new firmware from Printrbot. Re-enter your M92 and other calibration values from your saved settings. Update Start G-Code in Slic3r with G28 X0 Y0; home X&Y, G29; home Z, replacing the old homing command. Adjust probe and nozzle offset using M212 Z2 and M500 commands. Test the setup with a large print and adjust Z-offset as needed until achieving a perfect first layer. Watch a calibration video from Printrbot for guidance.
With this file you will be able to print Induction Probe Auto-Level Mount for Printrbot Simple 2013 with your 3D printer. Click on the button and save the file on your computer to work, edit or customize your design. You can also find more 3D designs for printers on Induction Probe Auto-Level Mount for Printrbot Simple 2013.