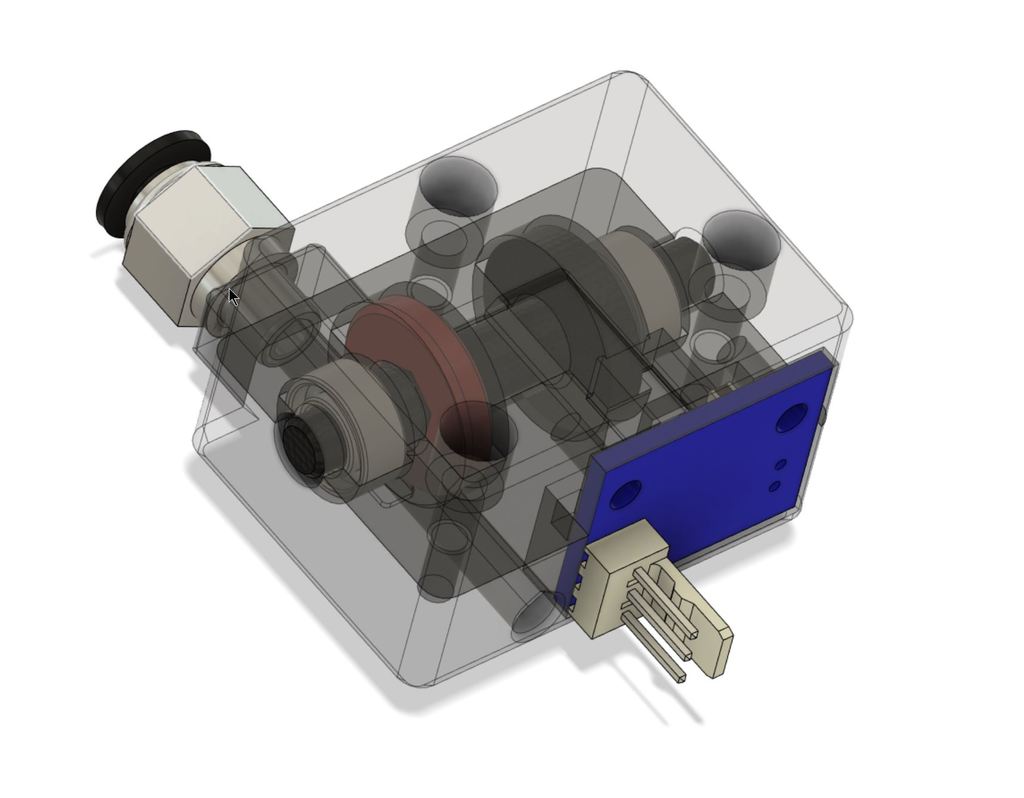
Indirect Filament Sensor using Duet3D Laser Filament Monitor:
prusaprinters
<p>The Duet3D Laser Filament Monitor is a neat little gizmo, but it cannot handle change in filament type/color/etc. well. This could lead to false positive under extrusion reports</p> <p><a href="https://duet3d.dozuki.com/Wiki/Duet3dFilamentMonitor_LaserVersion#Section_Housing_variations">https://duet3d.dozuki.com/Wiki/Duet3dFilamentMonitor\_LaserVersion#Section\_Housing\_variations</a></p> <p>This remix of Fractalenginner design for Pulse Generator filament sensor tries to solve the problem by placing a rotating disc in from of the laser sensor. The disc the rotated by filament movement, and thus we take out the filament type/color variation out of the picture.</p> <p>I was able to get consistent readings using this method over a long print with no false positives. And the original design by Frantalengineer is great at tracking the filament movement, so this feels like an improvement over other indirect sensor. Also most of the parts are printed.</p> <h3> Print Settings</h3> <p><strong>Printer:</strong></p> <p>SK-Go</p> <p><p class="detail-setting rafts"><strong>Rafts: </strong> <div><p>No</p></div><strong>Supports:</strong></p> <p>No</p> <p><p class="detail-setting resolution"><strong>Resolution: </strong> <div><p>0.2mm</p></div><strong>Infill:</strong></p> <p>20</p> <p><strong>Filament:</strong> Overture PETG. TPU Black <br/> <p class="detail-setting notes"><strong>Notes: </strong> </p><div><p>Use the print layout depicted in the picture.</p> Print Axel A using a Brim/Raft</div></p> <p>Print the Wheel using TPU (I used NinjaFlex 85A)</p> <p>Print rest of the parts with Black PETG, no supports</p> <h3> Post-Printing</h3> <p><strong>Preparation</strong></p> <ul> <li>Make sure there is no stringing, remove any strings from parts using a heat gun as they can interfere with the laser sensor</li> </ul> <ul> <li>I also sanded the disc on Axel B using 400 grit paper to remove any Z seams</li> </ul> <ul> <li><p>Using the cutting tool part, cut a piece of PTFE tube to fit in the Bottom part <strong>Assembly</strong></p> </li> <li><p>Fasten the PC4-M6 on the Bottom part</p> </li> </ul> <ul> <li>Insert the PTFE tube in the bottom part, make sure the cut is facing up</li> </ul> <ul> <li>Insert Axel A into Axel B</li> </ul> <ul> <li>Slide the TPU wheel on Axel A </li> </ul> <ul> <li>Slide the two MR105 bearings on the ends of the axel</li> </ul> <ul> <li>Place the axel in the bottom part and make sure it is rotating freely</li> </ul> <ul> <li>Fasten the Top part on the Bottom part using 3 M3x12 screws</li> </ul> <ul> <li>Mount the Laser Sensor using two M3x5 screws All done, try pushing some filament through the PTFE tube to make sure the axel is rotating freely.</li> </ul> <p><strong>DUET Config</strong></p> <p>Use the following guide to setup and calibrate the Laser sensor</p> <p><a href="https://duet3d.dozuki.com/Wiki/Duet3dFilamentMonitor_LaserVersion#Section_Calibration">https://duet3d.dozuki.com/Wiki/Duet3dFilamentMonitor\_LaserVersion#Section\_Calibration</a></p> <p>For my setup I am using</p> <p>;Filament sensor<br/> M591 D0 P5 C"e0stop" R180:245 E6.0 S1 ; Duet3D laser sensor for extruder drive 0, connected to endstop input 3 (E0), tolerance 180 to 245%, 6mm comparison length, Enabled</p> <p>I was getting consistent readings between 190%-210% over a long print.</p> <p><strong>Mount it</strong></p> <ul> <li>Fasten the mount on the extrusion with two M3 screws and T Slot Nuts.</li> </ul> <ul> <li>Slide the sensor on the mount</li> </ul> <ul> <li><p>Plug the PTFE tube going to the extruder in the PC4-M5 fitting. <strong>Parts needed</strong></p> </li> <li><p>1x Duet3d Laser Sensor<br/> <a href="https://www.filastruder.com/products/duet-filament-sensor">https://www.filastruder.com/products/duet-filament-sensor</a></p> </li> </ul> <ul> <li>2x MR105 Bearings (5mm ID x 10mm OD x 4mm)<br/> https://www.amazon.com/gp/product/B082PS3QDJ/ref=ppx\_yo\_dt\_b\_asin\_title\_o01\_s00?ie=UTF8&psc=1</li> </ul> <ul> <li>2x M3x5mm hex cap screw</li> </ul> <ul> <li>3x M3x12mm hex cap screw</li> </ul> <ul> <li>2x M3x8mm screw (for the extrusion mount)</li> </ul> <ul> <li>2x M3 T Slot Nut (for the extrusion mount)</li> </ul> <ul> <li>Filament, PETG (PLA might work as well) Black, and TPU 85A</li> </ul> </p></p> Category: 3D Printer Parts
With this file you will be able to print Indirect Filament Sensor using Duet3D Laser Filament Monitor: with your 3D printer. Click on the button and save the file on your computer to work, edit or customize your design. You can also find more 3D designs for printers on Indirect Filament Sensor using Duet3D Laser Filament Monitor:.
