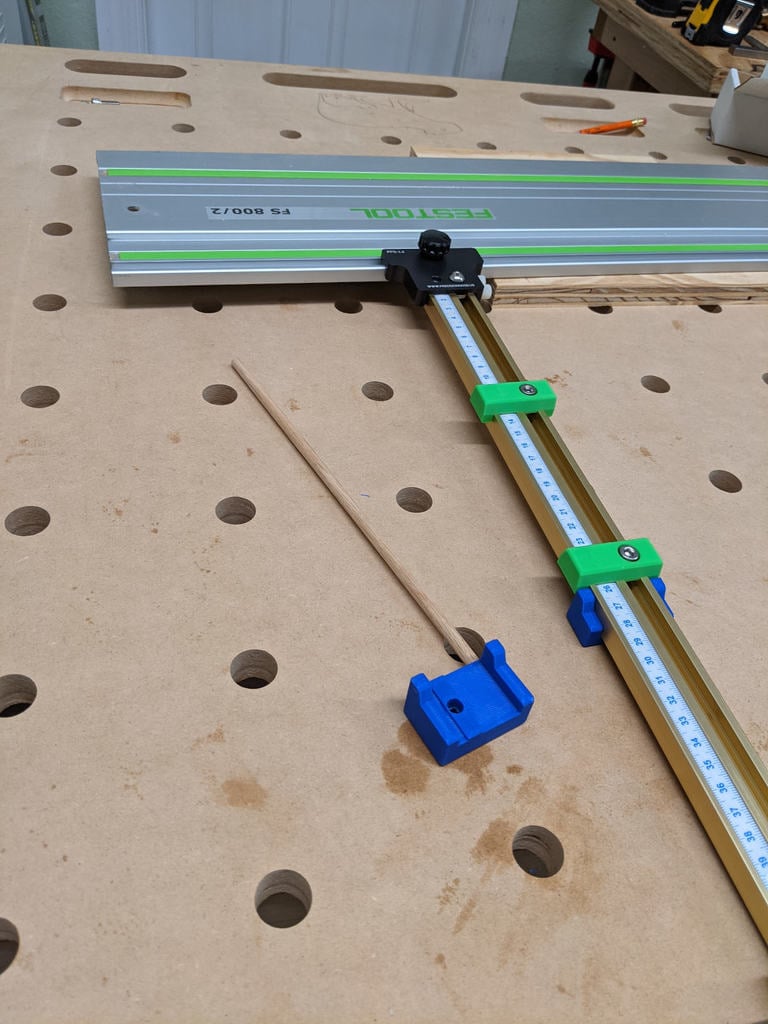
Incra T Track Plus Rail Stops for Parallel Guides
thingiverse
This is a stop system for creating repeated cuts of different lengths using a track saw parallel guide system based on Incra T track plus. I have the Precision Dogs set, but Seneca also makes a version and you could conceivably design your own. Basically you just need a way to attach the T track at a 90 degree angle to your track. The problem this solves is repeating multiple cuts of different lengths at different times. If you have a system without flip stops (which I believe neither Seneca nor Precision Dogs include), making a different length cut will always require moving the stop on the rail. You can't leave multiple stops in place because only the innermost one will index against the material edge. Going to a longer cut and then back to a shorter one becomes impossible. To solve this problem, I broke the stops into two parts. One half attaches to the top of the rail (using 1/4-20 socket head hex bolts, same as Incra uses for their miter gauges). This half doesn't extend below the rail, which means that it won't interfere with your material. You can set as many of these up as you want, effectively creating a story stick for your project. When you're ready to make your cuts, you attach one of the bottom stops to the bottom of the rail. Its surface extends far enough upwards to index against the top stop, and low enough to index against the material to cut. There are two versions of this stop: a simple one that indexes directly against the material, and one with a hole for a dowel that you can epoxy into place to create a spacer for cuts narrower than the width of the track. You'll want to print two each of the bottom stops with and without dowel, and as many of the top stops as you care to use to mark your positions. To finish/calibrate the stops, do the following: 1. Glue/epoxy 1/4" dowels into the holes. These should extend out as far out as you need to create space to get past the rail. For Festool/Makita rails, 250mm or 10" should work. Try to get the dowels as square as possible to the surface of the stop. I accomplished this by routing some V grooves into a scrap piece of plywood and clamping the dowels into the grooves with the stop pushed up flush against the edge of the plywood. 1. Cut both dowels to your desired length from the face of the stop. I did this using the same jig from step (1) by setting my miter gauge stop to 250mm, indexing the edge of the plywood (still flush with the faces of the stops) against the miter gauge stop, and cutting them with the table saw. 1. You can now calibrate your scales. Attach the T track to the rail, and loosely attach a dowel stop to the bottom of the rail with a 1/4-20 nut or square nut. Flip the rail over, and slide the stop up until the end of the dowel is flush with the edge of the splinter guard. I like to butt a combination square up against it to give myself a hard stop to index the dowel against. 1. Tighten the screw on the dowel stop. Now put one of the top stops on top of the rail, butted up against the dowel stop. The arrows on each stop should be pointing towards each other. 1. You may now remove the dowel stop. The position at the edge of the top stop with the arrow pointing towards it is now your zero point. Line your scale's 0 measurement up with it. 1. Repeat this process with the other T track and dowel stop. Your parallel guides are now fully calibrated. You can make narrow cuts by using the dowel stops and setting the desired width directly on the scale. For wider cuts, use the regular bottom stops and add the length of your spacer (e.g. 250mm or 10") to the value displayed on the scale.
With this file you will be able to print Incra T Track Plus Rail Stops for Parallel Guides with your 3D printer. Click on the button and save the file on your computer to work, edit or customize your design. You can also find more 3D designs for printers on Incra T Track Plus Rail Stops for Parallel Guides.
