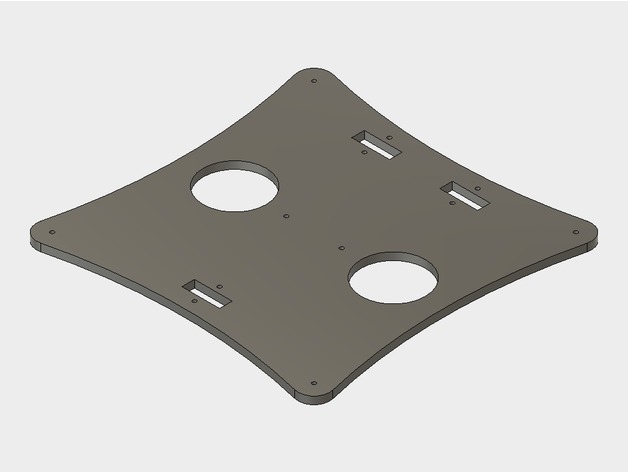
Improved Prusa / Cartesian Printer Heated Bed Support - Redesigned for Wood
thingiverse
IMPROVED TEMPLATE for Prusa i3 / Cartesian Heated Bed Support Plate. The Y-Axis bed is the most overlooked yet one of the most crucial parts of your Cartesian 3d printer, often getting little attention later because it's the first part constructed. Existing plates were designed to be laser cut and hobbyists typically cut them using hand tools or whatever power tools they have available. They usually use aluminum or acrylic, which are not ideal for heated bed applications due to their low thermal conductivity and high stiffness that can cause oscillation during acceleration. If you're after good thermal properties and strength, consider a low-cost nano-material with excellent low thermal conductivity and high strength-to-weight ratios. One such material is wood, which is readily available nearly everywhere and has excellent thermal properties. The sharply cut corners of traditional frames direct stress to vulnerable sharp corners, while drilling those corners to automatically fillet them could easily have been incorporated into the design for hand-tool or drill stand users. Users might like to choose between stronger but more fiddly to get right 4 linear bearings or the more traditionally and actually more triangularly stable 3 linear bearing supports on the bed frame. Wood, usually plywood, using the existing template ends up being springy where you don't want it to be springy and insufficiently rigid due to the thin arms. Additionally, most folks today DON'T use manual bed-leveling either, which is another issue. This template was designed to be cut from wood, using only a 3mm drill for all the holes and for starting ANY of the cutouts, as a corner fillet, requiring minimal tooling and marking out the centres of those holes for drilling. A recent issue regarding SAFETY of electrically heated aluminum plate beds where metal screws and springs can cut into the heated bed and cause ELECTRICAL SHORTS and potential safety issues can be addressed by using NYLON M3 BOLTS, WASHERS, NUTS, and FIXED STANDOFFS in lieu of springs to hold the heated bed to this plate. My heated bed is a MK3 BLACK aluminum plate type. FIXING the bed height using standoffs rather than springs will also take out the oscillation of the bed on its manual adjustment springs when the bed accelerates or decelerates in the Y axis. These are not strictly necessary anyhow if you have auto-bed-leveling via an inductive sensor. If you're getting layer alignment problems at the ends of any y-axis acceleration, these springs are likely the cause. I used two pieces of 3mm HARDBOARD, sanded the SHINY SURFACE, cuz that's the way I roll, and glued them together using TWO PART EPOXY, sanded-shiny surfaces glued together, to give a matt rough appearance. Clamped tightly and left to cure overnight. Print out the template at 100% and glue stick it onto the wood on the side that will be the underside, then grab hand-tools and liberally apply yourself all over the wood OR, if you're one of those people with a workshop, cut using expensive tools. Hardboard rescued from an old door; Cost zero. Two-Part Epoxy; Cost £1 from a 'pound shop', included ONE decent clamp and spreader, used the packaging the epoxy came in to mix the two parts together. Additional tools required; Hands, Drill + 3mm drill, Saw, Sandpaper. Mine weighs approx 300g, is roughly 6mm thick and is as rigid as stainless steel. Hope this helps.
With this file you will be able to print Improved Prusa / Cartesian Printer Heated Bed Support - Redesigned for Wood with your 3D printer. Click on the button and save the file on your computer to work, edit or customize your design. You can also find more 3D designs for printers on Improved Prusa / Cartesian Printer Heated Bed Support - Redesigned for Wood.
