Ikea Skadis Deluxe Fillament Spool holder with roller bearings and scales!
prusaprinters
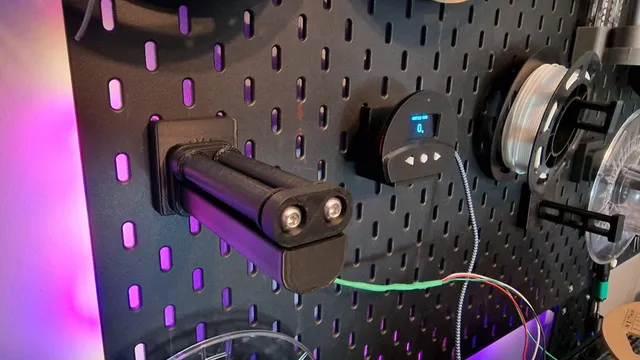
I was massively impressed by InterlinkKnight's Digital Spool Holder project, but wanted one that could be mounted on my Ikea Skadis pegboards.The design of the spool holder is very good - if you want a super quality filament holder with smooth rolling action and the ability to weigh and track filament use, then this is for you. If you dont need the scales option, just use the models here and refer to “ILK”s guide if you cant see how it fits together.The full build is here: https://www.instructables.com/Digital-Spool-Holder-with-Scale/Instructions for Skadis holder onlyI removed the screw mount and replaced with a Skadis 2 X 2 block. This seems to provide reasonable stability.I created a Skadis bracket/shelf for the display.I only made the base for M5 & M4 variant of the Loadcell - if you're not bothered about using the scales, then it doesnt even matter; if you do want the scales, make sure you get the correct loadcell - the M5M4 seems most common on Amazon.You will need: Printed: 1 x Bottom (Base), 1 x Top and 2 x rollers. Add the shelf from my models and refer to the full build guide above if you want the display.M6x100mm Screws x2: https://amzn.to/3isEINm M6 Lock Nuts x2: https://amzn.to/3uo2EnJBearings 6x12x4mm MR126ZZ x4: https://amzn.to/3HbXUcOSome short self-tapping screwsGlue I printed vertically with supports for a better finish and turned off “slow printing down for better layer cooling” to stop banding in Orca's Filament/Cooling tab.Use at least 50% infill and strong filament - PETG or better - to prevent sagging, presumably after 20 years of use …..You can print the top and bottom horizontally with reduced supports and quicker printing, but the quality didnt seem as good. You may also find you need to do this for the Bottom if the pegs into the Skadis board look like they will break off. I thought I might get upset where the seams on the rollers are, but because they are lifted up from the base, they dont affect the smoothness.Insert the lock nuts into the Top before inserting the Top into the Base. Insert the bearings into the rollers.Slide the two long M6 bolts through the top, through the rollers and into the lock nuts at the other end.This instruction only applies if you are not using a loadcell: it is a dirty shortcut because I havent yet reworked the screw connectors between top and bottom. Glue - yes - glue the Top half to the Bottom half. Put glue on the end of the Top that has the locking nuts in and glue on the bottom of the Top at the other end where it fits into the Bottom! Push the Top down and across so it makes good contact, center the two parts and allow the glue to set. A nicer option is to actually buy the loadcell and use the mounting holes properly per ILK's guide. When its dry, spin the rollers and smile.If you are using the full scales option, there is a Skadis bracket to mount the display. Construct the display and electronics per the guide and attach the display to the bracket with two small self tapping screws.Attach the holders to your Skadis, load up a spool and you are good to go.If you are using the scales function, the wires can be pushed through the holes in the Skadis to hide them.Shellhole4 has an opening that allow easy access to the connectors and PSU.
With this file you will be able to print Ikea Skadis Deluxe Fillament Spool holder with roller bearings and scales! with your 3D printer. Click on the button and save the file on your computer to work, edit or customize your design. You can also find more 3D designs for printers on Ikea Skadis Deluxe Fillament Spool holder with roller bearings and scales!.