IKEA Samla Wheel Extension
prusaprinters
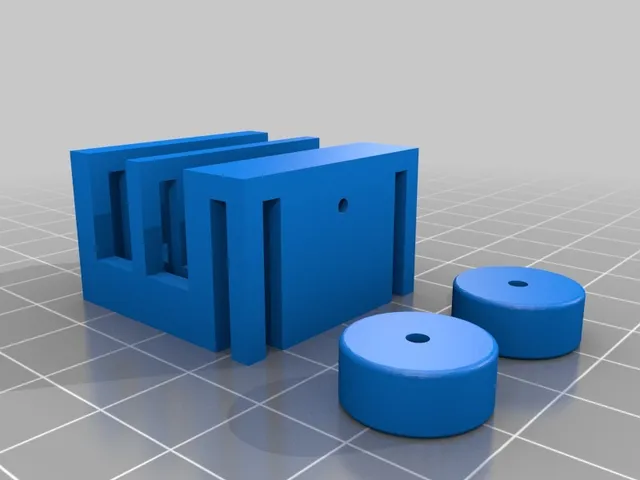
(English Translation after the German Text) Ich bin auf Grund meines Projektes einer Samla Filamentbox, auf die "Ikea Samla - wheels / rollers" von manticus gestoßen - siehe auch https://www.thingiverse.com/thing:2069387. Ich finde diese Idee sehr gut. Leider hatte ich am Anfang größere Probleme mit dem Drucken, weil der Halt auf dem Druckbett bei den dünnen Teilen kaum gegeben war. Als ich dieses Problem in den Griff bekommen hatte, sind mir diese Stützen weggebrochen. Ich habe das ganze verworfen erst einmal verworfen. Ein paar Wochen später und mit einer großen Portion Motivation - neues Bett und nun die Möglichkeit diese großen Boxen einsetzen zu können (Siehe hier auch die beiden Youtube Clips auf dem Original-Thing). Das Ergebnis nach dem Drucken, hat sich jedoch nicht geändert. Aber ich habe in der Zeit Tinkercad kennen und schätzen gelernt. Daher habe ich die STL in Tinkercad bearbeitet. Ich habe den Boden um 4 mm unterfüttert. Damit kann nun die Filementachse durch alle Wände durch und trotzdem liegt alles auf. Das hat den Vorteil, dass das Einfädeln und Sichern mit Sekundenkleber deutlich einfacher geworden ist. Und meiner Meinung nach ist das Ganze auch etwas stabiler geworden. Eben weil nun die Unterseite wieder voll auf der Unterseite der Box aufliegt. Das Erhöhen war schon soweit ok, aber für meinen Geschmack war das alles noch zu dünn und Anfällig für ein Wegbrechen. Denn die Stege der Box, haben in meinen Fällen diese Stützen immer etwas weggedrückt. Daher habe ich das Ganze noch ein wenig verbreitert und somit mehr versteift. Das ist die zweite Variante. Und diese ist mein persönlicher Favorit. Die zweite bzw. breitere Version passt auf alle Samla Boxen, bis auf die 5 Liter Version. Dort kann aber die erste Version einsetzt werden, das ist dort auch vollkommen ausreichend, wenn man diese rollbar haben bzw. machen möchte. Und hier noch ein paar Tipps zum Drucken und Verarbeiten: • Ich habe den Infill von 80% gewählt und die Perimeter auf 4 gesetzt. Es muss schließlich Gewicht tragen. • Ich drucke die Teile in diesem Fall mit einer Schürze/Brim von 10, damit hatte ich keine Druckabbrüche mehr. Mit dem Filament Extrudr NX2 ist das Entfernen des Brim total einfach, da das Filament nicht so spröde ist wie andere. • Die Löcher habe ich mit einem Dremel und einem 2 mm dünnen Bohrer nachgebohrt. Damit hat dann das Einführen super geklappt und die Rollen haben dadurch auch eine schöne Leichtgängigkeit. Wer seinen Drucker aber super im Griff hat, kann es auch versuchen über seine Einstellungen zu lösen. • Die Enden des Filaments habe ich jeweils bündig abgeschnitten und mit 1-2 Tropfen Sekundenkleber verklebt. Damit treibt das Filament nicht mehr auf Grund von Bewegung etc. aus der Halterung. English Translation via www.deepl.com: I came across the "Ikea Samla - wheels / rollers" from manticus - https://www.thingiverse.com/thing:2069387 - because of my project for a Samla filament box. I think this idea is very good. Unfortunately, I had bigger problems with printing at the beginning, because the hold on the printing bed was hardly given with the thin parts. When I got this problem under control, these supports broke away. I have discarded the whole thing for a while. A few weeks later and with a lot of motivation - new bed and now the possibility to use these big boxes (See also the two Youtube clips on the original Thing). However, the result after printing has not changed. But I got to know and appreciate Tinkercad during that time. That's why I edited the STL in Tinkercad. I relined the floor by 4 mm. Now the filement axis can pass through all walls and still everything rests on it. This has the advantage that threading and securing with superglue has become much easier. And in my opinion the whole thing has become a bit more stable. Just because the underside now rests fully on the underside of the box. The Raising was ok, but for my taste it was all too thin and susceptible to breaking away. Because the bars of the box, in my cases, these supports have always pushed something away. That's why I widened the whole thing a little bit and stiffened it more. This is the second variant. And this is my personal favorite. The second or wider version fits all Samla boxes, except the 5 litre version. However, the first version can be used there, which is also completely sufficient if you want to have it or make it rollable. And here are a few tips for printing and processing: • I chose the infill of 80% and set the perimeter to 4. After all, it has to carry weight. • I print the parts in this case with an apron/brim of 10, so I had no more pressure drops. With the Filament Extrudr NX2, removing the brim is totally easy because the filament is not as brittle as others. • I redrilled the holes with a Dremel and a 2 mm drill bit. Thus the insertion has worked very well and the rollers also have a nice smoothness. But if you have your printer under control, you can also try to solve it using your settings. • I cut off the ends of each filament flush and glued them with 1-2 drops of superglue. As a result, the filament no longer drifts out of the holder due to movement etc. (Translated with www.DeepL.com/Translator) Print Settings Printer Brand: Anycubic Printer: All-metal Mega Rafts: No Supports: Yes Resolution: 0.2 Infill: 80 Filament: Extrudr NX2 PLA Category: Containers
With this file you will be able to print IKEA Samla Wheel Extension with your 3D printer. Click on the button and save the file on your computer to work, edit or customize your design. You can also find more 3D designs for printers on IKEA Samla Wheel Extension.