IKEA LACK table enclosure PRUSA MK3 modification
prusaprinters
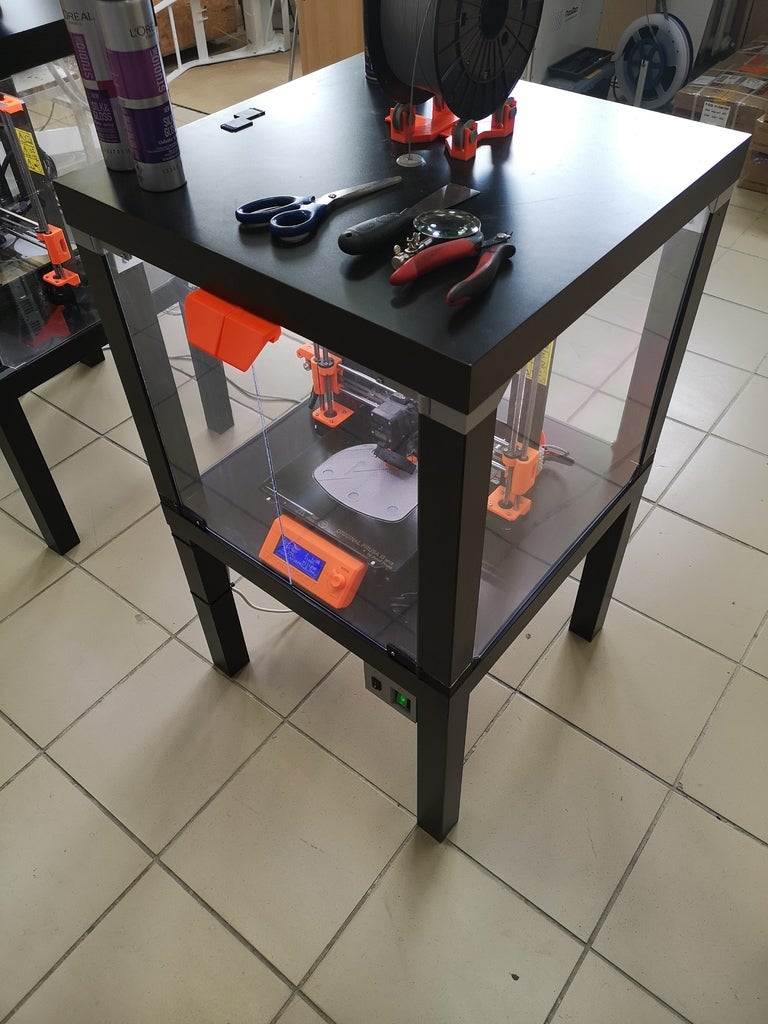
<p>I started to make the original enclosure, but very soon I realized, that design of some parts is not the best.<br/> The position of main switch on the power supply does not have any sense, it is located back and under table... I wanted to control also LED lights, so I make extra "switch box" with 2 independent switches. One for on-off printer itself, and it is immersed so you can not accidentally switch it off, and the smaller one for LED strips light inside.<br/> I put 4 LED strips around with total length 1,6 m. It is enough light now inside the box.<br/> I printed some LED strip holders, because I can not trust the glue of LED strips on the paper surface, which is IKEA table bade from. Moreover on that temperatures, there are inside cover. So I printed fixation holders.<br/> I put also electric installation box in the middle of the lower table from bottom, to make wirings better and more safe. Transparent panels I cut 440x440 mm but they are bigger than enough. I have to cut some mm from sides, where panels are in holders.<br/> Also I add screws 3 mm to the front door holders.<br/> I used magnets from furniture, so I redesign door handles. Magnets I put on the top, it is better to have clean bottom front space.<br/> I am thinking to make top floor for filament spool, to keep it warm and out of the moisture..</p> <p>EDIT 22.6.2019:</p> <p>Added termostat holder.</p> <h3>Print instructions</h3><h3>Category: 3D Printer Accessories Summary</h3> <p>I started to make the original enclosure, but very soon I realized, that design of some parts is not the best.<br/> The position of main switch on the power supply does not have any sense, it is located back and under table... I wanted to control also LED lights, so I make extra "switch box" with 2 independent switches. One for on-off printer itself, and it is immersed so you can not accidentally switch it off, and the smaller one for LED strips light inside.<br/> I put 4 LED strips around with total length 1,6 m. It is enough light now inside the box.<br/> I printed some LED strip holders, because I can not trust the glue of LED strips on the paper surface, which is IKEA table bade from. Moreover on that temperatures, there are inside cover. So I printed fixation holders.<br/> I put also electric installation box in the middle of the lower table from bottom, to make wirings better and more safe. Transparent panels I cut 440x440 mm but they are bigger than enough. I have to cut some mm from sides, where panels are in holders.<br/> Also I add screws 3 mm to the front door holders.<br/> I used magnets from furniture, so I redesign door handles. Magnets I put on the top, it is better to have clean bottom front space.<br/> I am thinking to make top floor for filament spool, to keep it warm and out of the moisture..</p> <p>EDIT 22.6.2019:</p> <p>Added termostat holder.</p> <h3> Print Settings</h3> <p><strong>Printer Brand:</strong> Prusa</p> <p><strong>Printer:</strong> i3 MK3</p> <p><strong>Rafts:</strong> No</p> <p><strong>Supports:</strong> No</p> <p><strong>Resolution:</strong> 0.2</p> <p><strong>Infill:</strong> 20</p> <p><strong>Filament:</strong> PM filament PETG <br/> <strong>Notes:</strong></p> <p>240°C 90°C</p>
With this file you will be able to print IKEA LACK table enclosure PRUSA MK3 modification with your 3D printer. Click on the button and save the file on your computer to work, edit or customize your design. You can also find more 3D designs for printers on IKEA LACK table enclosure PRUSA MK3 modification.