IKEA Lack enclosure - filament slot
prusaprinters
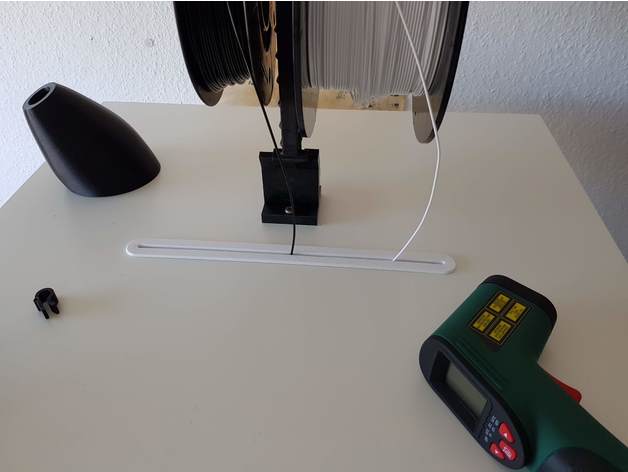
<p>I have built the <a href="https://www.thingiverse.com/thing:2864118">Prusa i3 MK3 enclosure - Ikea Lack table</a> which is awesome.</p> <p>However, I was not satisfied with the filament feeder tubes, especially when the extruder is near the topmost position.<br/> Here is my take on a solution for feeding the filament - a slot that has the same length as the x-axis travels.<br/> This makes it much easier for the extruder to pull the filament from the spool at any position on the x-axis, as there is very little friction in the slot.</p> <h3>Print instructions</h3><p><strong>Printer settings</strong><br/> Resolution: 0.2<br/> Infill: 20%<br/> Supports: No<br/> Filament_material: PETG</p> <p>If you place the objects on the printbed as shown, then there is no need for support during printing.</p> <p><strong>Post-Printing</strong><br/> Remove any small filament residue that may have been left in the groves.<br/> Test that the two sliding lock profiles slides smoothly in the groves on the slot insert.</p> <p><strong>Assembly</strong><br/> Cut slots in the lack table and insert the feeder slot</p> <p>On the top table surface, mark the position for two 10 mm holes 250 mm apart both with a distance of 270 mm from the front edge of the table and symmetrical.<br/> Do the same on the underside of the table.<br/> Drill the holes and draw tangent lines between the holes.<br/> Finally cut the top and underside slots along these lines.</p> <p>Clean the slot and insert the feeder slot from the top.<br/> Lock the feeder slot by sliding the two sliding locks in from each side on the underside.<br/> Make sure that they are fully inserted in the grooves in the feeder slot.</p>
With this file you will be able to print IKEA Lack enclosure - filament slot with your 3D printer. Click on the button and save the file on your computer to work, edit or customize your design. You can also find more 3D designs for printers on IKEA Lack enclosure - filament slot.