IKEA Enclosure Vent System - With and Without Servo Valve - For 2" central vacuum pipe
prusaprinters
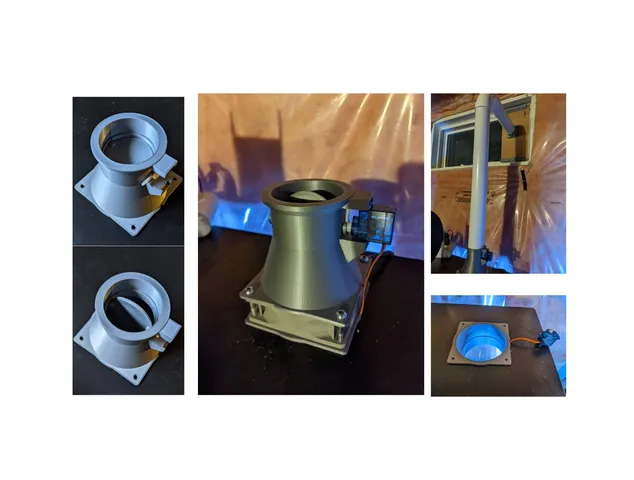
This is a ventilation system for an IKEA Lack enclosure.The top and bottom flanges have a “key” that will align the two halves so that the screw holes line up as well as the notch that can be used for servo and/or fan cable management if you wish to run wiring back down inside of your enclosure.A non-servo upper pipe attachment was also included if you just wanted a straight connection to the vent pipe.Print two baffle halves and glue them together taking care of the alignment. Only a tiny bit of glue is required (primarily near the pivots) as it will squish and spread so you don't want a ton of glue oozing out from between the parts. The pivot pins have a hex that is just a rough guide for alignment. You will likely want the servo attachment to be in line with the baffle plane so that you know the orientation of the baffle once assembled. NOTE: you may need to sand the outer diameter of the baffle to get a smooth fit due to slight alignment variation between the halves or to remove the glue ooze.Once you have verified a smooth rotation (the baffle is designed to be able to rotate 360 degrees within the body), then a small dot of glue inside of the baffle hex can be applied to ensure that the pivots are affixed to the baffle.The servo vent pipe connector uses a standard 9g servo module. use the one sided actuator as is shown in the photo. This will fit snugly in the pivot and is ultimately held in place by the servo. However, if you wish a more robust connection between these two parts, a dab of glue can be added.PRO TIP: This is meant to use a 180 degree servo. Ensure that the servo is all the way to one side and the baffle is closed on that same side. This way a 90 degree rotation of the servo will fully open the value. If the servo actuates 180 degrees, then the baffle just flips over to “closed” on the other side (there is enough clearance to the servo attachment to allow the actuator to swing underneath. There is no clearance the other way so if the Servo is not in the proper position when you attach it, then there is risk that the Servo can rotate in a “negative” direction when going to a home position and there will be a collision between the actuator and the Servo attachment mount.This design will accommodate a standard 2 inch central vacuum pipe (cheap and cheerful). It is meant to be a tight fit, thus you may need to sand the outer diameter of the pipe slightly for it to slide into place.In my application, I used a 90 degree long bend to go from the top of my printer case to my basement window.The final part of this system is a convenient window plate. The upper and lower rails provided will clip into a standard basement window frame and accept a ¼ inch MDF board. You will need to cut a board to the appropriate height dimensions for your application. The slot in the upper rail is deeper than the lower rail. Thus size your board so that you can slide the upper rail all the way into the upper track of the basement window and allow the bottom rail to clear the lower track of the window. The board can then be lowered to capture the lower track of the window and the upper track is still attached. This will then slide over into the window pocket, and the window can be slid snugly against this bracket to seal up the opening.The alarm attachment is if you have a magnetic home alarm contact. This design uses the small magnet that came with your kit. It slides inside of the bracket and is captured when fastened to the board. This way you can still set your alarm when this bracket is in place.The outside vent attachment fits inside of a hole made in the MDF board. This will allow you to easily pop the pipe with that attachment in and out of the board to make removal of the board easy.You could offset this flange to be flush if you don't need it to fit into a hole. There are also screw holes in case you want to more permanently affix this attachment to a board.
With this file you will be able to print IKEA Enclosure Vent System - With and Without Servo Valve - For 2" central vacuum pipe with your 3D printer. Click on the button and save the file on your computer to work, edit or customize your design. You can also find more 3D designs for printers on IKEA Enclosure Vent System - With and Without Servo Valve - For 2" central vacuum pipe.