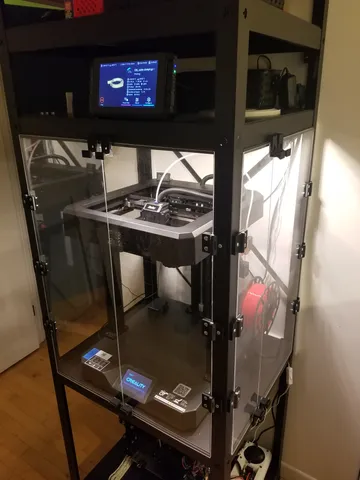
IKEA BROR Shelves system for 3D printer enclosure
prusaprinters
Few web search closed on the IKEA BROR system. As always, IKEA supply cheap and very efficient furniture. As before with the LACK table, IKEA can supply a good solution for bigger printer enclosure. The BROR shelves system is composed of many size but the best one for my needs is the 545 x 645 x 1905 mm heigh shelf in black. It fits Ender-7 big size very well. The kit sell for 90$ Cad $. I put one additionnal shelf (total 4 included +1) to the kit for a total of approx 115$ cad. In this design you will find a STEP for the complete assembly and a step for the acrylic panel cutout pattern + all part in stl. This is a design in progress for me. Updated part to come after first assembly of doors. I am now cutting my 30'' x 60'' x 0.125'' acrylic panel. I will update with pictures. Hinges are working with pins made with 8D nails (0.125'') cut to 40 mm lenght. The hinges STL is a complete print in place assembly (at 90 degres) with minimal support. Top and bottom door handles use 6 mm x 3 mm magnet insert. (My magnet are not delivred yet, I use double sided tape for now.) Hinges are secured with philips #10-32 x 3/4'' L or M5 X 20 mm L button head screw. Feel free to comment.Best Regards and EnjoyPatrick2023-02-05 progress (see pictures):Hinges work well printed as is. They need a bit of filling and cleaning of course. Drilling them back with a 1/8'' (0.125) drill bit help with pin insertion.Door handle are designed to be installed with a #10-32 x 3/4L Phillips button head screw but I got a roll of double sided alien tape and it is just perfect to hold handle and its just less drilling for nothing in acrylic panel.Only thing that is missing is the back panel. I will make it with a 3 mm fiber panel board. The one they use in almost any furniture. I will look for a white sided one. For now, I have no insulation and no seal around doors and panel. Ther is lot of gap. I am able to keep an ambiant of 40C at print level and 28C at base level without any auxiliary heat source.3 mm Clear acrylic panel can be cut to dimensions in any hardware store with a cut center (they nearly all closed during COVID and after in my region). So, if you need to cut them by yourself, you have 2 options: 1- With a very good quality table saw with sturdy guide, a good blade and a large surface. 2- Using an angle grinder with a 1/16 thick steel cutting disk. Put the sheet flat on a surface on a table top or floor with a scrap plywood sheet or particle board under it (to protect the floor or what is underneath). Trace to dimension with a sharpy pen on the plastic protection and use a steel flat bar as a cutting guide ruler. Cut both end first to avoid craking then you can cut all the lenght. Overall very easy to cut. You will only have a pretty bad plastic smell in you garage or house for a couple of hour after cutting cause the angle grinder is more melting than cutting. For drilling, simply try to get the slower speed on your drill. Dont push too hard and add dish soap on the drill bit. Of course, use a vizor + safety glasses and gloves. Melted plastic bits are projected toward hands by the angle grinder disk. Quite hot!!!
With this file you will be able to print IKEA BROR Shelves system for 3D printer enclosure with your 3D printer. Click on the button and save the file on your computer to work, edit or customize your design. You can also find more 3D designs for printers on IKEA BROR Shelves system for 3D printer enclosure.
