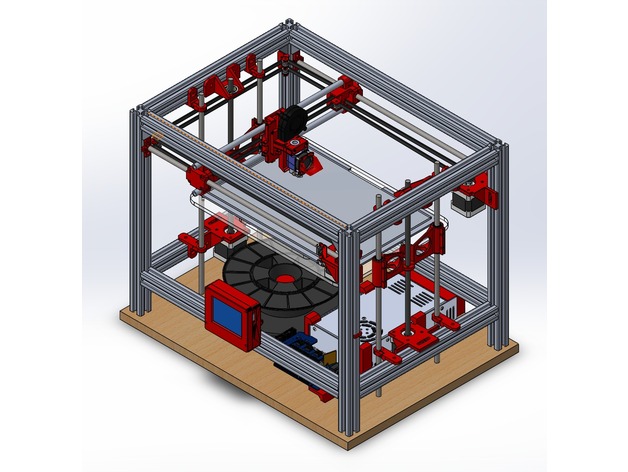
HyperCube 3D printer (2525 Aluminum)
thingiverse
Here is the rewritten text. Modified parts from either the Hypercube or Hypercube Evolution have been used for: * 2525 Aluminum Tslot * 3/8 Anodized Aluminum Rod or 8mm steel rods * Z axis design: Acrylic Base or 2020 Aluminum Tslot * Dual Z axis motors * Larger Print Area: 200x300x160mm * Compact Base Design: Power Supply, Ramps, Bowden Extruder, and Filament all sit below the printer This printer includes things from: * Brspartan's Horizontal Spool Mount * Tom114's E3D fan * Dintid's MKS TFT28 Case * Dasaki's Ramps Case * ProtoBuild's PSU Mounts Modified things from Schlotzz's Bowden Extruder have been used. Change Log: 11.21.18: All parts from V1 and V2 of my 2525 Hypercube/Hypercube Evolution were uploaded, including solidworks models and STLs. 09.07.18: Modified 2525 parts from the Hypercube Evolution were uploaded. I discovered some design flaws in the original Hypercube parts that I wanted to address. This version uses 2020 aluminum Tslot for the base, which is much more rigid than my previously used acrylic. It also improved the rigidity of the x axis by switching from the 3/8in aluminum tube to 8mm steel rods. 25.05.17: Added or modified PSUFanDuct QTY1.stl, Tool Holder QTY1.stl, bracket_no_notch_v2 QTY2.stl, and Filament Spool Mount v2 QTY1.stl. The PSU Fan Duct will prevent the air from cooling down your heated bed, the spool mount is now a tighter fit and the spool will no longer be able to slide around. BOM Frame: * T-Slot 2525 Aluminium Extrusion Profiles for X200 x Y300 x Z155 print bed area + 4 x 340mm (X) + 4 x 440mm (Y) + 4 x 350mm (Z) (longer if you would like a build height greater than my current 160mm) Fixings: * 100 x M5 x 12mm button head screws (for plastic parts) * 50 x M5 x 10mm button head screws (for corner brackets) * 2 x 100pcs 2525 T-Slot M5 hammer nuts * 3 x 10pcs Aluminium Corner Brackets CoreXY + Z + Bowden Drive System: * 2 x 8mmx440mm Hardened Steel smooth rod (choose 500mm length) for Y axis * 4 x 8mmx350mm Hardened Steel smooth rod (choose 350mm length) for Z axis * 1 x 3/8"x6' Anodised Aluminium Rod/Tube for X axis * 4 x 1pcs Self Lubricating 3/8" ID Bronze Bushing * 8 x LM8UU linear bearings for smooth movement * 2 x Lead Screw NEMA17 Stepper Motor Motors, Electronics and Accessories: * 3 x NEMA17 Stepper Motor * 1 x RAMPS 1.4 + MEGA2560 R3 + LCD&SD + A4988 With Heat Sink Kit * 1 x 12V DC 50mm Blow Radial Cooling Fan * 1 x Heatbed Aluminium MK3 12V 24V * 1 x 12V 30A 360W Switching Power Supply * 1 x Thermistor 100K With 1M Cable for Heat Bed Print settings: * 3 Perimeters * 3 top/bottom layers * 0.25mm layer height (or better) * 50% infill Laser Cut: * 1 x Acrylic Bed (249mm x 349mm) Follow Tech2C's build log for detailed instructions on how to build this printer! Be sure to follow them all the way through before you start your build.
With this file you will be able to print HyperCube 3D printer (2525 Aluminum) with your 3D printer. Click on the button and save the file on your computer to work, edit or customize your design. You can also find more 3D designs for printers on HyperCube 3D printer (2525 Aluminum).
