Hydroponic Net Cup and Enclosure
prusaprinters
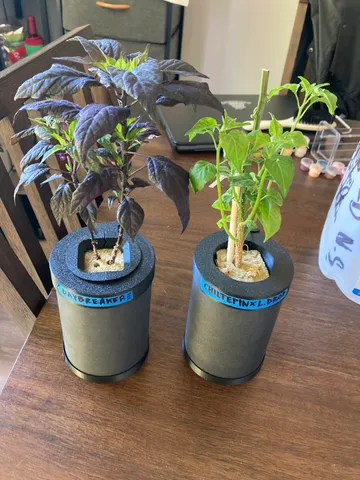
I didn't like the injection molded net cups found online, so I designed my own with a large opening at the bottom. The large opening should help with removing the plant and cube from the net pot without damaging the roots too much.The walls hug the 1.5 inch rockwool cubes. This prevents light from entering into the jars from the top without resorting to clay pebbles, but only if black filament is used. I tried using dark filament (prusament mystic brown and mystic green), but the grow lights still penetrated and caused algae.The blackout containers us a strip of cardstock taped into a tube. To find the length of cardstock needed, calculate for the circumference of the mason jar: 2 x 3.14 x the radius, then add about .5" / ~15mm extra for overlap. For example, if the outer diameter of the mason jar is 100mm, the radius is 50mm, and the cardstock length would need to be 314mm + 15mm = 329mm. Even with the blackout containers, the nutrient solution needs to be changed out every week and a half.These are designed to work with any standard mouthed mason jar. The pictures for this model are using 12oz mason jars. Print Settings:No supports needed. I'm proud of the stepped bridging design :)Recommend .2mm layer heightPrint with the large opening on the print bed (shown in the last picture)Recommend printing with black filament only. I tried gray, prusament mystic brown, and prusement mystic green, but all of them were too light. Algae grew very quickly as a result.These printed well in PLA, and so-so in PETG (net cup had a lot of stringing and hanging bits).
With this file you will be able to print Hydroponic Net Cup and Enclosure with your 3D printer. Click on the button and save the file on your computer to work, edit or customize your design. You can also find more 3D designs for printers on Hydroponic Net Cup and Enclosure.