Hubless Fly Reel
thingiverse
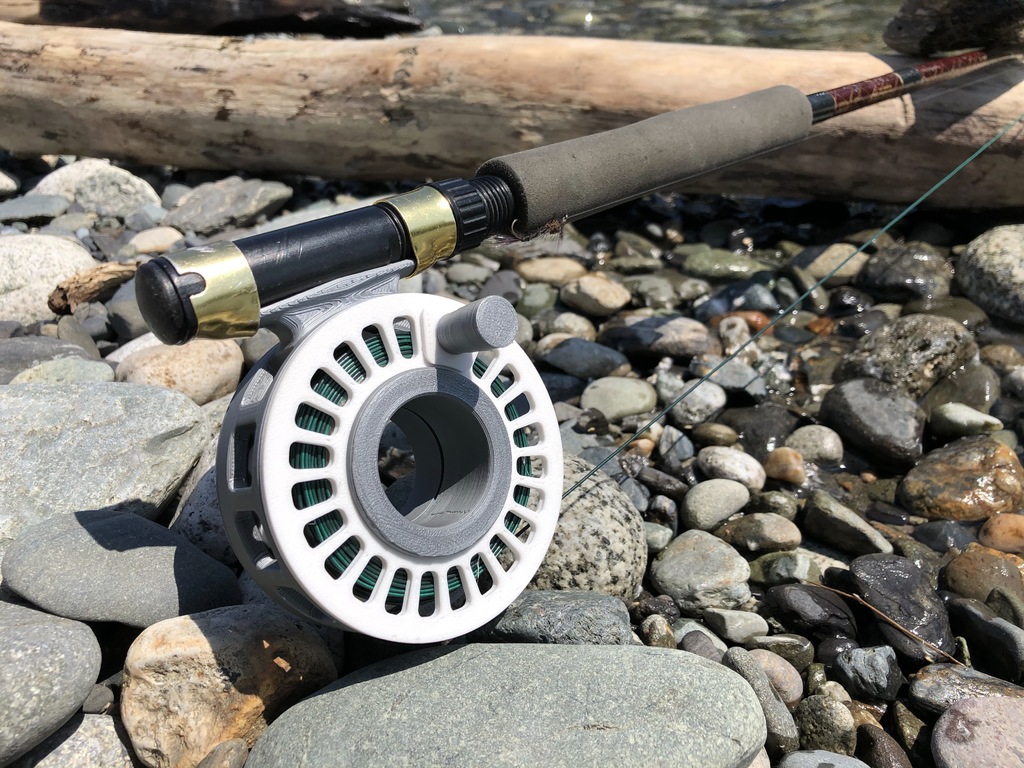
Here’s my take on a Hubless Fly Reel. I love the look of hubless reels such as the LUNAR AC2, LOOP and others and wanted to try my hand at this. Design goals included; • no additional hardware required to assemble the reel, • a bi-directional leaf spring and pawl clicker, • an auxiliary clicker (this was my first attempt at a clicker but decided to leave it in), • an adjustable drag system. I was mostly successful in avoiding glue but have resigned myself to krazy gluing the spool halves together. The entire reel will assemble and work without glue but line pressure in the spool forces the spool halves apart creating unintentional drag against the frame and keyed drag hub. I now also glue the handle post to the outer spool. Over time the interference fit between the outer spool and handle post relaxes and can pop loose. The overall dimensions of this reel are 88mm OD x 33mm wide. The spool dimensions (line storage) are 53mm ID x 77mm OD x 21mm wide. These dimension are similar to my Supreme QRS 2/3 4/5 fly reel. All the gray parts in the photos use the Prusa PLA filament that shipped with my printer. The white parts are Overture PETG. Not sure how PLA will hold up on a hot summer day but wanted to print this in the two colors I have right now. Before you start printing, ensure you select the correct frame. I have included both left hand and right hand frame STL files. The pictures and model views all show the right hand frame. Most of the parts print without supports except for the inside half of the spool, handle post and reel frame which require support. You may need to use a raft or brim to secure the part during printing. Here is how you can assemble your reel: 1. With at least one active pawl, install the spool onto the hollow hub of the reel frame and ensure the outside surface of the spool is flush with the end of the hollow hub and that the pawl(s) are seated in the gear. 2. Prior to installing the drag hubs lubricate the threads with Vaseline or Prusa printer lube and ensure the hubs thread together smoothly. You may need to work the threads back and forth 20 or 30 times to get them to wear into each other and operate smoothly. 3. Install the keyed drag hub in the keyed end of the hollow hub. Insert the ribbed hub from the other side and tighten as desired to adjust the drag. 4. Load up some line and go fishing! Additional Comments: I have not experimented with lubrication too much, other than on the drag hub threads and pawl(s) as mentioned above. The PETG spool running on the PLA hub is naturally slippery and spins very freely even with one pawl engaged (drag backed off). I have included 4 slot shaped “grease” grooves in the outside diameter of the hollow hub to hold a little residual lubricant but have not tried this yet. The other supplied “drop-in” clicker (PETG) installs in the slot in the frame beside the reel mount. Squeeze the ends together to engage the clicker in the slot (see pictures). The drop-in clicker is not as satisfying or smooth in operation but it is quieter than the pawl clicker setup. Disengage the pawl(s) (step 1 above) to try this clicker on its own. I have included 4 resistance levels of the drop-in clicker; Light (1 hole), Med Light (2 holes), Med Heavy (3 holes) and Heavy (4 holes) (see picture). For a very quiet reel just use the drag hubs alone (without the pawls or drop-in clicker). Finally, thanks to sthone, SublimeLayers and others for sharing their work and providing inspiration for this design. I welcome any comments, questions or suggestions for improvement. Enjoy… Ed
With this file you will be able to print Hubless Fly Reel with your 3D printer. Click on the button and save the file on your computer to work, edit or customize your design. You can also find more 3D designs for printers on Hubless Fly Reel.