Hourglass
prusaprinters
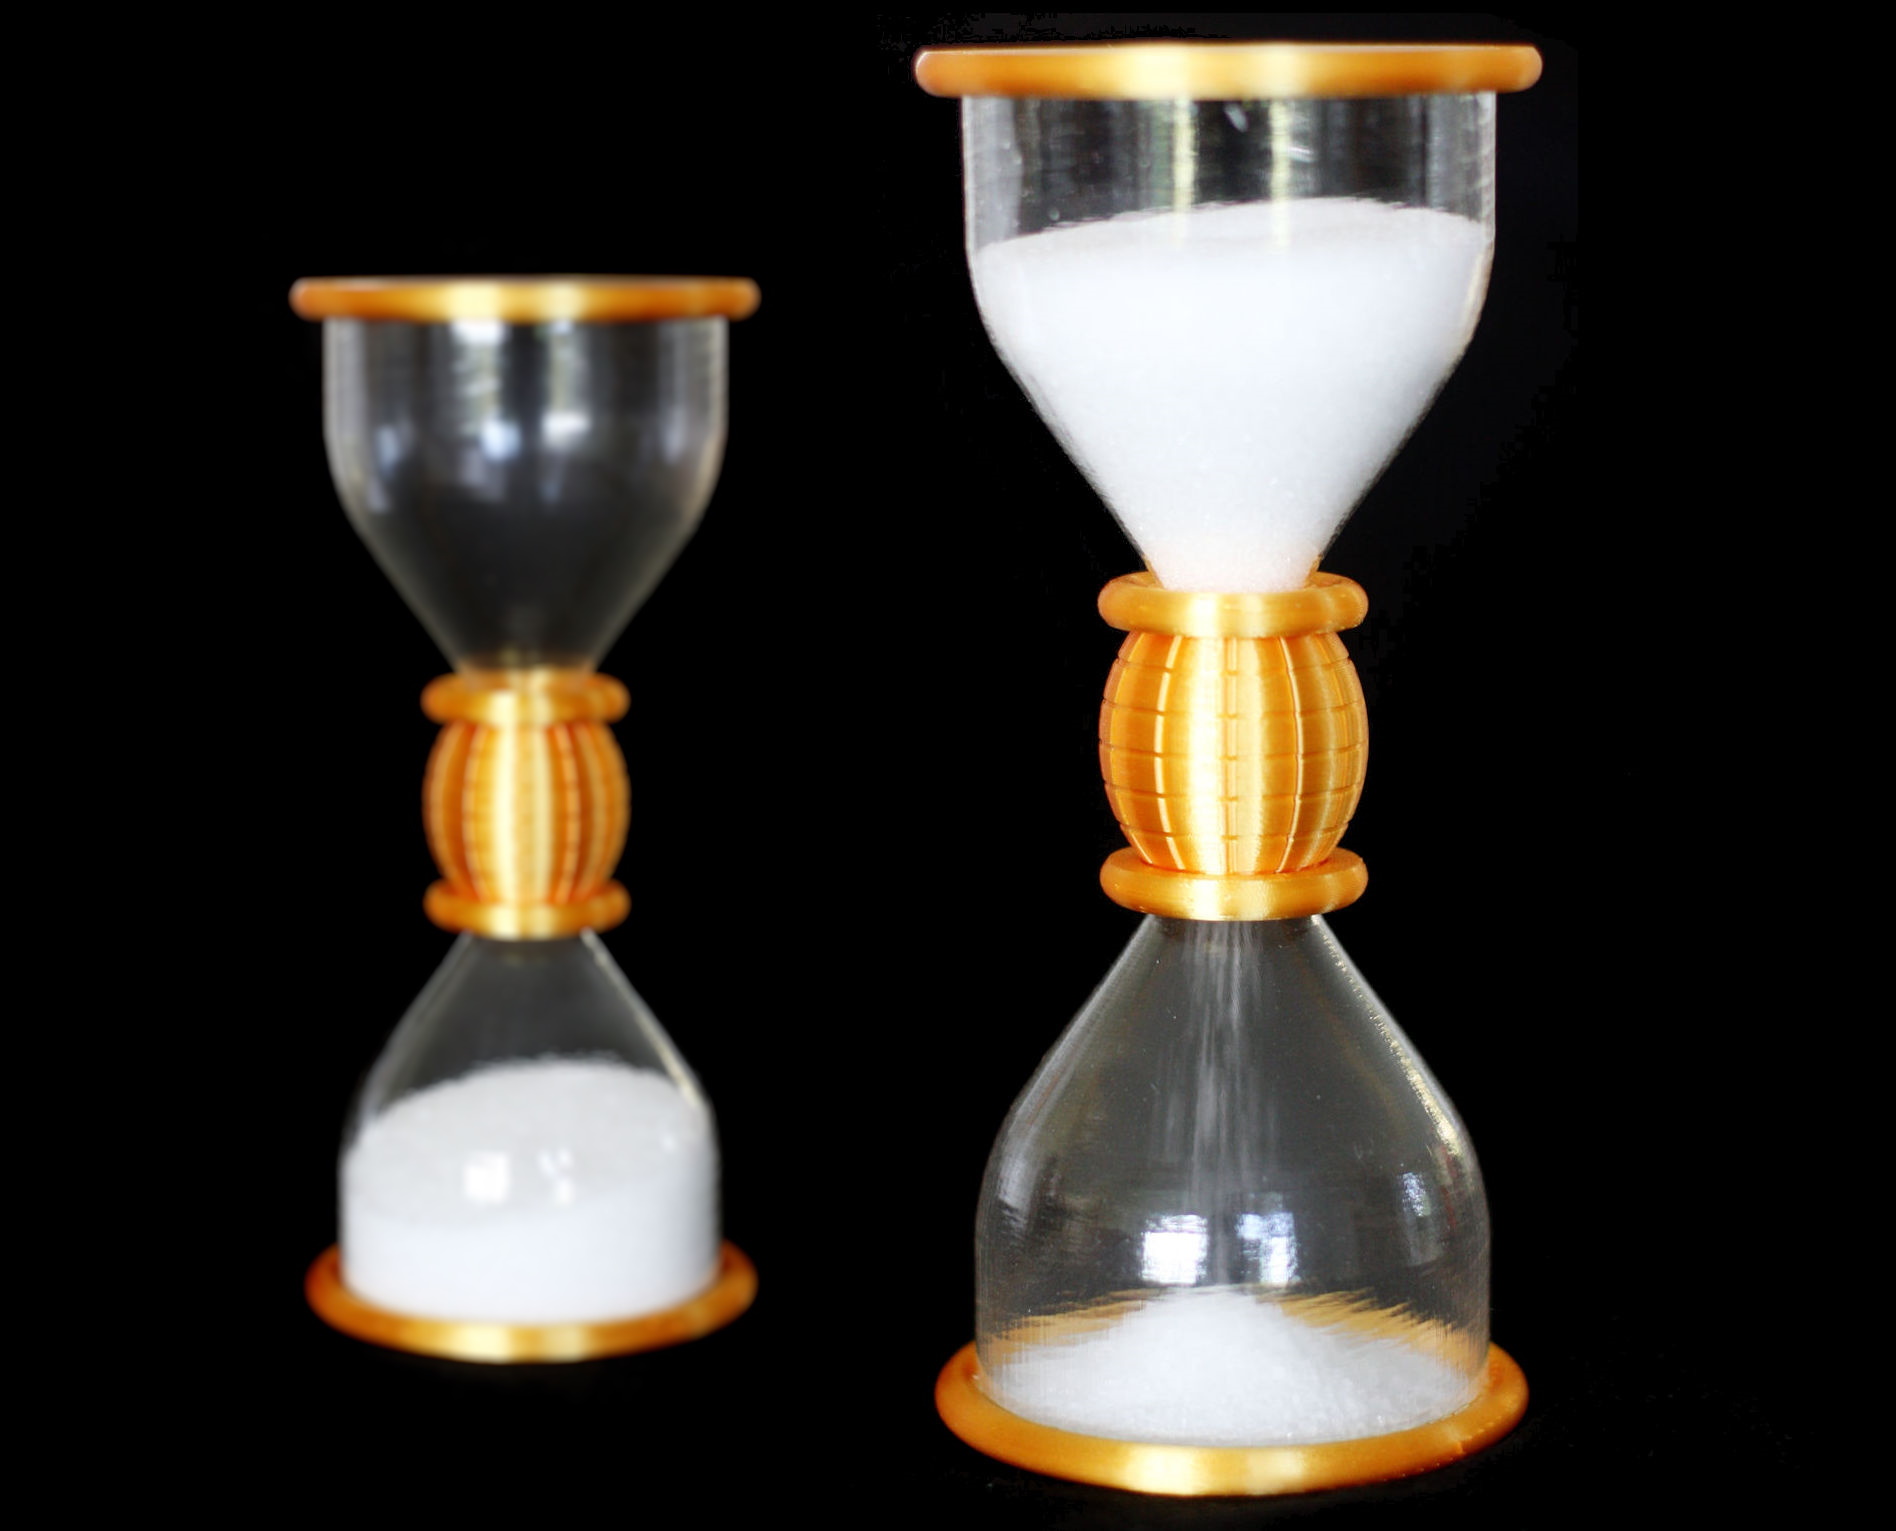
<p>This beautiful hourglass is made of smoothed PVB for the “glass” and ultra silk PLA for the connector and decorations. The unique connector design eliminates the need for glue or other material and still provides a very stable hourglass that can be easily disassembled at any time.</p><figure class="table"><table><tbody><tr><td style="width:300px;"><figure class="image image_resized" style="width:100%;"><img src="https://media.prusaprinters.org/media/prints/69196/rich_content/76c9a377-7a26-41ce-ad17-d9478c91c126/hourglass.jpg#%7B%22uuid%22%3A%22a6ab957b-2d78-41aa-8ca0-709c8395721f%22%2C%22w%22%3A1040%2C%22h%22%3A1583%7D"></figure></td><td><figure class="image image_resized" style="width:92.61%;"><img src="https://media.prusaprinters.org/media/prints/69196/rich_content/59d96b22-17df-4c07-a076-b713412bca42/assembly3.jpg#%7B%22uuid%22%3A%2237215e56-4560-4f12-9463-79906a6049db%22%2C%22w%22%3A619%2C%22h%22%3A725%7D"></figure></td></tr></tbody></table></figure><h3><strong>Printing</strong></h3><p>For printing I have provided the STL, 3MF and gcode files (for MK3/s/+). So there is no need to worry about the actual settings.</p><p>The design is printed in two different materials:</p><h4><strong>Clear PVB:</strong></h4><figure class="table"><table><tbody><tr><td style="width:180px;"><figure class="image"><img src="https://media.prusaprinters.org/media/prints/69196/rich_content/beabd582-c3f9-4949-a9e1-230804bcbaf3/_glass.jpg#%7B%22uuid%22%3A%2283236c0d-286c-4d7e-a38d-099ef701bcf1%22%2C%22w%22%3A256%2C%22h%22%3A256%7D"></figure></td><td>We make use of the spiral vase mode for printing a nice piece of PVB. So there will not be any seam visible in the end. To increase the wall thickness I have opted for increasing extrusion width for overextrusion - there really is no need to get a bigger nozzle than 0.4mm for printing PVB.</td></tr></tbody></table></figure><h4><strong>(Ultra Silk) PLA:</strong></h4><figure class="table" style="height:957.031px;width:713.993px;"><table style="background-color:rgb(255, 255, 255);border-bottom:1px double rgb(179, 179, 179);border-left:1px double rgb(179, 179, 179);border-right:1px double rgb(179, 179, 179);border-top:1px double rgb(179, 179, 179);"><tbody><tr><td style="border-bottom:1px solid rgb(191, 191, 191);border-left:1px solid rgb(191, 191, 191);border-right:1px solid rgb(191, 191, 191);border-top:1px solid rgb(191, 191, 191);padding:0.4em;vertical-align:top;width:180px;"><p><strong>bushing:</strong></p><figure class="image image_resized" style="width:167.708px;"><img src="https://media.prusaprinters.org/media/prints/68338/rich_content/17bfc152-ab11-4e60-9d61-471c7fadb5d3/_bushing.jpg"></figure></td><td style="border-bottom:1px solid rgb(191, 191, 191);border-left:1px solid rgb(191, 191, 191);border-right:1px solid rgb(191, 191, 191);border-top:1px solid rgb(191, 191, 191);padding:0.4em;"><p>The bushing is the heart of the Design: Along with the size of the grains it will decide whether this hourglass is working or not. In theory the lowest diameter for the bushing of an hourglass should be about 12 times as big as the size of the grain. Since we are aiming to use ordinary sugar and the hourglass should not be huge, we have to make a few compromises here.</p><p>This part ist printed in 0.1mm layer height in order to have a smooth surface. No need to use silk PLA for this part - being invisible in the end, any PLA will do.</p></td></tr><tr><td style="border-bottom:1px solid rgb(191, 191, 191);border-left:1px solid rgb(191, 191, 191);border-right:1px solid rgb(191, 191, 191);border-top:1px solid rgb(191, 191, 191);padding:0.4em;vertical-align:top;"><p><strong>connector:</strong></p><figure class="image image_resized" style="width:167.708px;"><img src="https://media.prusaprinters.org/media/prints/68338/rich_content/ef38bfbc-25e0-4aaf-8f2f-07c87bf19cbc/_connector.jpg"></figure></td><td style="border-bottom:1px solid rgb(191, 191, 191);border-left:1px solid rgb(191, 191, 191);border-right:1px solid rgb(191, 191, 191);border-top:1px solid rgb(191, 191, 191);padding:0.4em;">Print two of these in nice and shiny silk PLA in 0.2mm layer height. The grid structure has a purpose: it will hide the seam when connecting both of the connector parts.</td></tr><tr><td style="border-bottom:1px solid rgb(191, 191, 191);border-left:1px solid rgb(191, 191, 191);border-right:1px solid rgb(191, 191, 191);border-top:1px solid rgb(191, 191, 191);padding:0.4em;"><p><strong>ring:</strong></p><figure class="image image_resized" style="width:167.708px;"><img src="https://media.prusaprinters.org/media/prints/68338/rich_content/67a2baa5-383a-46cc-afcb-cfd65a6419e6/_ring.jpg"></figure></td><td style="border-bottom:1px solid rgb(191, 191, 191);border-left:1px solid rgb(191, 191, 191);border-right:1px solid rgb(191, 191, 191);border-top:1px solid rgb(191, 191, 191);padding:0.4em;">Print two of these in variable layer height (0.07…0.3mm). They will be pushed onto the connectors to lock them in place (see assembly instructions). The ring has a somewhat flat side to improve printability.</td></tr><tr><td style="border-bottom:1px solid rgb(191, 191, 191);border-left:1px solid rgb(191, 191, 191);border-right:1px solid rgb(191, 191, 191);border-top:1px solid rgb(191, 191, 191);padding:0.4em;"><p><strong>large_ring:</strong></p><figure class="image image_resized" style="width:167.708px;"><img src="https://media.prusaprinters.org/media/prints/68338/rich_content/e05d1f08-91e3-4f14-8322-5cea74d9e40c/_large_ring.jpg"></figure></td><td style="border-bottom:1px solid rgb(191, 191, 191);border-left:1px solid rgb(191, 191, 191);border-right:1px solid rgb(191, 191, 191);border-top:1px solid rgb(191, 191, 191);padding:0.4em;">Print two of these in variable layer height (0.07…0.3mm). They will be pushed onto the glass (see “PVB smoothing” section).</td></tr></tbody></table></figure><h4><strong>Optional: A Funnel</strong></h4><figure class="table" style="height:231.094px;width:713.993px;"><table style="background-color:rgb(255, 255, 255);border-bottom:1px double rgb(179, 179, 179);border-left:1px double rgb(179, 179, 179);border-right:1px double rgb(179, 179, 179);border-top:1px double rgb(179, 179, 179);"><tbody><tr><td style="border-bottom:1px solid rgb(191, 191, 191);border-left:1px solid rgb(191, 191, 191);border-right:1px solid rgb(191, 191, 191);border-top:1px solid rgb(191, 191, 191);padding:0.4em;width:180px;"><p><strong>funnel</strong></p><figure class="image image_resized" style="width:167.708px;"><img src="https://media.prusaprinters.org/media/prints/68338/rich_content/b38a7b8a-d480-4b40-96c4-41e920bc0d36/_funnel.jpg"></figure></td><td style="border-bottom:1px solid rgb(191, 191, 191);border-left:1px solid rgb(191, 191, 191);border-right:1px solid rgb(191, 191, 191);border-top:1px solid rgb(191, 191, 191);padding:0.4em;">If you don't already have a small funnel for filling the sugar into the glass, you can just print this one. I have used PETG for durability and printed it in spiral vase mode.</td></tr></tbody></table></figure><h3><br><strong>PVB-Smoothing</strong></h3><p>After printing, the PVB is still more like milk glass. To make it really transparent, it must be treated with IPA in the appropriate places. This is the most critical part of reproducing the design. Be aware that you must let the parts dry and so finishing the smoothing process will take some days - rather a few weeks. I guess this is why we do not see as many PVB projects as there should be out there… But don't worry: You will be rewarded in the end by having a unique clear 3d-printed design.</p><p>IPA penetrates the PVB and softens it. The surface becomes smoother and thus more transparent. The IPA then gradually evaporates. However, we must urgently avoid the IPA completely soaking the wall of the print: The part would then deform and the print would inevitably be lost:</p><figure class="image image_resized" style="width:25.69%;"><img src="https://media.prusaprinters.org/media/prints/69196/rich_content/8935cab4-1704-4e55-83a8-f5a1feaa71fd/deformed.jpg#%7B%22uuid%22%3A%22c581466b-4f0e-4923-b078-8ac81382cc0a%22%2C%22w%22%3A676%2C%22h%22%3A527%7D"></figure><p>So take your time and follow my instructions.</p><p>Before smoothing please attach the large ring to the lower glass. This will provide a place to hold the part and also makes sure the ring still fits after smooting. The ring should snap right into place. The dissolved PVB will then later also act as some kind of glue to completely fix it.</p><figure class="image image_resized" style="width:368.056px;"><img src="https://media.prusaprinters.org/media/prints/68338/rich_content/3a249d1f-dc65-4ab9-82d1-c346c1cee68f/attach_large_ring.jpg"></figure><h4><strong>1. Smoothing the inside</strong></h4><p>Smoothing the inside of the glasses is the most critical part of the job: with the small hole on the top, IPA will evaporate very slowly. So we start on the inside and leave the outside of the glass as is. In this way, the outer shell serves as a kind of exoskeleton and keeps the part in shape, while the soft inside can dry and thus become firm again.</p><p>Use a syringe or the funnel to inject about 3ml of IPA into the part:</p><figure class="image image_resized" style="width:246.684px;"><img src="https://media.prusaprinters.org/media/prints/68338/rich_content/ef8df806-7d37-4ac1-a9e6-7965d231da31/smoothing_inside.jpg"></figure><p>Then quickly hold the opening closed with a finger (protective gloves?) and shake the part wildly in every direction for about 15 seconds. By this the IPA is distributed everywhere inside. Then pour the rest out again. Keep in mind that this is a PVB-IPA mixture. Therefore, do not pour back into the IPA supply under any circumstances. I therefore have my own small bottle of IPA for smoothing PVB, where PVB may also be dissolved in the IPA.</p><p>Now let the part dry for at least one day. There are several ways to help the IPA vapors escape from inside the part:</p><ul><li>Blow into the opening (if available: use compresed air)</li><li>Put the parts onto the heat bed at about 65-70°C</li><li>Let the part sit in warm and dry environment</li></ul><p>After that repeat this step. Now let the part dry for about a week! Be warned: Only go on to the smoothing of the outside when you can no longer smell any IPA!</p><h4><strong>2. Smoothing the outside</strong></h4><p>Now comes the fun part of the smooting process, since it will go much quicker and you will see good progress. Use a brush to apply IPA on the side of the glass:</p><figure class="image image_resized" style="width:59%;"><img src="https://media.prusaprinters.org/media/prints/69196/rich_content/609e4824-b204-413f-b76e-84c2e5d4d218/smooth2.jpg#%7B%22uuid%22%3A%229321684d-85e0-47e3-a7a9-6dd53e4d7649%22%2C%22w%22%3A1062%2C%22h%22%3A766%7D"></figure><p>Do not apply any IPA to the opening of the glasses: They will be hidden by the connector in the end and they have to keep their structure for the connectors to fit.</p><p>With each application, go around the part twice and spread the dissolved PVB well. Then allow it to dry for at least half a day. Only when no more IPA can be smelled and the material is no longer soft can the next pass be made! Otherwise you will risk the part to collapse. Repeat this process 3 to 5 times.</p><p>Let me repeat this again: The most important thing is to make sure that the part never becomes too soft.</p><h4><strong>3. Smoothing the bottom</strong></h4><p>When done with smotthing the sides, repeat the same steps on the bottom of the glasses:</p><figure class="image image_resized" style="width:53.05%;"><img src="https://media.prusaprinters.org/media/prints/69196/rich_content/bd16a474-fe16-4b7b-9246-aadd00364bef/smooth3.jpg#%7B%22uuid%22%3A%22f2d6ff4f-c144-4ddd-af5d-fed31bebd92f%22%2C%22w%22%3A746%2C%22h%22%3A531%7D"></figure><h4>4. Let it dry!</h4><p>After finishing the smoothing let the parts dry for some more days. The filling material will otherwise stick to the walls of the glass and it also might clog.</p><h4><strong>Pro-tip for smoothing chemicals (absolutely optional)</strong></h4><p>You can mix a bit of antistatic spray with IPA to make an even better chemical for smoothing: So the resulting PVB should be less susceptible to static charge. But please restrain from applying antistatic spray after drying, since it contains IPA and other chemicals and will make the PVB soft again.</p><h3> </h3><h3><strong>Assembly</strong></h3><p>With all the parts printed, smoothed and well dried (let it sit for one more day!) assembly is done quickly. </p><figure class="image image_resized" style="width:99.45%;"><img src="https://media.prusaprinters.org/media/prints/69196/rich_content/4c2b4989-17cf-4a3b-b2c9-bd4d91acab9a/all.jpg#%7B%22uuid%22%3A%22136fa018-6e1f-40cf-b982-0fe9726ac7fe%22%2C%22w%22%3A1062%2C%22h%22%3A766%7D"></figure><h4><strong>Step 1: Fill in sand, sugar or similar material</strong></h4><p>Use a funnel to fill in small grained material into the bottom glass:</p><figure class="image image_resized" style="width:355.625px;"><img src="https://media.prusaprinters.org/media/prints/68338/rich_content/c9a6c473-ef35-4840-9225-e0a8d0a3f169/assembly2.jpg"></figure><p>I use 80g of sugar to achieve a run time of pretty much 90 seconds.</p><h4><strong>Step 2: Attach Connector parts</strong></h4><p>Slide the small rings to the necks of the glasses with the flat side pointing to each other. Put the bushing on top of the bottom glass and attach one half of the connector to the side. You can hold this with one hand:</p><figure class="image image_resized" style="width:410.538px;"><img src="https://media.prusaprinters.org/media/prints/68338/rich_content/a1b040b5-d99f-46c5-82b6-6795ee12cb42/assembly3.jpg"></figure><h4><strong>Step 3: Lock the Connector</strong></h4><p>Now attach the second half of the connector and slide the rings over its end to lock everything in place:</p><figure class="image image_resized" style="width:373.767px;"><img src="https://media.prusaprinters.org/media/prints/68338/rich_content/216d05ba-33f5-433d-a300-23e0a9db48a3/assembly4.jpg"></figure><p>The lock might seem a bit loose and all the parts still can rotate. That is perfectly alright as long as it does not come apart too easily. In case your connector does not fit, you can slighty modify the size of the rings in the slicer (tiny steps of +-0.1mm in diameter).</p><h4><strong>Step 4: Test and Calibration</strong></h4><p>Now your hourglass is ready for a test drive:</p><figure class="image image_resized" style="width:293.507px;"><img src="https://media.prusaprinters.org/media/prints/68338/rich_content/d26e58ba-f5c7-41f7-b1a7-dd8dadad453b/testdrive.jpg"></figure><p>You might want to adjust the amount of filling material to get the running time you want. This can easily be done by reversing the assembly steps. In fact that is one of the main benefits of this design: It can be assembled and disassembled as often as you want.</p><p>In case the material gets stuck in the bushing, you might have to slightly widen and smoothen the bushing using a file or sand paper. If it still does not work, your material might be too wet (did you let the PVB dry for long enough?) or to coarse-grained.</p><h3>Optional: Numbered connectors</h3><p>As an optional upgrade I have provided some collector parts with numbers, so that you can specify the running time of the hourglass:</p><figure class="image image_resized" style="width:34.44%;"><img src="https://media.prusaprinters.org/media/prints/69196/rich_content/7b47f03b-dae5-42a2-8c71-2514402c129c/numbers.jpg#%7B%22uuid%22%3A%22eca3437d-4204-4af3-b88d-3f5fd113c6c7%22%2C%22w%22%3A447%2C%22h%22%3A464%7D"></figure><p>I have put the numbered designs in the “Variations” folder of the download section.</p><h3><strong>Design and Source Code</strong></h3><p>The design has been implemented in OpenSCAD (the source code is provided for download):</p><figure class="table"><table><tbody><tr><td><figure class="image image_resized" style="width:98.99%;"><img src="https://media.prusaprinters.org/media/prints/69196/rich_content/0db0d686-e7ab-435d-8a8c-ae2488d2f372/3d_detail.png#%7B%22uuid%22%3A%221930ad96-7880-4528-a0c0-522286cb3c68%22%2C%22w%22%3A844%2C%22h%22%3A752%7D"></figure></td><td><figure class="image"><img src="https://media.prusaprinters.org/media/prints/69196/rich_content/3bd339bb-46d2-4749-a5cf-3fa8a1ffd4b3/3d_explosion.png#%7B%22uuid%22%3A%228a9629ed-0341-4333-93b8-049683789944%22%2C%22w%22%3A1063%2C%22h%22%3A866%7D"></figure></td></tr></tbody></table></figure><p>For the numbers on the connector you will need the Write.scad library in the folder 'write'. It is written by HarlanDMii (<a href="https://www.thingiverse.com/thing:16193">https://www.thingiverse.com/thing:16193</a>) but I did use DonJuanito's improved version (<a href="https://www.thingiverse.com/thing:4638409">https://www.thingiverse.com/thing:4638409</a>).</p><h3><strong>Happy printing!</strong></h3><p>If you like this design, then <strong>please leave a like</strong> and also <strong>post a photo in the comments</strong>. Also check out my <a href="https://www.prusaprinters.org/social/52356-mageb/prints"><strong>other designs</strong></a>.</p><figure class="table"><table><tbody><tr><td style="vertical-align:top;"><p><strong>You want to use this hourglass as a toothbrushing timer?</strong></p><p>Have a look at <a href="https://www.prusaprinters.org/prints/68338-the-tooth-of-time"><strong>The Tooth of Time</strong></a> - you only have to exchange one of the PVB parts to convert this hourglass to this fancy design:</p><figure class="image image_resized" style="width:95.35%;"><img src="https://media.prusaprinters.org/media/prints/68338/rich_content/c18e9623-175f-41e3-854d-1fb45ac3f144/thumbs/cover/800x674/jpg/all.webp"></figure></td><td style="vertical-align:top;"><p><strong>Looking for more PVB-smoothing fun?</strong></p><p>Have a look at my <a href="https://www.prusaprinters.org/prints/60395-rain-gauge-using-advanced-techniques-and-pvb"><strong>PVB Rain Gauge</strong></a><strong>:</strong></p><figure class="image image_resized" style="width:100%;"><img src="https://media.prusaprinters.org/media/prints/68338/rich_content/a84aebb5-6e5c-48a8-a4c1-f9bb5ec8a5e4/thumbs/cover/800x921/jpg/raingauge3.webp"></figure></td></tr></tbody></table></figure>
With this file you will be able to print Hourglass with your 3D printer. Click on the button and save the file on your computer to work, edit or customize your design. You can also find more 3D designs for printers on Hourglass.