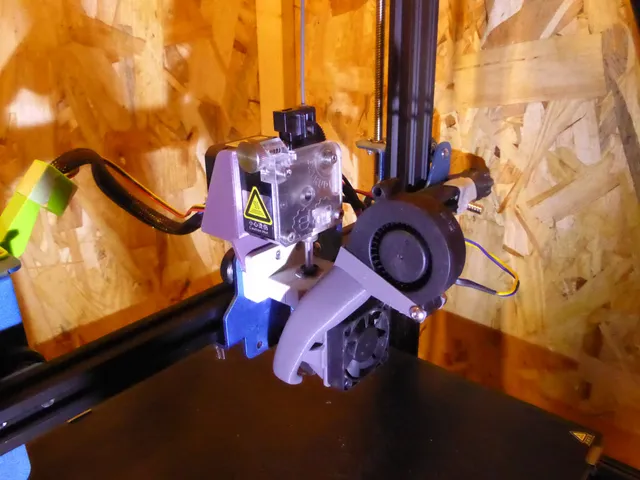
hotend/extruder mod for the CR-10 V3.
prusaprinters
This project aims to be a complete hotend and extruder support mod for the CR-10 V3 with an efficient cooling duct. I was soo bored every time i had to demount the hotend of the CR-10 V3 to access the PTFE tube, that i designed a new support based on the very nice fan duct designed by JamesK1. With this mod you can demount the hotend and access the PTFE tube in less than a minute.Important note : This design requires changing the Titan stepper motor by a shorter stepper, max 34mm deep. This is a very good upgrade because of the gain of weight, and since i have installed this fan duct, i never had the famous nasty noise while retracting, even with extruder acceleration as high as 3000 mm/s2. Important note 2 : I think you can install this mod without cutting/soldering the wires, but i'm not sure about this point. Please let me know !Specifications :Fast access to the hotend and easy demount - with this montage only one screw has to be removed to access the hotend.Good cooling - it offers quite the same performances as the famous petsfang, and is far better than the stock oneLightweight - This mod weights about 80g, and changing the stepper motor by a pancake offers a fair weight loss. It's also well-balanced SturdyCompatible with the stock hotend and E3D V6 too - This design has a 3mm gap to tune the height of the fang, so it can use both. I use a V6 clone with bimetal heatbreak and it works great, my stock hotend is mounted with a 0.6 Noozle. Changing hotends takes 2 minutes.Reusing the stock CR-10 V3 parts - Normally you don't even have to cut the fan's wires, but as I said i'm not sure about this point.Have some room to put an ABL device - the 2 screws on the right of the carriage are free so you can install any device. I choosed the TouchMi, from hotends.frAcceptable visibility of the nozzle Printing instructions : You can print it with PLA if you later keep a minimal air flow when printing with it(15% for me), it won't deform. Obviously PETG, ABS or ASA are a better choice.Everything should be printed with 0.12 layers or less.Everything should be oriented as it is, except the fang.FanDuct : Large brim, I used a 15mm brim - Support from buildplate only, 65° is enough. Please correct the orientation so the 5015 support is placed on the bed. (aka this part should be printed upside-down)FanShroud : No brim, No supportHotend Support : No brim, support from buildplate only, i used a raft so removing the support is easy.Clamp : 5mm brim or raft, support from buildplate only.Directdrive mount : No brim, support everywhere. Removing supports can be quite difficult, this is the price to have a sturdy stepper motor mount.Backplate : as it is.WireBlocker is a mess to print, i have to upgrade that part. No brim, supports everywhere. Furnitures : 1x NEMA 17 stepper, max 34mm deep.4x M3 inserts, 4MM long1x 10 mm M3 screw2x 12 mm M3 screws4x 12 or 16mm M3 screws depending on the 4010 fan.2x 8 mm M3 screw1x 25mm M4 screw2x M3 nuts1x M4 nutAssembling Instructions :- If you wanna switch your hotend very quickly, equip the wires with JST connectors or anything you like- Assembly the FanDuct and the FanShroud with the 2 fans, one 25mm M4 screw and the M4 nut for the 5015, four 12 or 16mm M3 screws for the 4010 fan, depending on your fan. Do not tighten these four screws yet.- Equip the HotendSupport with 3 M3 inserts and the Clamp with the last M3 insert. Push this one until it goes past the groove, you should have to clean the groove after that. See the picture- Have a try at first assembling every parts on your backplate, you could have some sanding/hole adjustments to do, it’s easier without stuff on it , then do it for real.When everything is smooth, go ahead- Insert the DD_Mount on the carriage plate.- Assembly the titan on the DD_Support, follow instructions on E3DBe sure to use a pancake stepper motor, maximum 34mm !- Assembly the HotendSupport with one 8mm M3 screw on the back, and two 12mm M3 screws on the front, use the Backplate with 2 M3 nuts. Put the hotend in place, check if everything is leveled, then tighten the 3 screws.- Cut your PTFE tube at the good length (FYI , 95mm for my stock hotend, 87mm for my cloned V6). It should be stuck, a little bit compressed.- Assembly the hotend on the support with the Clamp and two 12mm M3 screws- Assembly the FanDuct with one 10mm M3 screw : For the stock hotend, it should be all down, and all up for a V6 hotend. Adjust the height of the fang ( 1-2mm above the noozle’s tip) , then tighten the 4010 fan.- Put on the WireBlocker, use a 8mm M3 screw to secure it, then use a collar to secure the wires. (This part has to be upgraded)et Voilà ! Feel free to share your thoughts, remarks or questions. Things 2DO :Better WireBlockerVerify if everything can be mounted without cutting the stock wires.
With this file you will be able to print hotend/extruder mod for the CR-10 V3. with your 3D printer. Click on the button and save the file on your computer to work, edit or customize your design. You can also find more 3D designs for printers on hotend/extruder mod for the CR-10 V3..
