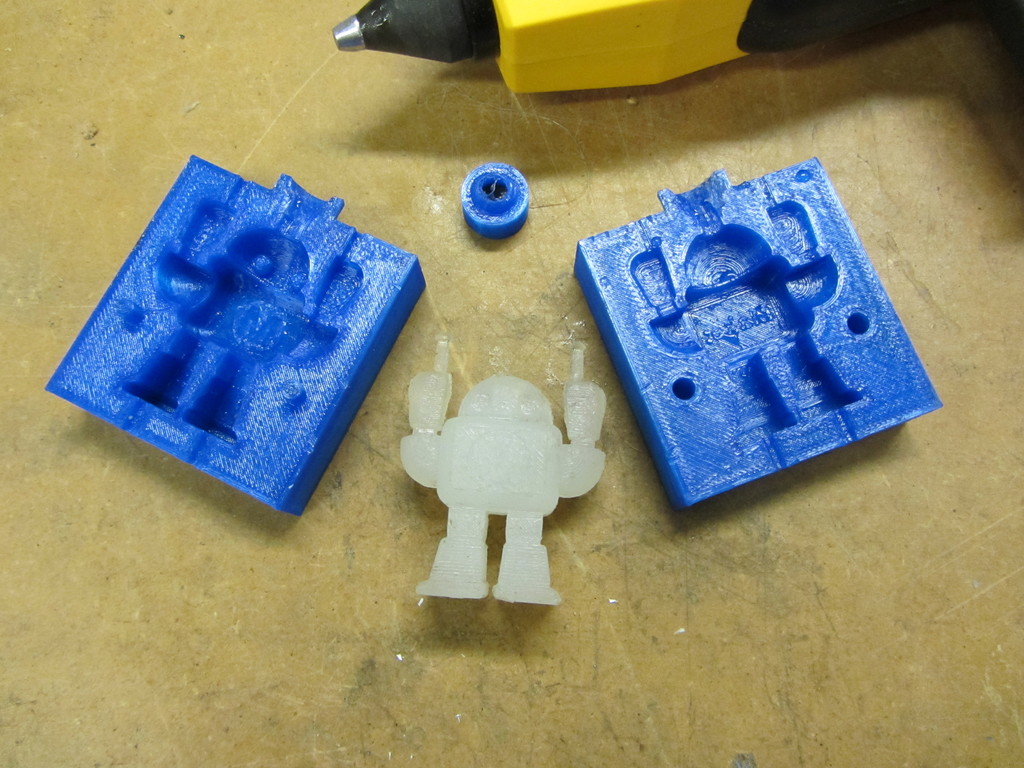
Hot Melt Injection Mold for Maker Faire Robot
prusaprinters
<p><em>Update (7/1/17):</em> Turns out this design is nearly identical to an earlier design: <a href="https://www.thingiverse.com/thing:796654">https://www.thingiverse.com/thing:796654</a> which another user just brought to my attention. Check it out, too!</p> <p>This is a test of a mold for hot melt glue injection molding. I'm not sure if it is good for anything, but I wanted to see if it is possible to injection mold hot melt glue in a PLA printed mold. (It is!) I started off with the iconic Maker Faire robot (the manos arriba version) and created a 2-part mold. I added an inlet port and outlet ports at the extremities.To keep from melting the input port with the hot melt glue gun nozzle, I also designed a small sacrificial input duct that does get a little melted, but it is easily replaced. I was worried that the hot melt glue would simply melt the mold, but even though I was using high-temp hot glue (the gun gets to about 220C) the mold survived fine.</p> <p>The only use I can think of for this technique would be for over-molding/potting of electronic components or small circuit boards.</p> <h3>Print Settings</h3> <p><strong>Printer Brand:</strong></p> <p>MakerGear</p> <p class="detail-setting printer"><strong>Printer: </strong> <div><p>MakerGear M2</p></div> <p><strong>Rafts:</strong></p> <p>Doesn't Matter</p> <p class="detail-setting supports"><strong>Supports: </strong> <div><p>Doesn't Matter</p></div> <p><strong>Resolution:</strong></p> <p>0.2mm</p> <p class="detail-setting infill"><strong>Infill: </strong> <div><p>20%</p></div> <p><strong>Notes:</strong></p> <p>I printed this with zero solid bottom layers (as shown in the photo). This is because I wanted to dunk the filled mold in water to cool it off before the PLA melted, and the open mesh of the infill allows the cooling water to get right up next to the mold surface.</p> <p>I printed the mold show in the photo at 150% scale, although I also did an earlier version at 100%.</p> <h3>Post-Printing</h3> <p><strong>Using the Mold</strong></p> <p>First, I coated the inside of the mold very thoroughly with oil to act as a release agent. Then I clamped the two halves together in a vice and placed the sacrificial duct on top of the input port. Next, I jammed the tip of the hot melt glue gun into the tapered duct piece and injected glue until I saw it start to ooze out of the outlet ports. Finally, I dunked the whole mold in a tub of water for 15 min to make sure the glue had fully hardened.</p> <p>To retrieve the molded object, I first pried the two mold halves apart with knife blade, and then also used the tip of the blade to pry the object out of the mold. It takes a little patience because you don't want to rip his arms or legs off.</p> </p></p></p> Category: Model Robots
With this file you will be able to print Hot Melt Injection Mold for Maker Faire Robot with your 3D printer. Click on the button and save the file on your computer to work, edit or customize your design. You can also find more 3D designs for printers on Hot Melt Injection Mold for Maker Faire Robot.
