Hop LED Light Bulb Cover
prusaprinters
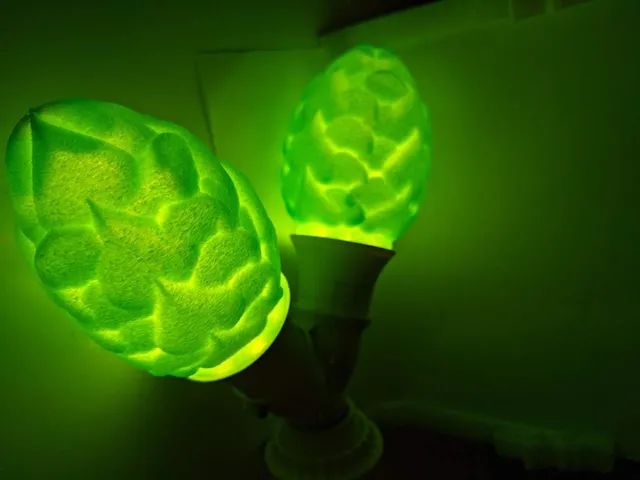
Scaling up the size and thinning down the walls turned the original fairy light cover into a screw base light bulb cover and attaching it to a LED bulb base following the procedure in the video below. I have found using a bench vise much easier than removing the plastic light bulb domes by hand since I am not big clive. Resistor code calculator https://kiloohm.info/smd4-resistor/22R0Shown in translucent green PLA, natural/translucent/clear PLA, and opaque green PETG.By following the method outlined in the video above, the heat dissapated by the LED lamp is significantly reduced, which will increase the life of the lamp as well as reduce the possibility of heat based effects on the PLA cover.This model is sized for a 43mm opening on a Sylvania brand bulb. Scale up or down as needed based on the inside diameter of your E26/E27 bulb base. Super glue the printed hop cover into the bulb base.If you print the first few mm of the model and cancel, you can test fit the part on your bulb base to make sure it is scaled correctly before waiting for the whole print to finish.Don't electrocute yourself or others. It's super bad for you and rather unpleasant.Please post a make!Remixed from https://www.thingiverse.com/thing:595362Print SettingsInfill:0Supports: NoResolution:0.2 Notes: A brim is recommended to ensure adhesion during printing since this is relatively narrow/tallCura/experimental settings/fuzzy skin will add a sort of shimmer to the light in transparent filament. Other factors to contribute to a sparkly surface include printing slightly hotter and slower than usual for a given PLA. Category: Decor
With this file you will be able to print Hop LED Light Bulb Cover with your 3D printer. Click on the button and save the file on your computer to work, edit or customize your design. You can also find more 3D designs for printers on Hop LED Light Bulb Cover.