Honeycomb Tube Rack
prusaprinters
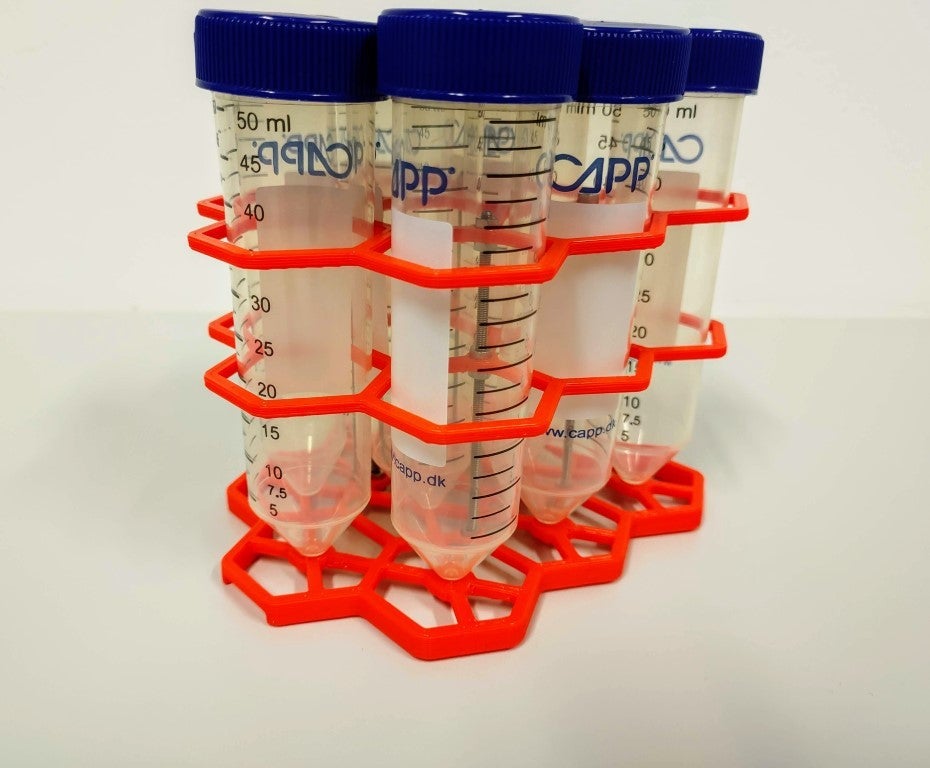
<p>This is a special 50 mL Tube Rack. It is able to store up to 9 tubes at once and it was designed with compact storage in mind. Ideal for storage of samples in small fridges and tight spaces. For this design, my goal was to make it as compact and cheap as I can make it. I started with a basic honeycomb pattern in Fusion 360. I took inspiration from various tube racks in the lab and different designs on Thingiverse. I tried different kinds of feet for the bottom part, but these bigger more rigid ones came out as most reliable. Depending on your region each rack should cost you less than 5 € easily, which is far cheaper than I was able to get one in stores.</p> <p><strong>Advantages over conventional tube racks</strong></p> <p>.) Less material use</p> <p>.) Light weight</p> <p>.) Compact design</p> <p>.) Fast & easy print</p> <p>.) Low cost</p> <p>.) Drainage holes for accidental leaks</p> <p>.) Easy to read tube labels from side and top view</p> <p><strong>Additional features</strong></p> <p>.) Suitable for freezing</p> <p>.) Water resistant</p> <p>.) Chemical resistance (if printed in PETG)</p> <p>.) Colour coding depending on filament</p> <p><strong>Final thoughts</strong></p> <p>I am very happy how this design turned out. We use them in the lab for half a year now and hadn’t had any issues with them, even at cool temperatures. PETG is an ideal material for lab use due to its chemical resistance and no moisture absorption, but it isn’t autoclavable unfortunately. Printing the design in PC (no resistance against acetone), PEI or even PEEK can solve this issue, but these materials aren’t suitable for many printers. Also, I am thinking about how the assembly time can be further improved. Right now, it takes me about 10 to 15 minutes for each tube rack. I thought about 3D printing the rods as well, but I didn’t get good results with this technique. Regarding different 50 mL tube designs, I can tell you that I have tested 50 mL tubes with built in stand and they work as well.</p> <p>Enjoy.</p> <h3>Print instructions</h3><p><strong>Materials needed for one Honeycomb Tube Rack</strong></p> <p>.) 4x 86 mm long M3 threaded steel rods (3 mm diameter)<br/> .) 24x M3 nuts (3 mm inner diameter)<br/> .) Optional: 24 M3 washers</p> <p><strong>Print parameters</strong></p> <p>Each tube rack is made out of 1 bottom part and 2 top parts. I printed them on my modded direct-drive CR-10 with a 0.8 mm volcano nozzle and 0.4 mm layer heights. You can probably use your normal slicer settings, I just wanted to cut down on print time as much as possible. No brim needed, 100% infill.</p> <p><strong>Assembly instructions</strong></p> <p>Cut the M3 threaded rod into 86 mm long pieces. You need 4 for one Tube Rack. File sharp edges. Once all parts are printed and cleaned you can start by inserting a nut on each rod. Insert the bottom plate and secure it with another set of 4 nuts. I used two wrenches to tighten both nuts. Add another set of nuts onto the rods in about 45 mm distance to the bottom part. Add one top part and work your way up until the rack is finished. There should be around 27 mm distance between the two top parts.</p> <p>You can vary the length of the rods and the space between the pieces depending on your needs. Feel free to try out which one works best for you. If you think your 50 mL tubes aren’t sliding in well enough you can try adding a fourth layer. You can also use washers if you experience any loose nuts over time, but in my experience this wasn’t necessary.</p>
With this file you will be able to print Honeycomb Tube Rack with your 3D printer. Click on the button and save the file on your computer to work, edit or customize your design. You can also find more 3D designs for printers on Honeycomb Tube Rack.