Home Control Center using BeagleBone Green Wireless
thingiverse
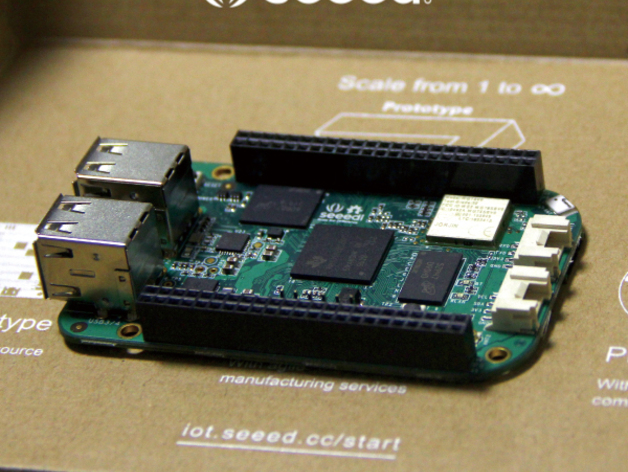
SeeedStudio BeagleBone Green Wireless (SeeedStudio BBG Wireless) is a collaborative effort between BeagleBoard.org and Seeed Studio, combining the strengths of both organizations to create an innovative platform. The BBG Wireless comes equipped with two Grove connectors and support for the mraa library, making it easier than ever to connect to the vast family of Grove sensors. By removing the on-board HDMI port and adding a wireless chip, this board supports WiFi and Bluetooth connectivity. In this project, I utilize a Grove Base Cape for BeagleBone to integrate other Grove modules such as the Grove - Air Quality sensor to monitor indoor air quality and the Grove – Temperature Sensor to sense temperature fluctuations. Additionally, I incorporate a Grove – Relay to control table lamps or other devices remotely. We can view sensor values from the web interface, with the web server running directly on the Beaglebone Green Wireless. Although local access is currently limited to within the network, this setup provides a solid foundation for further development and expansion. To take our project to the next level, we can leverage Fusion PCB (https://www.seeedstudio.com/fusion.html) to create custom BBGW boards using open-source hardware resources. Now that we've set the stage, let's dive into the process of creating this innovative home control center. --- STEP1: HARDWARE WORK In this initial step, we need to fabricate an acrylic box based on the design provided. Fortunately, my colleague Nosk, a skilled industrial designer, has graciously shared the drawings for download (https://github.com/Lee-Kevin/19.HomeControlCenterBBGW/tree/master/Drawings). Next, we'll use laser cutting to precision-cut the board. If you don't have access to a laser cutter at home, consider visiting your local hacker space or utilizing Seeed's Laser Cutting Service. --- STEP2: WIRING I connect a Grove - Relay to GPIO_51, a Grove – Air quality sensor to A2 port, and a Grove – Temperature sensor to A0 port on the Grove Base Cape for Beaglebone Cape. This wiring configuration enables seamless communication between the sensors and the Beaglebone Green Wireless. --- STEP3: CONNECT TO YOUR BEAGLEBONE GREEN WIRELESS First, we need to configure your BBGW connection to the internet using a smartphone. Simply connect to the "BeagleBonexxxx" AP network, and your mobile device will automatically launch the login page. Select the nearby SSID and input the password as shown in the provided picture. Once connected, the BBGW will display its local IP address, allowing us to access the Beaglebone Green Wireless via SSH. This marks an important milestone – our board is now online, and it's time to tackle some software configurations. --- STEP4: SOFTWARE WORK Since the codebase for this project is relatively complex, I'll highlight the key technologies involved. To manage Grove Modules, view sensor values, and control devices remotely using a Grove – Relay, we need to run a web server on Beaglebone Green Wireless. Step1: Install Flask I employ the Flask web framework for this application, utilizing its lightweight design and robust features based on Werkzeug, Jinja 2, and good intentions. To install Flask, execute the following command: pip install flask Step2: Install Flask-SocketIO Flask-SocketIO enables bidirectional communication between clients and servers, allowing real-time updates of sensor data and remote control of devices. Install it using the following command: pip install flask-socketio Step3: Install Gevent For asynchronous services, I select gevent as the framework for this project. Gevent provides long-polling transport support and can be used in conjunction with gevent-websocket for WebSocket functionality. To install gevent, run the following command: pip install gevent Step4: Download the code Now that we've installed the required dependencies, download the code from GitHub using the following command: git clone https://github.com/Lee-Kevin/19.HomeControlCenterBBGW Step5: Run the code Navigate to the project directory 19.HomeControlCenterBBGW/Code and execute the demo code using the following command: python runserver.py --- STEP5: THE RESULT Open your web browser, input the Beaglebone Green Wireless local IP address (8000 as the port), and you'll see the web page as shown in the picture below. This home page displays sensor data and allows remote control of the Grove – Relay. Join our Idea contest here to win a FREE beaglebone wireless for yourself: http://www.seeed.cc/topic_detail.html?id=5559
With this file you will be able to print Home Control Center using BeagleBone Green Wireless with your 3D printer. Click on the button and save the file on your computer to work, edit or customize your design. You can also find more 3D designs for printers on Home Control Center using BeagleBone Green Wireless.