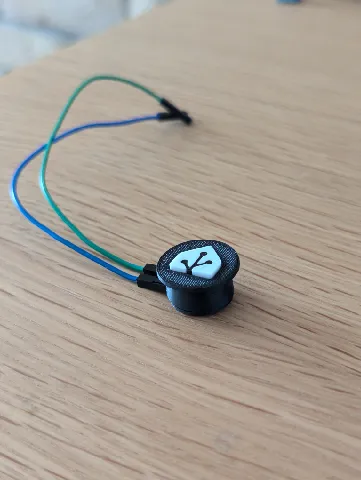
Home Assistant power button
prusaprinters
DescriptionIntroducing a 3D-printed power button, perfect for your home assistant server! This solution came to life when I needed a power switch for my 3D-printed Mini-ITX case, which featured a 16mm hole. Instead of waiting for a lengthy delivery from Aliexpress to have a generic button, I decided to create a unique power button that not only fits perfectly but also adds a personalized touch to my project.Key features:Custom Design: The power button features an embedded home assistant logo, blending functionality with a sleek, aesthetic appeal.Perfect Fit: Designed to fit seamlessly into a 16mm hole, this button ensures a snug and secure installation.Micro Switch Compatibility: The button is designed for use with a 6x6mm height 5mm micro switch, providing reliable and responsive operation.Wiring: Solderless, enclosure was designed to fit dupont wires. Whether you're setting up a new home assistant server or upgrading an existing setup, this power button is a great addition, combining practicality with style. Download the design now and bring a personalized touch to your project! RequirementsMicro push button - 6x6mm, height 5mm. can be a 1pin-pair variant as I bought the 2 pair version in case the first breaks off.Some wires (I used dupont wires for solderless approach).16mm diameter hole. Print settingsPrinted on: Elegoo Neptune 3 ProFilament: PLAResolution: 0.10mm (due to smallish parts/details)Infill: 100% (small parts so not huge difference in used filament, feel free to reduce)Supports: NoPerimeters: 2Ironing: On (I used ironing only for the button_top part to smooth out smallish gaps in HA logo) AssemblyPlug the button_top into the button_base. If needed clean up any stringing or blockage.Insert the combined buttons into the front part.Insert the combined front+buttons part into your case hole.Insert the micro push button into the back partWire the push button with dupont wires or solder wires directly to it. If soldering - obviously before step 4.Snap the assembled back part to the assembled front part from the inside of the case.Wire to power switch pins on the motherboard.In case the buttons part needs to be firmer due to some extra tolerance, add a layer of electrical tape or similar to the back of the button_base part before assembly and cut it to circle shape with scissors - should make it snug and have tactile click.The assembled construction should have a snug fit as is, but if you find it popping out upon a stronger press - add some glue when putting the back part on.
With this file you will be able to print Home Assistant power button with your 3D printer. Click on the button and save the file on your computer to work, edit or customize your design. You can also find more 3D designs for printers on Home Assistant power button.
