Hologram Viewer Lens Shoe 3x3 cm for Tablet or Laptop
thingiverse
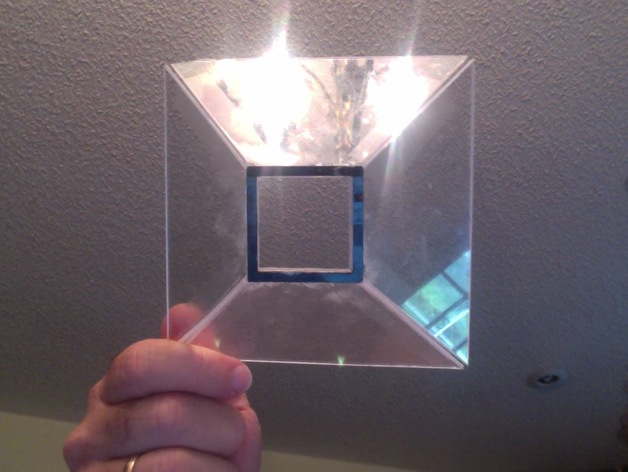
Greetings! This small print serves as a protective casing for hologram kits that can be easily attached to tablets or laptops as demonstrated on YouTube. The smallest opening should measure precisely 3 cm x 3 cm. To assemble the hologram viewer, follow these steps: 1. Take four clear plastic CD case covers and use an exacto knife to carefully cut out a trapezoid from each one. 2. Ensure that the dimensions are accurate: base = 12 cm, height = 7 cm tall, and 3 cm along the top. Next, attach the sloped edges of the trapezoids together using glue or tape. This will create a sturdy base for the hologram viewer. The 3x3cm square hole at the top will fit snugly into this casing, providing added stability for this innovative toy. To see the construction process in action, watch these videos: https://youtu.be/nkXEsmt3I6U and https://youtu.be/HFSmhHxXj6U. Additional tutorial videos can be found here: https://youtu.be/LXHy8JCe0oA. Enjoy your new hologram viewer! Post-Printing How I Designed This Stabilizer Without this protective casing, the four trapezoids would fold and fall flat. However, with this shoe in place and a little glue, much more stability is achieved. **SUPER GLUE USERS - PLEASE ALLOW THE GLUE TO FULLY DRY BEFORE PLACING ON LAPTOP SCREEN***
With this file you will be able to print Hologram Viewer Lens Shoe 3x3 cm for Tablet or Laptop with your 3D printer. Click on the button and save the file on your computer to work, edit or customize your design. You can also find more 3D designs for printers on Hologram Viewer Lens Shoe 3x3 cm for Tablet or Laptop.