Hold Down / Clamps for Desktop Milling Machine / Shapeoko / xCarve
thingiverse
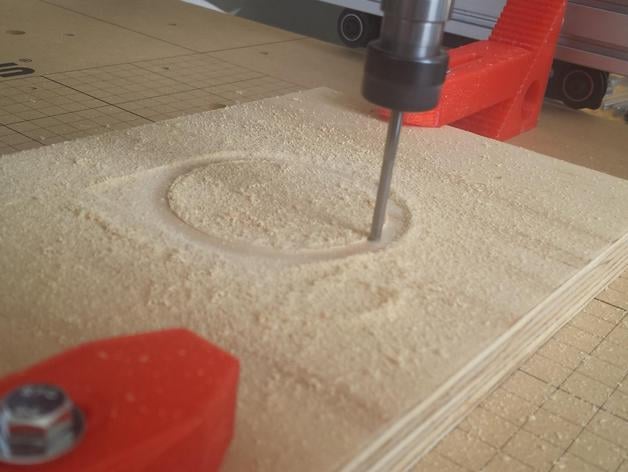
I spent way too much time making another mix of standard Milling Machine hold downs. I wasn't satisfied with their performance or design, and lacking source files for customization really gets under my skin... so, I came up with a set in Inventor 2014. These are set to work with 5mm bolts but you can customize the source files as needed (or scale your STL along the width axis to elongate the 5.5mm opening for the clamp bolt) - if you do, though, you'll have to remember to scale all of the parts correspondingly or the mating surface between the step blocks and hold down bars won't line up anymore. Update: I changed the hold down bar to eliminate the bevel on top. This allows for easier printing (print the bars upside down with teeth facing up) without support or warping during print if printed unsupported. Print Settings: When first printing parts, I used high percentage of infill for strength. I believe my initial prints were done with a 60% infill w/rectilinear fill pattern - it was very strong for clamping and good at resisting cracking or delamination while in use but that's the price for using so much filament on small part. So, after testing lots more prints and each one separately, I'm changing my recommendation for print settings. For now, for being strong yet light and printing fast, higher perimeter count is it - with 10 to 15, you'll get a solid shell for connection points that will remain rugged even after heavy use yet only needs 20% infill and 200 micron layer heights. For Arms I mostly print them at 8-10 perimeters and 6-8 solid layers for top/bottom. With all that said then going with 20% infill is actually more than enough as it's now mass vs strength of the part you need - although be sure to have enough infill so your clamp arm isn't crushed when cranking down on a part if not using a large washer to distribute the load. Print Orientation: For printing orientation, I was most successful with these steps: Steps - Print side way, with teeth facing sideways. For these it's best to print in pairs with the teeth opposite each other and oriented 180 degrees apart forming one rectangle, giving yourself about 4-6mm between them allowing brim for your slicer that will bridge over parts. Clamping: You have to clamp just slightly above part level so that flat of clamping bar is not flat on part. Instead, use transition edge of bevel (it has a very small surface area), it translates the most force possible onto one point and you can create tremendous amounts with minimal effort especially when compared to plastic. As mentioned previously in the article, using this style first teaches beginners that using rigid materials produces incredible amount of pressure - I have noticed tons of force by applying even small force which should give new users a good clue about using correct material and why inclined planes make them effective at their purpose! This may not seem obvious when training someone how to do something for the very first time so we can simply put this idea out there, it does work! The final thing here that matters is you must be sure that corner of clamping bar contacts part (but not more), do not set bars flat on stock because your clamps may never properly grasp due insufficient angle; nor do lower than part because those bars cannot effectively grip and prevent stock movement which we also call “slip”. Set up so it will go like this, place your clamping bolt right above surface. Use bevel for corner that does contact material. Set bars 1-2 steps from material level. Make sure never to use a longer bar unless needed. And you might have seen that sometimes we are forced to use even more force because SO2 has limited clamping spots. We could easily summarize it like this: The main idea of Machining and other materials with Rigidity in mind, meaning to be as rigid and solid in their nature or performance as possible is extremely important, especially in a high-tech manufacturing context
With this file you will be able to print Hold Down / Clamps for Desktop Milling Machine / Shapeoko / xCarve with your 3D printer. Click on the button and save the file on your computer to work, edit or customize your design. You can also find more 3D designs for printers on Hold Down / Clamps for Desktop Milling Machine / Shapeoko / xCarve.
