Hodl Hex Wallet - 0.375 Hex Rod Stamp Jig
prusaprinters
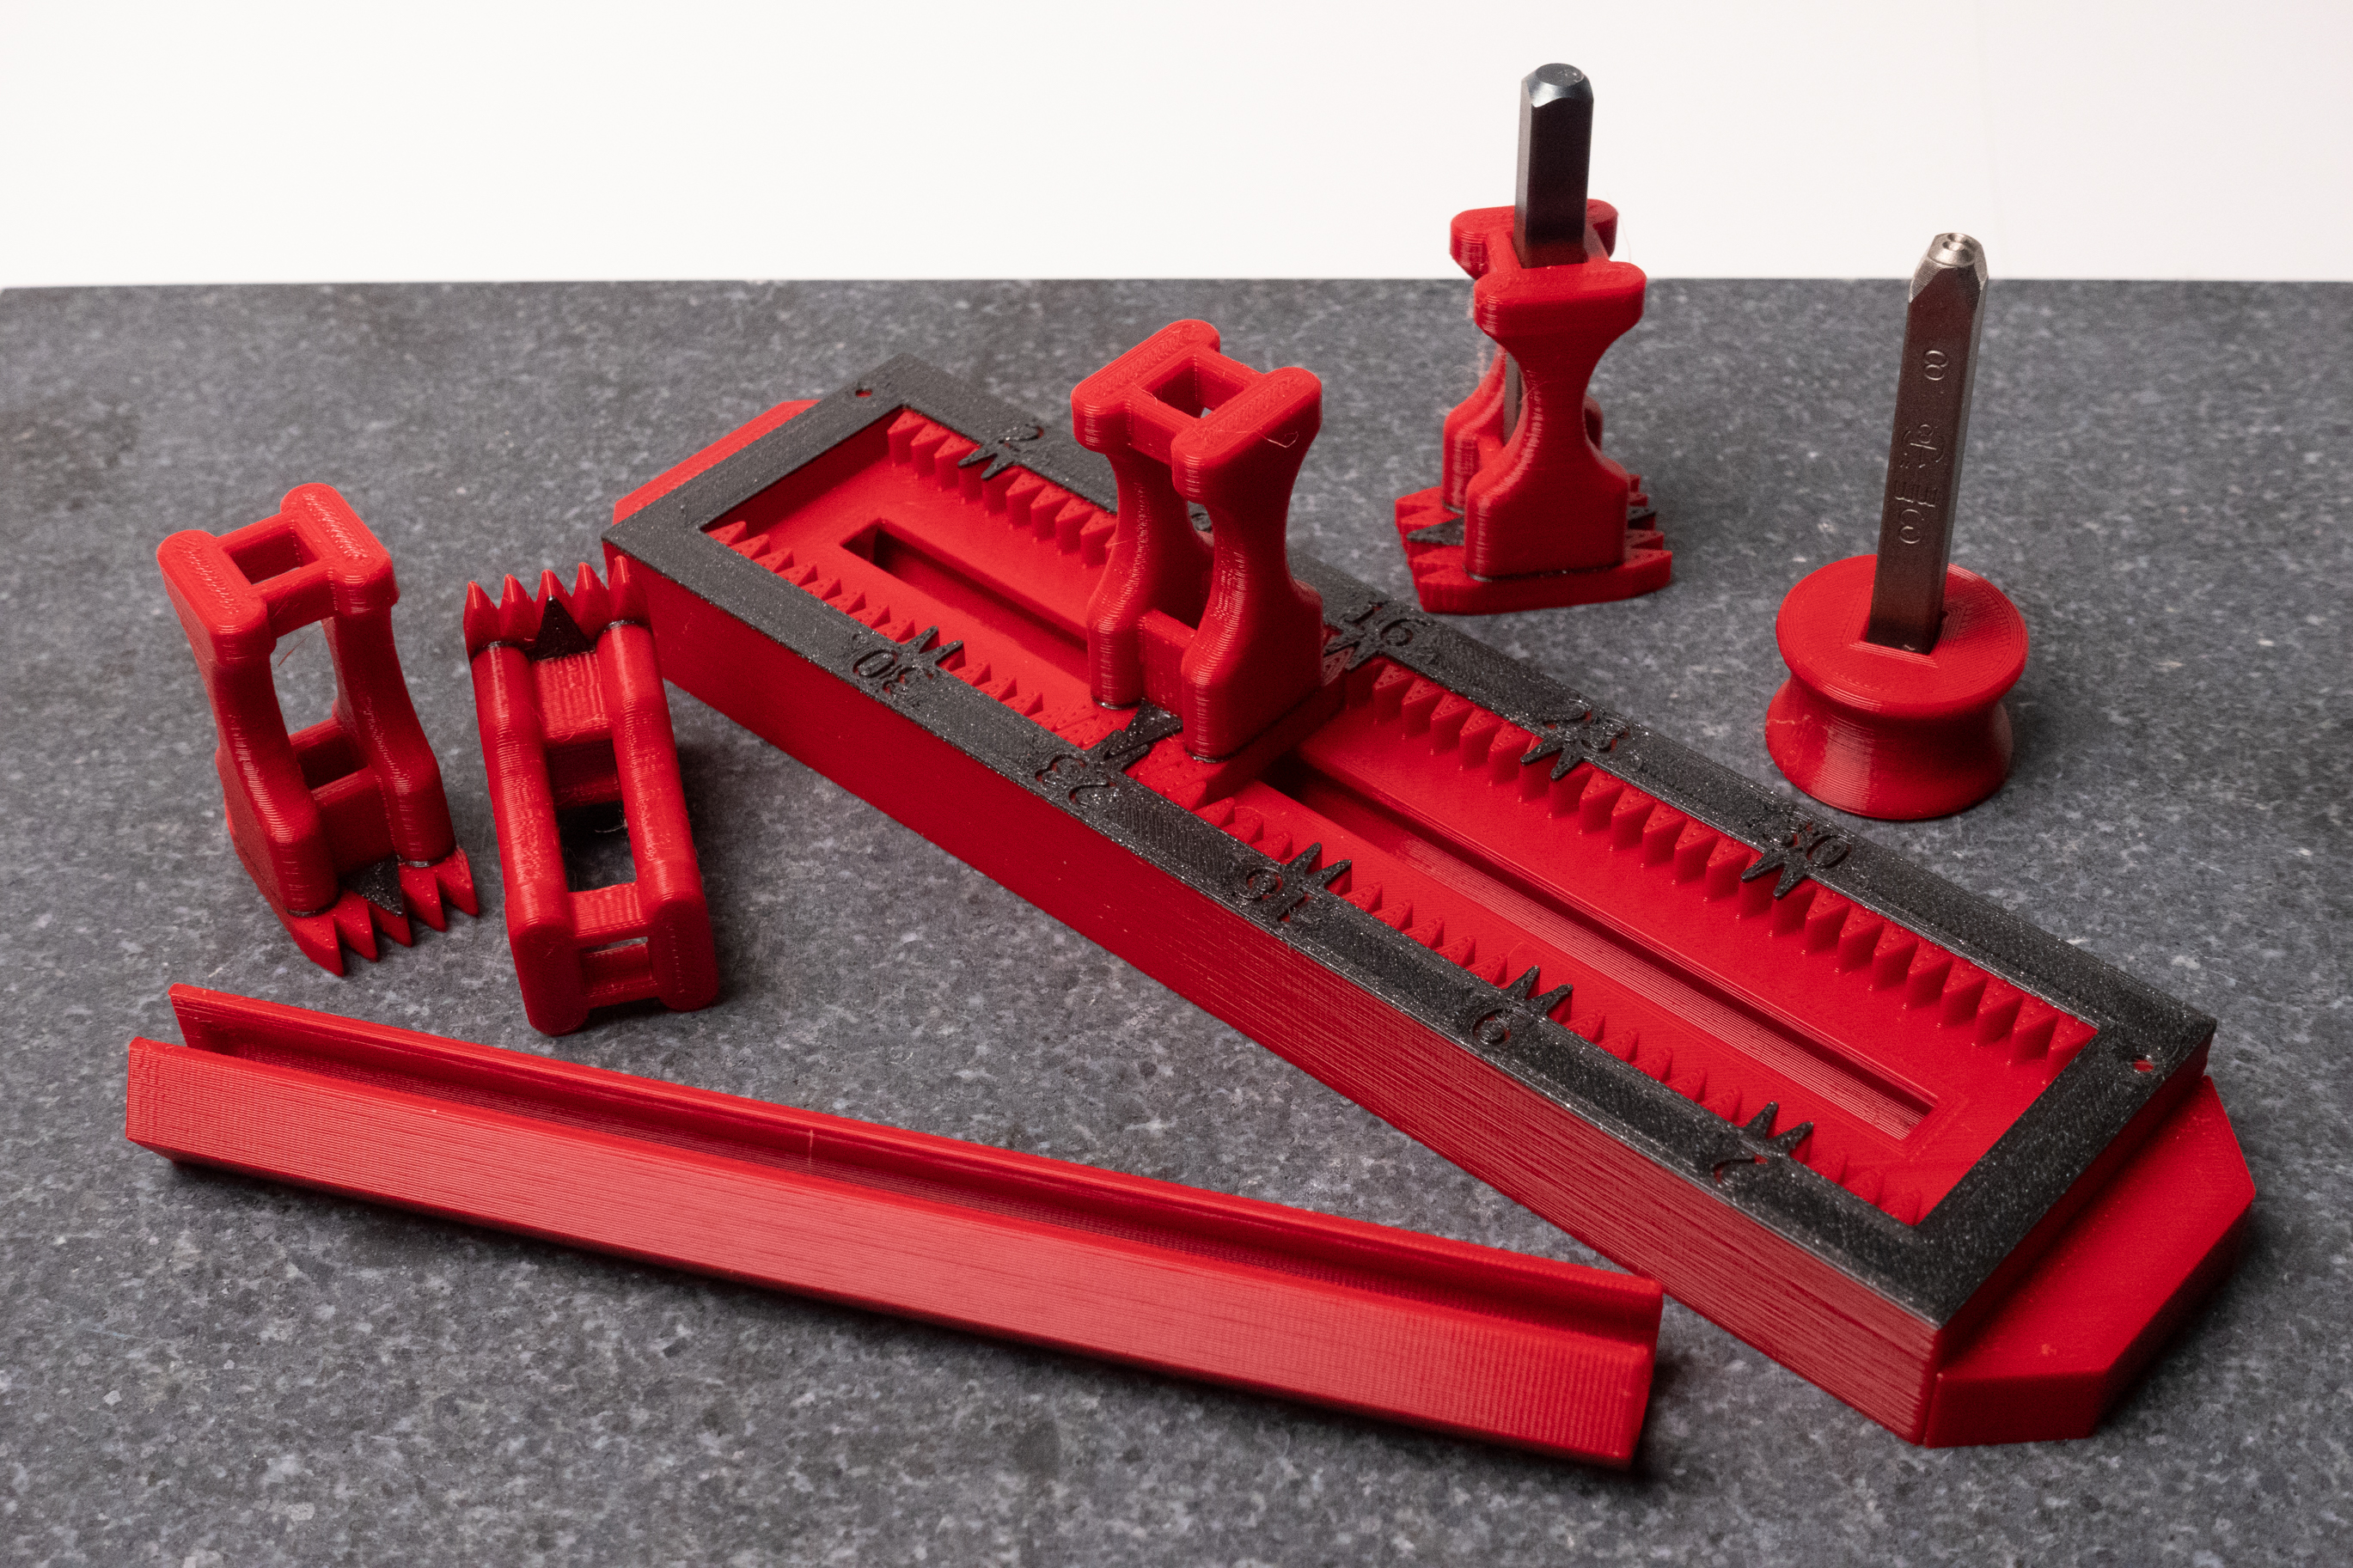
<h3>The Hodl Hex Wallet: A Jig for 0.375" Hex and 3mm stamps</h3><h4>Overview</h4><p>“Not your keys, not your coins” you hear. So, you store your coins offline, or in a hardware wallet like they tell you too. But those hardware wallets come with paper for writing down the recovery passphrase. Paper can burn, smudge, decay, etc. Don't store your backup recovery on paper, store it on metal instead!</p><p>Say, you love the concept of something like the Coldbit Hex, but find the cost high, or function limited. What is to stop you getting some raw 316 Stainless Hex rod, and doing it yourself? Nothing! But, it might look a little messy. :( Its hard to hold the stamps in the right place. (Don't even get me started on trying to use a rotary tool to engrave your recovery phrase!)</p><p>That is where this print comes in! Now you have a jig to hold all your 3mm stamps perfectly for stamping your hex rod! Of course, you can use any old flavor of hex rod, but I do recommend you go for 316 Stainless Steel or Titanium. <i>Leave the 304 Stainless to the newbs, we don't want no corrosion here!</i></p><h4>What you need</h4><ol><li>A length of your favorite hex stock, measuring 0.375" from flat to flat. (e.g., <a href="https://www.onlinemetals.com/en/buy/stainless-steel/0-375-stainless-hex-bar-316-316l-annealed-cold-finish/pid/2179">Online Metals</a>)</li><li>One HexStampJig print.</li><li>Multiple ToolHolder prints. (You will smash at least one, might as well print a few spares.)</li><li>One HexMeasurementTool print for measuring how long the hex rod should be cut.</li><li>One StampSizingTool print.</li><li>One method of cutting hex stock. (Hacksaws, bandsaws, friction wheels, whatever your weapon of choice is, just stay safe and use appropriate PPE!)</li><li>One set of “3mm” stamps. (Note, I use this set because it has the sides marked.</li><li>One Hammer. (Don't skimp, get a heavy one to do the work for you.)</li><li>One method of grinding the stamps. (My angle grinder and a flap wheel make this a short job.)</li><li>A good pair of safety glasses. (Seriously, you only have one set of eyes, please protect them from flying metal and plastic bits!)</li><li>A smooth surface that will survive you pounding on it. (My concrete porch left a rough surface finish, so instead I got a cheap granite surface to pound the stamps/rod against. Whatever you choose, do realize that you will be repeatedly whacking it with a sledgehammer, so make sure its sturdy!</li></ol><h3>Instructions</h3><h4>Preparing the stamps</h4><p>Sadly, all the cheap stamps have a problem, in that they are not ground “truly parallel”, and tend to bulge right around the head of the stamp with the letter. If we made the jig accept these stamps (super loose tolerance), then the letters would be all over the place, and it wouldn't look as nice.</p><p>So first off, we have to grind down the bulges on the stamps. Grind down all the bulges until all the stamps pass through the StampSizingTool print with a tight fit. On the stamps that I bought, the bulges were primarily on two sides. And we are not removing a lot of material, so take it slow until you get a feel for how many seconds to grind and where the bulge is on your stamps.</p><p><i>The StampSizingTool opening is the same size as the ToolHolder openings, so if the stamp is a loose friction pass through the sizing tool it will be a loose friction fit in the ToolHolder.</i></p><h4>Preparing the hex rod</h4><p>Now that we have stamps, we need to cut some hex rod! This upload will need hex rods 133mm long (~5.236"). Using the measurement tool:</p><ol><li>Stick the raw rod in the tool till it bottoms out.</li><li>Mark the rod where the open end of the tool is, this is your cut line!</li><li>Remove the measuring tool, and cut the Hex rod. <i>(Those portable bandsaws make this an easy job!)</i></li><li>After you finish cutting the hex rod, it will usually have a ‘rough’ and unpleasant edge. You will want to remove this rough edge / face before you continue. <i>(Put the hex rod in a drill, and use an angle grinder with a flap wheel to make short work of any burrs on the cut face.)</i></li><li>Once the hex rod is cool (assuming you are using an angle grinder or other friction cut off device), test it again with the measurement tool. You want the hex rod to be roughly flush with the measurement tool. (The combined slop of the 3D printed parts will give you roughly +/- 0.5mm of tolerance on your cut.</li></ol><p>If you buy hex on sites like Online Metals that sell in 12" increments, then each 12" will get you two cut hex rods. </p><figure class="image"><img src="https://media.prusaprinters.org/media/prints/75703/rich_content/3b03681e-ce9c-407f-b690-d5a586c63836/_dsc0547.jpg#%7B%22uuid%22%3A%2254a2f1bb-450a-4b31-ac37-40bb8169ead1%22%2C%22w%22%3A919%2C%22h%22%3A232%7D"/></figure><figure class="image"><img src="https://media.prusaprinters.org/media/prints/75703/rich_content/7365cdac-d8d0-4be3-aac0-8186477984a8/_dsc0548.jpg#%7B%22uuid%22%3A%221dbc733b-4de6-48e5-aaee-31fa239189f5%22%2C%22w%22%3A1368%2C%22h%22%3A912%7D"/></figure><h4>Preparing the Jig</h4><p>The jig has two rotating end-caps that print in place. Right off the print bed, these caps tend to fuse to the main part, and might need a little percussive persuasion to release.</p><ol><li>At the top skinny ends of the Jig, there is a circle on each side. The rotation axis is below that circle.</li><li>Place the jig so that one skinny end is hanging 75mm / ~3" off the edge of a hard surface.</li><li>Gently tap the edge (farthest from the circle) until the rotating end cap opens.</li><li>Close up the first side, and repeat for the other end.</li></ol><figure class="image"><img src="https://media.prusaprinters.org/media/prints/75703/rich_content/1459d22f-6f2d-42a1-83a4-cebbcb6bd3ac/_dsc0552.jpg#%7B%22uuid%22%3A%22962b2027-34cd-44d3-8f91-478f10894e67%22%2C%22w%22%3A522%2C%22h%22%3A488%7D"/></figure><p>One end of the jig has a place for a 4mm spring to go, to help push a slightly small rod to one end for consistency in stamping.</p><figure class="image"><img src="https://media.prusaprinters.org/media/prints/75703/rich_content/e2abcef0-1f7f-4b10-91b2-2d10ae2a36cd/_dsc0555.jpg#%7B%22uuid%22%3A%22cff8a2c7-5482-4aed-b434-57dee2e57290%22%2C%22w%22%3A556%2C%22h%22%3A313%7D"/></figure><h3>Time to stamp!</h3><p>The jig has space for 36 letters across. (Well, really 34 if you put a space on each end. But you don't have to do that.)</p><h4>For Recovery seeds:</h4><p>When you have lots of crypto assets, its best to actually annotate what each recovery seed is. So, split the six surfaces of the hex rod as follows:</p><p>One surface becomes the ‘nameplate’, and can take 34 letters. (leave a blank space at either end for looks!)</p><p>The other five surfaces have room for 5 of the following groups: 2 numbers, 4 letters, and a space. Start by aligning the raised arrow on the tool holder to the raised portion on the Jig, and that is the beginning of the group boundary. </p><p>Because we can store 25 BIP 39 words, we can accommodate even Algorand recovery phrases. (Take that commercial Bitcoin cold wallets!)</p><h4>For passphrases, passwords, etc:</h4><p>You have 34 spaces on each side, go nuts!</p><h3>Print Settings</h3><p>I tend to use 0.2mm layers, cubic infill, four perimeters, and ~1mm top/bottom. A lot of my models are designed for the 2.49mm walls that equate to 6 print lines with a 0.4mm nozzle. </p><p>Both the Tool Holders and the main Jig are setup to have a color transition at Z height. </p><h3>Donations</h3><p>If you found this print helpful, sending me a (crypto equivalent) cup of coffee is appreciated!</p><ul><li>ADA: addr1q9ezu4kjx4kgzlrwtmnd90gjcuhwyx4ely37h0ggzxxzqwtj9etdydtvs97xuhhx627393ewugdtn7fraw7ssyvvyqusu62dce</li><li>ALGO: GYMXWQDLAWVNG77RHRJYUDXG3AY35ZJZRQLNJWEC3X7FDOEFKO2QNGAJP4</li><li>ERGO: 9hX2T5c35nKwWDEF4tsLAzKUbTxBDkrTjPBmgBy8jfgBuLqbksp</li><li>ETH: 0xC41e82AA6317b12B6Af56f5b29dAEE703cfEA3d0</li><li>NANO: nano_1ytz4hxip5xhrezubmbetyyhxcgip1kkwjigbsxro3oiirwntsciw1azc4wo</li><li>RVN: RXVxnNkxXWxyta9kH8oNj6Ya8kbrL4x3LY</li><li>XLM: GCA75WOTEO2ZRQIGL32XWKUTKY5HU45OQ477BKO6LUA7WPID3ZJT3QBX</li><li>ZIL: zil1wvcqgrya4n6fj2ke8vvtnra2fzy2206r9nl27n</li></ul><p> </p>
With this file you will be able to print Hodl Hex Wallet - 0.375 Hex Rod Stamp Jig with your 3D printer. Click on the button and save the file on your computer to work, edit or customize your design. You can also find more 3D designs for printers on Hodl Hex Wallet - 0.375 Hex Rod Stamp Jig.