Hobbes
cults3d
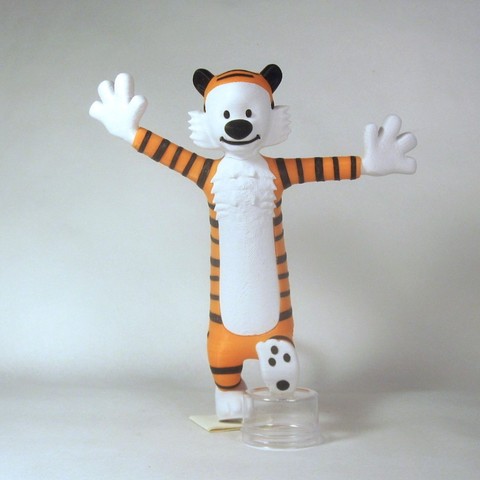
Hobbes, from the iconic comic strip by Bill Watterson. The beloved comic strip Calvin and Hobbes showcases the humorous escapades of Calvin, a precocious six-year-old boy with an insatiable appetite for adventure, and his sardonic stuffed tiger companion, Hobbes. This 3D model is built using individual models of Calvin and Hobbes, so I created three separate Cults3D uploads: For the final build using the individual Calvin and Hobbes models see: https://cults3d.com/en/various/calvin-and-hobbes For the Calvin model see: https://cults3d.com/en/various/calvin For the Hobbes model see: https://cults3d.com/en/various/hobbes (this upload) The fully assembled model stands at an impressive 250mm tall. Note: Hobbes is 240mm tall and designed to fit snugly into the log from the final build. His foot is flat on the bottom, but he cannot stand upright without the log's support. Enjoy this delightful creation! **Print Settings** **Printer:** FlashForge Creator X **Rafts:** Not necessary **Supports:** No supports required **Resolution:** 0.2mm resolution for a smooth finish **Infill:** 10% infill for added stability **Notes:** Minor supports are needed for the following pieces: 1. h_face requires supports only under the lowest portion of hair 2. h_fur requires some very small supports by the collar **Building the Model** **Colors:** * White: + h_face + h_fur + h_left_foot + h_right_foot + h_left_hand + h_right_hand ... * Orange: + h_head + h_tail + h_body_top + h_body_bottom + h_leg_left + h_arm_left ... * Black: + h_ear_right + h_ear_left + h_nose + h_tail_tip + h_mouth + h_toe_1 + h_toe_2 + h_toe_3 + h_toe_4 + h_eyes + h_stripe_1 through h_stripe_32 ... * Any color (hidden connectors): + h_head_bump + h_body_bump **Printing and Assembly Tips** 1. Very minor supports are required for the following pieces: * h_face requires supports only under the lowest portion of hair * h_fur requires some very small supports by the collar 2. The stripes are designed to be a single layer thickness of 0.2mm, or less as long as they print solid on your machine. 3. Be sure to clean any first-layer squish if you have any problem joining parts. The parts should fit nicely when printed cleanly. **Assembly Tips** - "Stripes! There had to be stripes!" I avoided creating this model for quite some time due to the stripes. I finally settled on a design: + The stripes are printed flat, one layer high + The parts that the stripes are glued to contain indents for stripe placement + Most of the stripes are slightly curved to help wrap around the surface. - Important: To make it simpler to glue flat stripes to a round surface, take a moment to curl the stripes like you would with a piece of ribbon. Using a flat edge, pull the stripe along the edge to make it curl. Pay special attention to the very ends and ensure the ends curl. - Test the length of each stripe before gluing, due to printer differences, stripes may need to be trimmed a bit. - Optionally, instead of using the 3D printed stripes, the stripes can be painted on using the indents as a guide. - The diagram below will help in assembling the model and is quite straightforward. - The model is meant to be glued together. I use E6000 glue. It is a nice clear tacky glue allowing for easy part positioning. The longer you let it sit before joining parts, especially for the stripes, the tackier it gets until it fully sets. The Hobbes model fits snugly into the log using the Cults3D links provided in the introduction.
With this file you will be able to print Hobbes with your 3D printer. Click on the button and save the file on your computer to work, edit or customize your design. You can also find more 3D designs for printers on Hobbes.