Hexagonal Nanoleaf - Hexaleaf
prusaprinters
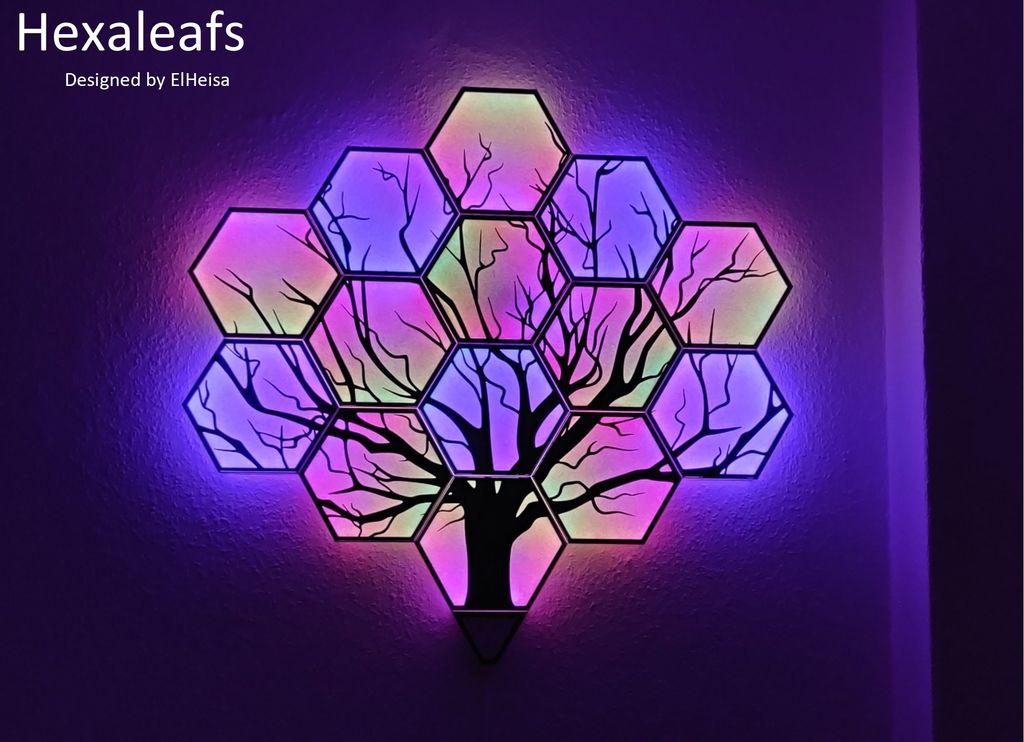
<p><strong>*I designed my own version of the Hexagonal Nanoleafs.</strong>*</p><p>*<strong>For people who look for an easier project without the soldering, please check out my No Soldering Version.</strong>* <a href="https://www.thingiverse.com/thing:5207176">https://thingiverse.com/thing:5207176</a></p><p><i>Why is this version better than others?</i></p><p><strong>+ better light dispersion</strong> The panels are homogenous illuminated <strong>+ cover design</strong> Do you want a clean cover or a little more extra? Let your creativity run free. <strong>+ all kind of panel arrangements</strong> If you want 5 or 50 panels, this design will suit your creativity <strong>+ long time stability</strong> LED Strips are held without adhesives that stops sticking after some time <strong>+ easy connectable</strong> Panels are slotted together without glue or extra pieces <strong>+ No funky wires</strong> wires are easily managed with cable shrouds <strong>+ clean outside</strong> No holes or extra connectors on the outside of your panel arrangement <strong>- plan first, print second</strong> Due to the connectors being different on every piece, you need to plan your arrangement first before you can start printing <strong>- long print time</strong> The panels are intricate and take longer to print than other designs <strong>- Do not scale</strong> The panels are designed with the thickness and spacing of your LED Strip in mind. Scaling will result in your LED Strip not fitting perfectly <strong>- soldering</strong> beginner level soldering skills required</p><p>*<strong>Instructions</strong>* <strong>Step 1: Planning</strong></p><p>I supplied a lot of files enabling all kind of shapes and configurations for your very own Hexaleaf. Plan<strong>how</strong> you want<strong>to arrange</strong> them on the wall. Extravagant irregular shapes are possible!</p><p>Make a<strong>list</strong> of what<strong>number</strong> and<strong>kind</strong> of Hexaleafs you need to print and what kind of LED Strips you want to use.</p><p>I used<strong>WS2812b</strong> LED Strips with 60 LEDs/m.</p><p>Every Hexaleaf takes 60 cm of Light Strip, so 18 or 36 LEDs depending on whether you use<strong>30 or 60 LEDs/m</strong>. Both work fine.</p><p>Depending on whether you use<strong>IP30</strong> (non-waterproof)<strong>or IP65</strong> (waterproof) Strips there are different file versions due to the IP65 Strips being a bit thicker.</p><p>All pieces will be a bit different due to the<strong>connectors</strong> being on<strong>different sides</strong>. This enables clean outside faces without unnecessary connectors and also all kinds of different arrangements. I used the following method to labeling them:</p><p>*<strong>m</strong>* – male connector / connector on the outside (three bottom sides) *<strong>f</strong>* – female connector / connector on the inside (three top sides) *<strong>0</strong>* – no connector / outside face</p><p>If you<strong>draw</strong> out how you want the finished pieces<strong>to be arranged</strong>, it should be easy to make a list of all the pieces you will need. The labels for the pieces I used in my arrangement can be seen in the<strong>Arrangement picture</strong>.</p><p>Each LED draws up to 50 mA at full brightness. My Arrangement has 516 LEDs, therefore I am using an external 20 A Powersupply.</p><p>The WS2812 LED Strips call for<strong>extra power delivery</strong> every 5 m.</p><p>If you plan for large arrangements make sure to route extra power cables. I went a bit overboard and made extra connections about every 1 meter which is probably unnecessary but better be safe than sorry.</p><p>Lastly what kind of<strong>cover</strong> do you want? I designed my own<strong>tree cover</strong> (<a href="https://www.thingiverse.com/thing:5025463">https://www.thingiverse.com/thing:5025463</a>) though I also left a file with<strong>just the rim</strong> if you don’t want anything special. I do recommend designing your own or checking out the<strong>100Hex Project</strong> for a bunch of inspirations (<a href="https://www.thingiverse.com/thing:2477471">https://www.thingiverse.com/thing:2477471</a>).</p><p><strong>Step 2: Printing</strong></p><p>The pieces are all connected by just<strong>slotting them into each other</strong>. To make sure they will fit perfectly I recommend printing two of the<strong>Connector Testpieces</strong>. They should twist perfectly into each other. If you are using CURA, you can adjust the tolerances with the property "Horizontal Expansion" that can be found under "Walls".</p><p>I printed my pieces with a 0,4 mm nozzle at 0,2 mm layer height without any brim or raft. Every piece took about 6 hours to print and weighs about 50 g.</p><p><strong>Mark</strong> every piece to not lose track of already printed pieces and its position.</p><p>I cut out all the<strong>diffuser panels</strong> from<strong>paper</strong>, but you can also use the supplied diffuser file to<strong>print them</strong>.</p><p><strong>Step 3: Assembly</strong></p><p>I<strong>soldered</strong> every LED Strip to some wire with pin connectors so I can finish all soldering before assembly.</p><p>To fit the LED Strips into their position I recommend<strong>bending</strong> the strips every 3 / 6 LEDs (for IP65 Strips I recommend cutting away the insulation at the bends) and then slotting them into position without using their adhesive tape.</p><p><strong>Connect</strong> all the Hexaleaf pieces and route<strong>extra power</strong> cables.</p><p>I glue stripped the Hexaleaf arrangement onto a piece of<strong>cardboard</strong> and made some holes in the cardboard to hang it on the wall. It should be fine without the cardboard, but you also eliminate some light bleed on the wall.</p><p><strong>Step 4: Programming</strong></p><p>I used a<strong>ESP8266</strong> (WEMOS D1 Mini) to control the LEDs.</p><p>Using the<strong>WLED Project</strong> you have access to an easy control interface with<strong>numerous presets</strong> and a very well documented help guide.</p><p>This allows you to control your Hexaleafs with an<strong>App</strong> or a<strong>website</strong> over<strong>WiFi</strong>. Using the start-up guide you can program the ESP8266 with a browser-based interface <a href="https://install.wled.me/">https://install.wled.me/</a> and do everything else using the App.</p><p><a href="https://kno.wled.ge/basics/getting-started/">https://kno.wled.ge/basics/getting-started/</a></p><p>The App allows you to create<strong>segments</strong> to group all LEDs in a Hexaleaf together so that you can color each one individually.</p><p>*<strong>Hope you like my design. I would love to see your creations!</strong>*</p><h3>Print Settings</h3><p><strong>Printer Brand:</strong></p><p>Creality</p><p><strong>Printer:</strong></p><p>Ender 5</p><p><strong>Rafts:</strong></p><p>No</p><p><strong>Supports:</strong></p><p>Yes</p><p><strong>Resolution:</strong></p><p>0,2</p><p><strong>Infill:</strong></p><p>10%</p><p><strong>Filament:</strong> GIANTARM PLA</p><p>Black</p><p><strong>Notes:</strong></p><p>Print without Brim or Raft.</p><p>Print time ~ 6 hours</p><p> </p><figure class="media"><oembed url="https://youtu.be/_d2WedCOt9g"></oembed></figure><p> </p><p>Category: Art</p>
With this file you will be able to print Hexagonal Nanoleaf - Hexaleaf with your 3D printer. Click on the button and save the file on your computer to work, edit or customize your design. You can also find more 3D designs for printers on Hexagonal Nanoleaf - Hexaleaf.