Hex Tool Handles
prusaprinters
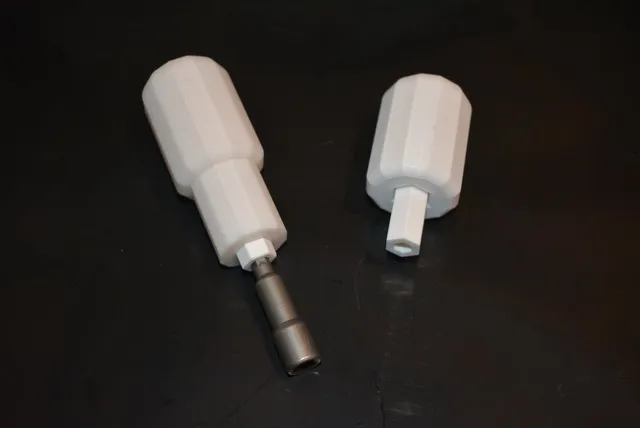
So I needed a method of holding a longshanked hex nut driver in a stub handle, to be able to get under the printhead of my original Prusa i3 MK3 and be able to remove & change the nozzle on the hotend - without having to go out and buy a (costly!) dedicated tool for the job. Rather than print the whole handle with a high-density infill (with asssociated extra filament cost), the best alternative was to produce a couple of different-length handles with interchangeable bit holders, which themselves then contain the relevant toolbit(s). The bit holders themselves are of course printed at 60-80% or more infill, but only cost a fraction of what it would otherwise mean if the entire handle was printed at high density. This idea means that the same handle can also be used with other toolbits, the same concept being used in most toolkits where a single handle with mulitple, interchangeable bit inserts are used. Check out https://www.thingiverse.com/thing:3605461 for a subsequent version of a handle which also uses the same core-shaft method and also enables interchangeability of toolbits. (This handle is however smoother and longer, being intended for a slightly different purpose.) The handles are 12-sided extrusions of about 35mm diameter, the stub being 50mm long and the longer one 80mm. The 0.1mm clearance between handle and holder means a smooth insertion and removal of the bit holder. The number of polygon sides make it comfortable enough but without losing grip and their hand ends being rounded for ergonomics' sake. All that is required is a few toolbit holders into which the relevant toolbits are permanently fixed, these holders then being inserted into their premade handles... Print Settings Printer Brand: Prusa Printer: i3 MK3Rafts: Doesn't Matter Supports: Doesn't MatterResolution: 0.15mm Quality Infill: 25% for handles, 60-80% or more for toolbit holder inserts Filament: Generic PLA Colour to suit toolbox! Notes: Since the toolbit holder inserts are what do most of the work in gripping the toolbits, they need to be high density. As PLA does have a slight tendency to shrink when cooling (not as much as ABS though!), the 0.1mm clearance between handle and toolbit holder insert makes for a neat and snug fit. This means it is best to insert the toolbit into its interchangeable holder before the PLA has cooled down, i.e. as soon as possible after its printing is completed, the PLA also being a little more pliable at that point. Use brims for all elements due to their height-to-bed area ratio - you don't want them breaking off mid-print or at 90% completion - the taller they get the less leverage is required to dislodge them from the heat-bed! Post-Printing Post printing - insert the toolbits into their interchangeable inserts ASAP after printing! Remove the brims and smooth off the rounded edges. Category: Hand Tools
With this file you will be able to print Hex Tool Handles with your 3D printer. Click on the button and save the file on your computer to work, edit or customize your design. You can also find more 3D designs for printers on Hex Tool Handles.