Hero Me Gen6 Dual 4020 - 5015 - 5020 Radial Duct for CR6 SE
prusaprinters
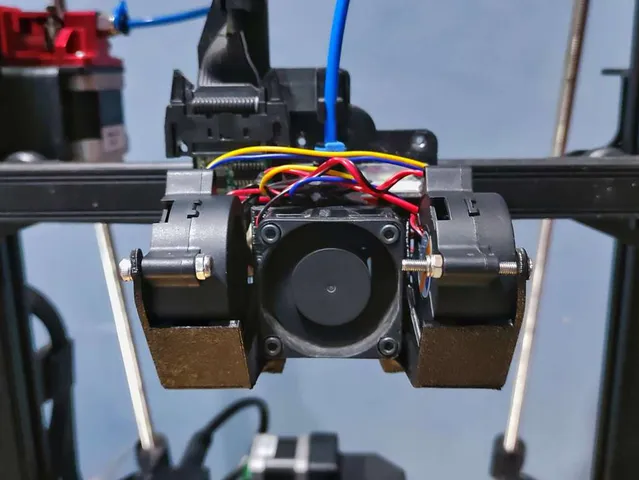
Not mantained anymoreSwitch to this model instead, which I made in CAD myself and it is easier to mantain and create newer versions (and you can also do it yourself because the step files are provided)https://www.printables.com/model/609150-persano-duct-for-the-cr6-se-4020-5015-and-5020-blo/filesAdded stronger 5020 and 4020 VersionsAdded V3 of the 5020 duct and V6 of the 4020 duct. They are stronger because I added a part I removed initially. This part prevent flexing and violent vibrations (experienced them when I was testing input shaping), so the duct is now less prone to break by handling it bad and won't vibrate that much.Added new 5020, 5015 and 4020 VersionsStronger fan mount for the axial fan and moved the duct 1 mm up for better airflow.Added 5020 and 5015 VersionI dont have any 5015 fan to test that version. Tested the 5020 version, is tight and the cable cover wont work. But it might be useful for some of you.UPDATED TO V4Now I am only making one STL. I figured out how to make this easier and quicker so I can fine tune more easily (still modifying a STL)The air is more centered in this version, for having proper cooling at the front. And the holes were fixed, reusing the stock format for making this easier to modifyThe mesh is now perfect and if I have any problem during my modifications, I have a method for fixing it and deliver to you a proper file.UPDATED TO V3I reduced the bottom of the duct by 0.6 mm, just enough. I was having problems after reprinting the part that goes to the hotend for the 4020 axial fan. Now the tips wont touch the bed or the print and the flow is the same as the V2, that is why i am replacing it with this newer version.I also repaired the part with the hole orientation fixed, because it had holes at the sides (bad mesh)! You should use that version, it fits perfectly.UPDATED TO V2Now the tips of the ducts are a bit lower and increased the clearance between the board and the duct, helping the airflow to reach the part that is being printed and avoiding problems when installing this ductAlso made the part where you hold the fan a bit thinner, but stronger to the sides.Added the version with the hole orientation changed, now it fits right!After A LOT of work, i managed to adapt the current gen duct for our printer!And it works sooooo good, i really needed this and i am happy with the resultI used the HMG6-long-dual-4020-30degrees for more space, because the straight one crash with the strain gauge.One important thing, it is probable that you would need some heat for the upper part that holds the blower. I didnt touch that part, but if i didnt heat that after printing i could not adjust the 4020 blowers in the right position, so you should check that!Important: I am using this 4020 axial fan mounting https://www.thingiverse.com/thing:5233463The version i am uploading has a bit more space than the one i printed first, so you wont smash your cable like i did. I will reprint in PETG, but PLA is fine.Used the same settings from the hero me fan duct: 50% infill, support only touching buildplate and it worked fine.If you can do a better job, remix it and i will print yours!
With this file you will be able to print Hero Me Gen6 Dual 4020 - 5015 - 5020 Radial Duct for CR6 SE with your 3D printer. Click on the button and save the file on your computer to work, edit or customize your design. You can also find more 3D designs for printers on Hero Me Gen6 Dual 4020 - 5015 - 5020 Radial Duct for CR6 SE.