Hemera + Volcano + Ender 3 X Carriage Mounting Set (with various mounts)
prusaprinters
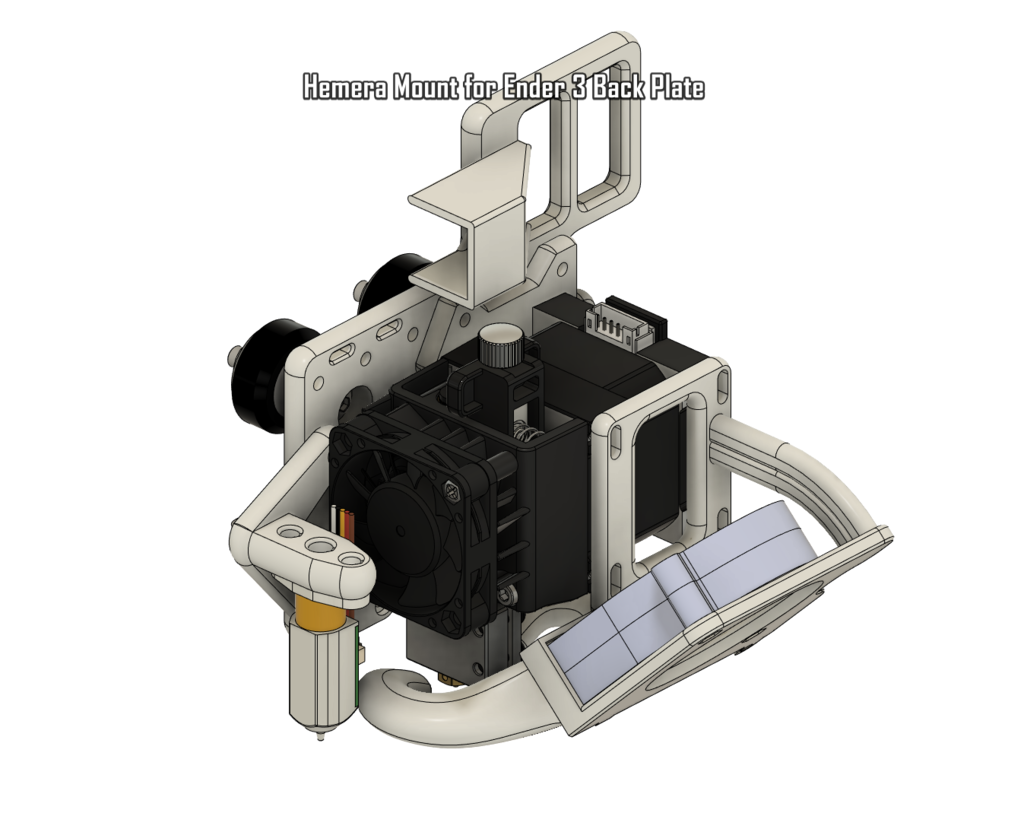
<p>This is a Hemera upgrade set of parts for an ender 3 X carriage with a cable chain mount.</p><p>It is designed around my Anycubic Chiron where the X Carriage was not made correctly and therefore could not be tightened onto the extrusion. This lead me to replace it with a generic Ender 3 X Carriage bought from Aliexpress Mellow (though there are many others).</p><p>I have not tested this on an ender 3, and so cannot guarantee that it will not lose some build plate space, however, the dimensional differences from the original nozzles placement and the new nozzle placement are pictured.</p><p>Cloned From Thingyverse</p><h3>Features</h3><ul><li>Dual sided cooling with dual duct Single 5015 fan duct (with adjustable height) (I've printed up to 65 degrees without issue at 100mms in pla)</li><li>BL Touch mount only 43 mm away from the nozzle (Fixed mount)</li><li>Nozzle Cam mount for Generic 7mm endoscope cameras</li><li>ADXL345 accelerometer mount for resonance measuring in klipper</li><li>Cable Chain Mount and Restriction piece with holes 7mm apart for stock anycubic chiron chain</li></ul><p>Secure Hemera mount with 4 bolts minimum holding each part in place. Designed with E3D Bolt length guidance in mind</p><h3>Printed Parts</h3><p>Nozzle Camera Mount</p><pre><code class="language-plaintext">+ Fits 7mm standard cheapo nozzle camera with measured dimensions of 7.32 mm Diameter and 38.2 mm Length + Secures camera non-destructively with 3 zip-ties + Within focus range of most of these cameras at 40mm away from the nozzle tip + Minimal camera blockage from duct + 4mm higher than nozzle + Built in cable relief + Requires supports (Though you can make overhangs printable in some slicers if you really really don't like supports) </code></pre><ul><li>Part cooling fan</li></ul><pre><code class="language-plaintext">+ dual sided ducts + single 5015 + Allows for high quality overhangs tested up to 65 degrees on my printer with a 0.6 nozzle and 0.7 line widths + Adjustable with slots + Requires some supports, but not excessively so. </code></pre><ul><li>Cable chain support</li></ul><pre><code class="language-plaintext">+ Stops cable chain from knocking into reverse bowden tube or filament + Simple part requiring no supports with a small bridge </code></pre><p>Backplate and Hemera plate</p><ul><li>Sturdy (Uses 4 bolts to hold the Hemera to the Hemera plate, 4 bolts to hold the Hemera plate to the carriage plate and 4 bolts to hold the carriage plate to the X carriage<ul><li>Created with E3D Bolt length advisory notice in mind as to not cause cracking of t-nut slots.<strong>DO NOT</strong> use longer bolts than recommended when attaching anything to the Hemera. This is E3Ds recommendation, and it is mine as well.</li><li>Expandability mounting holes around plate including spot on side for adxl345 accelerometer mounts for klipper</li></ul></li></ul><p>1 x 5015 Fan of the correct voltage for your printer (For my Chiron this was 24v)</p><ul><li>2 x M3 6mm Cap head bolts</li><li><a href="https://www.aliexpress.com/item/4001269311889.html?">12 to 14 x M3 8mm Cap head bolts (14 only if needed for ADXL345 Accelerometer)</a> (This link should contain all the nuts and bolts you need, but not the washers or heat set inserts)</li><li>8 x M3 12mm Cap head bolts</li><li>4 x M3 20mm Cap head bolts</li><li>18 to 20 x M3 nuts with a flat side to flat side width of 5.4 and height of 2.4 (20 only if not using heat set inserts for BLTouch)</li><li><a href="https://www.aliexpress.com/item/4001118619071.html?spm=a2g0s.9042311.0.0.27424c4dqMuw7D">4 x M3 0.8mm washers</a></li><li><a href="https://www.aliexpress.com/item/1005002526998853.html?">2 x M3 4.6mm D, 4.5mm L Heatset inserts</a></li></ul><p>5 x small zip ties (no wider than ~2.5mm and no thicker than 2mm)</p><ul><li>You probably have some laying around</li></ul><p>1 x ANTCLABS BLTouch 3.1</p><ul><li>The BLTouch is rigidly mounted so its specifically meant for this version of the BLTouch but I believe that is the latest, and matches previous ones as well, so you should check that you have the correct version or that its at a decent height regarding the nozzle and builtplate.</li></ul><p>1 x Generic USB 7mm endoscope camera with appropriately lengthy cable. You want one with a resistive spinning slider for the light so that it does not reset every time you reboot your pi. Notes</p><ul><li>You absolutely are not stuck buying from those links. Those are just there to guide you on what you need. You can buy these parts from just about anywhere, like <a href="https://www.amazon.com?linkCode=ll2&tag=thingiverse09-20&linkId=e4759bff1fa9a55a0f897d801ce2d765&language=en_US&ref_=as_li_ss_tl">Amazon</a> or even some local print shops.</li></ul><p>For the bolts using washers, you can likely just use 10mm bolts in their place. I just didn't have 10mm bolts at the time. Double check though if you aren't using washers, because I obviously did not test that with mine.</p><h3>Printing Instructions</h3><p>Follow the images showing part orientations.</p><ul><li>The Carriage Side Adapter Plate does not require any supports</li><li>The Extruder Side Adapter Plate does not require any supports</li><li>The Cable Chain Restriction does not require any supports</li><li>The Fan Duct requires supports, is to be printed fan opening side down, and is to use tree supports and the touching build plate option. No supports are to be used within the curvature of the ducting. It should print well utilizing bridging.</li></ul><p>The Nozzle Cam Mount requires supports, though you may be able to use a slicer feature to make overhangs printable if you absolutely positively hate supports. Pro tip: reduce line width (to about 2/3rds normal) and support interface density (to about 50% for instance) to have easy to remove supports without needing to resort to increasing distance.</p><h3>Assembly Instructions</h3><p>Hemera Mounting Instructions</p><ul><li>Press nuts into appropriate slots in backplate</li></ul><pre><code class="language-plaintext">+ You can use a bolt to pull them in. a clamp, any hard surface, or an arbor press. + They should be tight enough that they don't fall out, but you can also just glue them in place with anything that doesn't gum up the threads like a little tiny bit of super glue on the outside. </code></pre><ul><li>Install heat set inserts into the BLTouch mount (Skip if using nuts)</li><li>Install the BLTouch Mount using a 8mm M3 bolt for the top hole (length is important here such that it does not press against the x carriage) and 12mm M3 bolt for the bottom 2 holes.</li><li>Install the BLTouch using 2 M3 bolts of any length that works but I did put in 2 M3 12mm bolts in the bom for this which are slightly long as I did not have any 10mm Bolts left. Either should work.</li><li>Install Extruder Side Adapter Plate to Hemera with all 4 t-slot nuts in the rear using<strong>4 x 8mm M3 Cap head bolts</strong>.</li></ul><pre><code class="language-plaintext">+ [**DO NOT USE LONGER OR SHORTER BOLTS. DO NOT OVERTIGHTEN.** Follow E3Ds recommendation here. Longer bolts are likely to crack your Hemera. All plates attached to the Hemera in my design are 5mm or 5.2mm. This is within E3D Guidance for bolt length for the application. Read this link for more information, and heed this warning.](https://e3d-online.zendesk.com/hc/en-us/articles/360014202318-Hemera-Bracket-Design-Guide) </code></pre><ul><li>Install the Carriage Side Adapter Plate to the X Carriage using 2 x M3 6mm bolts for the protruding parallel threads (usually used to secure the stock bowden cool end)</li><li>Further secure the Carriage Side Adapter Plate to the X Carriage using 2 x M3 8mm bolts for the diagonal pattern threads on the X Carriage usually used for holding on the stock cool end encasement</li><li>Install the Extruder Side Adapter Plate to the Carriage Side Adapter Plate using 4 x M3 12mm bolts<strong>with</strong> 4 x M3 0.8mm height washers</li></ul><pre><code class="language-plaintext">+ 10mm bolts may work here, but I did not have them on hand to check </code></pre><h3>Fan Duct Instructions</h3><ul><li>Press nuts into appropriate slots in fan mount</li></ul><pre><code class="language-plaintext">+ You can use a bolt to pull them in. a clamp, any hard surface, or an arbor press. + They should be tight enough that they don't fall out, but you can also just glue them in place with anything that doesn't gum up the threads like a little tiny bit of super glue on the outside. </code></pre><ul><li>If you would like to, now is the time to feed your hot end cabling through the hole in the back of the fan mount. This is absolutely not mandatory. I just found it a good way to route the thick heater cables. Make sure you aren't squishing the cables and they are feeding in the space allowed by the fillets on the stepper motor.</li><li>Attach the fan mount loosely to the Hemera with all 4 t-slot nuts using<strong>4 x M3 8mm bolts</strong></li></ul><pre><code class="language-plaintext">+ [**DO NOT USE LONGER OR SHORTER BOLTS. DO NOT OVERTIGHTEN.** Follow E3Ds recommendation here. Longer bolts are likely to crack your Hemera. All plates attached to the Hemera in my design are 5mm or 5.2mm. This is within E3D Guidance for bolt length for the application. Read this link for more information, and heed this warning.](https://e3d-online.zendesk.com/hc/en-us/articles/360014202318-Hemera-Bracket-Design-Guide) </code></pre><ul><li>Ensure that the ducts are at a good height and secure the fan duct by tightening the screws reasonably</li><li>Insert the fan into the duct with the opening facing away from the Hemera</li><li>Secure the fan in place using the pressed in nuts and 2 x M3 20mm bolts Nozzle Camera Instructions</li><li>Have a live feed of your nozzle camera handy for best mounting</li><li>Align your camera correctly (so that up is up and level)</li><li>Zip tie your camera in place in all 3 zip tie locations and ensure it is still level</li><li>Use 2 x M3 20mm bolts to secure the Nozzle Cam mount in place.</li></ul><pre><code class="language-plaintext">+ Note: I personally use a retracting keychain glued to a basement support beam to hold the cable up separate to the rest of my cable look due to its size. It may or may not fit in your cable room, so I am mentioning this other option. </code></pre><h3>FAQ</h3><ul><li>Can you make a variant for the V6</li></ul><blockquote><p>Short answer: No.</p><p>Long Answer: I looked into it briefly but its too much work to rework the design for something I'm not using. Fusion dependencies and what not. Id basically be redesigning the duct part (Which would take a lot of time and I wouldn't feel comfortable unless I tested it myself, which would also take time) or poorly enlarging the slots, and I don't think that would look very good.</p><p> </p><ul><li>Does this have a place for a homing switch/endstop on the X axis?</li></ul><p>No. I planned to use sensorless homing and didn't need it, so I didn't add it.</p><p> </p><h3>Misc</h3></blockquote><ul><li><a href="https://grabcad.com/library/e3d-hermes-hemera-v6-volcano-1">If you are wondering where the beautiful Hemera model in the pictures came from, here is a link</a></li></ul><h3>Print Settings</h3><p><strong>Printer Brand:</strong></p><p>Anycubic</p><p><strong>Printer:</strong></p><p>Large Size Chiron</p><p><strong>Rafts:</strong></p><p>No</p><p><strong>Supports:</strong></p><p>Yes</p><p><strong>Resolution:</strong></p><p>0.2mm Layer Height, 0.4mm Nozzle (I used a 0.6 nozzle)</p><p><strong>Infill:</strong></p><p>15% (whatever you usually use is probably fine)</p><p><strong>Filament:</strong> 3D Printing Canada PLA (Though PETG or other temperature resistant materials are probably better) Transperant<br/><strong>Notes:</strong></p><p>Print whatever you feel is sturdy. I went 5 walls, and 6 top bottom layers.</p><p>I actually used a CR6 to print most of the parts, but did print some of them on the anycubic Chiron its for. The Chiron stock is probably not worth your time, but it's my sunk cost fallacy fixer upper.</p><p>The modified Chiron now has:</p><ul><li>Completely new wiring ditching their annoying proprietary-esque cabling</li><li>An SKR2</li><li>Sensorless homing</li><li>A Hemera</li><li>Plated Copper Volcano Hot Block</li><li>40W Heater</li><li>0.6mm Nozzle X Nozzle</li><li>Nozzle Cam</li><li>Raspberry Pi Camera that moves with Z</li><li>Smart Filament runout sensor</li></ul><p>Klipper with Input shaper using a ADXL345 Accelerometer and Seeeduino Xiao to control it. Thus far I can print at 1000mm/s/s Acceleration at 100mm/s regularly</p><h3>How I Designed This</h3><p>Category: 3D Printer Parts</p>
With this file you will be able to print Hemera + Volcano + Ender 3 X Carriage Mounting Set (with various mounts) with your 3D printer. Click on the button and save the file on your computer to work, edit or customize your design. You can also find more 3D designs for printers on Hemera + Volcano + Ender 3 X Carriage Mounting Set (with various mounts).