Hattori Hanzo knife holder
prusaprinters
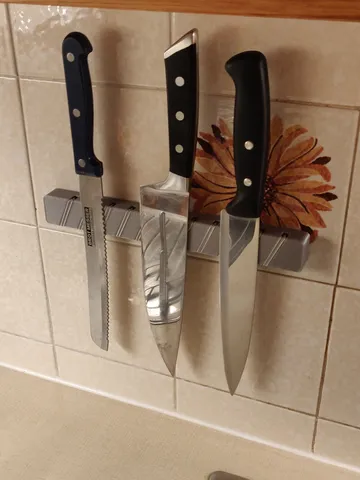
If you remember this scene:Well, that's the best I could do after about 15 minutes:Materials and Assembly The Hattori Hanzo™ knife bar is actually super-simple to make. Fits on most print beds printed diagonally without supports and can hold comfortably 5 knifes.Requires:12 magnetic discs of 10mm in diameter (any depth up to 18mm). I have used 12 10x5mm N42 neodymium magnets (source). Don't go overkill with the magnet strength.11 small (15mm) silicone rubber bands for grip (source)Soft adhesive for fixing the magnets (UHU universal gel glue works perfectly)Strong adhesive to fix on the wall/surface (I used silicone on mine)Pre-print checks:You can potentially use this attachment without fixing the magnets in the holes and also without the silicone rubber bands, but you need to test the combination on your knifes first.You can scale the model along Z to give it more depth if desired (but ensure you have a good way to fix it to the wall!). I've found 20mm (the current depth) to be adequate to grip all my knifes without taking too much space.I do recommend fixing the magnets inside the support, and I suggest a soft glue to do so. UHU universal gel glue stays relatively soft when hardened, which is exactly what we need here. There's no risk of the magnets falling off, but there can be a big shock when the knife lands on the surface. If the magnets are not properly fixed they can easily crack with repeated shocks.Depending on the strength of your magnets, a support without the extra grip provided by the silicone strips can still be sufficient. Test this by printing a slice of the support with 2 magnets and testing it in isolation. I greatly recommend against increasing strength and instead to add the silicone rubber strips (or some other grippy material).When tensioned, the silicone rubber bands are expected to have a depth of ~0.3mm, riding above the surface only by 0.1mm. Adjust your live Z beforehand to ensure this outcome.Assembly instructions:Print preferably using a textured sheet to improve the surface grip. Adjust your live Z appropriately so that the rubber bands are riding outside the slots for 0.05-0.1mm only.Alternate the polarity of the magnets between holes (when inserted into the holes, no magnet should show tendency to pop out).Layout the magnets on your table before proceeding to the next step.Place a drop of UHU glue in each recess, then place the magnets.Put a knife along the front face to keep the magnets pressed against the glue for about 6 hours until the glue is fully set.Wrap the small silicone rubber bands into the appropriate slots (these can be added/replaced later, but doing so from the wall will not be a fun experience).Ensure each rubber band is not twisted and rides nicely straight into it's own slot.Fix to a surface using the appropriate adhesive. You don't want this to fall off.Usage experience and recommendationsDon't do what I'm doing: It would be wise to place the knifes pointing up if you don't have space constraints. When doing so, place the bar just below the shoulder level, so that the handle is at a comfortable height. Any lower becomes cumbersome to use in this orientation.When testing some prototypes, I originally tried to increase the magnetic strength and also add a second horizontal bar (just like the movie) to hold heavier knifes without slipping. You can absolutely do that (see this for an example), but I've found it to be extremely uncomfortable to use due to the strength required to pull the knifes off the bar. I strongly recommend to keep the magnetic strength to a minimum and increase the surface grip instead.Do not use cheap elastic bands. Use proper high-quality silicone strips: this will last a lifetime. With the linked part and recommended settings the blade won't be able to cut the silicone even if placed directly against the cutting edge. There's perfect grip even with a wet blade. They can easily be replaced if they get broken, which is the main reason I decided to use replaceable silicone strips instead of gluing some other rubber to the surface.This brings me to the best way to place/remove the knives on the bar, which is to lean the back of knife on the support first, then twist flat on the side:Reverse the order when pulling out the knife. Again: these magnets can have a very strong pulling force, you don't want to pry hard on the handle and have the knife jolt off with the cutting edge towards your face. When twisting and placing the knife on the back edge the force is drastically reduced, but it can still be annoying so, again: don't go overboard with the magnets. Test it first.Remix challenge!It feels like printables is still not gamified enough. I mean, where's the TikTok-level remix challenge culture?! Let's fix this ;))I'm proposing the following:Challenge: Most overkill magnetic knife holderHow: this holder requires glue and rubber bands to work.. com'on, you can do better than that. Hidden fixing screws? Multi-material goodness? Swiveling magnetic arm? Safe ejecting mechanism to pull the knifes off?.. The sky is the limit.Just link this model as a remix or post a make to enter the contest. I'll post a big fat link at the top of the description on the 1st of January 2023 with the winner :P
With this file you will be able to print Hattori Hanzo knife holder with your 3D printer. Click on the button and save the file on your computer to work, edit or customize your design. You can also find more 3D designs for printers on Hattori Hanzo knife holder.