Hartmann Micro forceps
prusaprinters
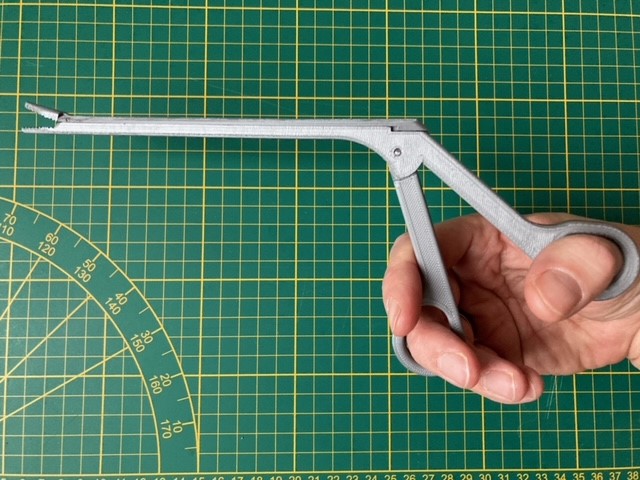
<p>MAJOR UPDATE: Long reach Pliers V3<br/> This update makes the pliers print more easy then ever! No more fettling... However you now need a small M3 countersunk bolt and a normal or nylock nut.</p> <p>Video:<br/> <figure class="media"> <oembed url="https://youtu.be/Nh-kuHk8TgM"></oembed> </figure> </p> <p>Game with these forceps:<br/> <figure class="media"> <oembed url="https://youtu.be/mUKegYFgeos"></oembed> </figure> </p> <p>updates:</p> <p>Better tolerances (just slides together)<br/> Turned the V-grove upside down.<br/> More material around the hinge for the jaw<br/> one sided scissor hinge<br/> MINOR UPDATE: Long reach Pliers V3.1<br/> This update only changes the top slider. It was extended slightly to increase clamping for thin items.</p> <h3>Print instructions</h3><p>Infill<br/> I printed with 20% infill. The only part that needs 100% infill is the moving handle (with cam) up past the hinge hole. (I had the cam snap off on one of the pliers.)</p> <p>Supports<br/> I used the option to add support material on buildplate only. This should ensure that the holes stay open</p> <p>Orientation<br/> The models are not correctly oriented for printing.</p> <p>Best Orientation of the top part for printing is to have the v-grove pointing up</p> <p>Best orientation for the base is flat on it’s side with the logo pointing up</p> <p>Best orientation for the jaw is with the cam and teeth pointing up</p> <p>Best orientation for the separate handle is flat on its side, with the little cam pointing up. The other way around would require a lot of extra support material.</p> <p>All the parts should fit on a 200x200mm printbed.</p>
With this file you will be able to print Hartmann Micro forceps with your 3D printer. Click on the button and save the file on your computer to work, edit or customize your design. You can also find more 3D designs for printers on Hartmann Micro forceps.