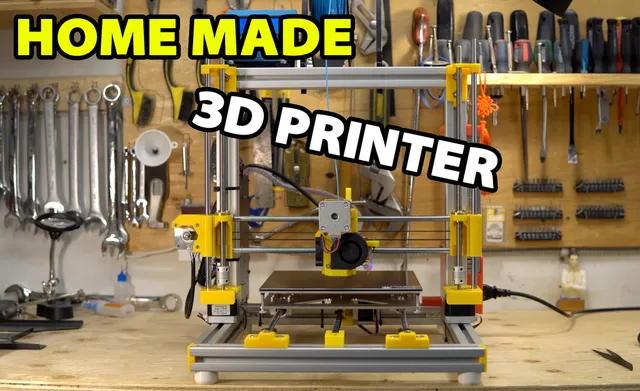
Haribo Frank's 3D Shop Edition
prusaprinters
Update October 2 Made a Github with my Marlin code for the Haribo, right now it is at version 2.0.6.1 you have to use the updated X-motor mount with a stopper, or use the old end stop position X_MIN_POS and Y_MIN_POS https://github.com/Franks3dShop/Marlin/tree/Haribo P.S: The new X-Motor mount is called "X-Motor V2 with stopper for Marlin 2.0.6.1 and newer.stl" Update January 2020 Added "Meanwell Cap Box Transfo.stl" as demanded by someone, not tested, it's a flat top cap for the Meanwell Power Supply. Update January 2019 Replaced the Motherboard with: Amazon US: https://amzn.to/2EHmql8 Amazon Canada: https://amzn.to/2tJEGUK Replaced the Power Supply with a branded Meanwell LRS-350, added Meanwell versions for the Power Supply cases. Update December 8th 2018 I have added my Marlin 1.1.9 in two version 1- One with MAX7812 and NeoPixels Led enable. 2- The other Firmware without MAX7812 and NeoPixels. You should take care that you have the same board, calibrate everything yourself X-Y-Z-Extruder. This is just to get you started, I will add a pinout in a next update, you can figure out the pinout from the pins_RAMPS.h I have left in comments the old pins, like "#define Y_MIN_PIN 2 //14", new pin = 2 old pin = 14 please refer to this pinout chart for the board https://reprap.org/mediawiki/images/thumb/c/c2/MksGenV14-Pinout.png/800px-MksGenV14-Pinout.png The SD Card is disable I use Octoprint, if you want to use the SD Card, you will have to reassign pins for the SPI hardware (pins 50,51,52) to other pins on the board, from my tests the SD Card is always on, there is no CS for the SD Card, so you can not control the TMC2130 in SPI and the SD Card at the same time on the bus, you will have to use TMC software SPI in Marlin if you want the SD Card to work. I have connected the TMC2130 in SPI mode, Toms3D has some information about that, the CS are X_CS_PIN = 14 Y_CS_PIN = 15 Z_CS_PIN = 53 R_CS_PIN = 49 Also I use the switchless end stop mode from Marlin, you could move some connections and connect regular end stop switches. Update October 30th 2018 Added version 9 of the Box Transfo file with a hole to pass cables through the 3030 channel to the top of the transfo Added two DC-DC converters for the printer LEDs (+5v) and Noctua fans (+12v) makes for a clean install. Included two versions of the top box for the power supply that hosts the DC-DC converters along with the cover for it. With or without a place for a smoke detector MQ2 sensor (The case base needs supports and also some supports for the screw holes of the smoke detector version). AliExpress Link to the DC-DC buck convert I used. And an AliExpress Link to the MQ2 sensor that I also used. Also added the MKS Gen v1.4 Case I have design for it. And a Raspberry Pi Case that is attached to the frame base. Finally I have added the X-Axis Idler camera case directly in this project. Update October 13th 2018 Adding a Raspberry Pi Camera Wide angle to the X-Idler mount glued or part of the X-Idler, check out thing: https://www.thingiverse.com/thing:3153408 Update October 1st 2018 Adding a MAX7912 low level debug display https://www.thingiverse.com/thing:3053313 My build based on this: http://www.prusamk2.com/haribo-3030-extruded-aluminum-prusa-i3-mk2-build/ https://github.com/PrusaMK2Users/3030_Haribo_Edition/tree/master/STL/optional And also on Tom’s 3D work: https://toms3d.org/2017/02/23/building-cheapest-possible-prusa-i3-mk2/ You can use end stop switch first, there are holes for them on the X and Y, same as the Prusa. For Z auto-leveling, because of the glass surface of the Ultrabase, I have used a BLTouch original. For assembly, I mostly referred to Prusa MK2 kit manual: https://manual.prusa3d.com/c/Original_Prusa_i3_MK2_kit_assembly Except for the Extruder assembly wich is a mix between MK2 and MK3: https://manual.prusa3d.com/Guide/5.+E-axis+assembly/510?lang=en Also, I have used Marlin 1.1.9 and customized it for the printer, if you need the settings, ask me and I will give you some of my settings for you to configure your own Marlin, you should do this anyway it's a good way to learn. I have bought some 3030 aluminum extrusion from a local shop and cut them to length from the instructions of www.prusamk3.com: Clear anodize 3030 Normal Rigidity Type extrusion 3x 354mm 2x 320mm 2x 330mm I have redone some parts in Fusion 360 to accommodate my 90 degrees angles that I used to assemble my 3030 frames instead of having to thread the ends of the 3030 and drill holes precisely in the 3030 to fix the Z frame. This way you can adjust the position of the Z frame. So there is a 90 degrees angle behind both Z motors supports, and you use a screw through the Z motor support into the 90 corners instead of a set screw. I also had to redo parts of to have room for the Z motors adapter to clear the X gantry. For the extruder I used from: https://www.thingiverse.com/thing:2735475/files cable-holder.stl https://www.thingiverse.com/download:4650325 extruder-cover.stl https://www.thingiverse.com/download:4650320 extruder-idler.stl https://www.thingiverse.com/download:4650321 MK2.3_ExtruderBody.stl https://www.thingiverse.com/download:4726083 MK2.3_X-_carriage.stl https://www.thingiverse.com/download:4711412 MK2.3_X-carriage_backplate.stl https://www.thingiverse.com/download:4650324 nozzle-fan.stl https://www.thingiverse.com/download:4650322 For the LCD Full Graphic Case (compatible with my 3030 support) from: https://www.thingiverse.com/thing:617468 For the rubber feet, I used Smooth PLA and this model from http://www.prusamk2.com http://www.prusamk2.com/download/4789/ For the Y rods holders: http://www.prusamk2.com/download/4645/ This Pinda Probe to BLTouch adapter: http://www.prusamk2.com/download/5050/ The Y belt holder: https://github.com/PrusaMK2Users/3030_Haribo_Edition/raw/master/STL/optional/1x_mk2x_y_belt_holder_modded.stl And the Spool Holder from: https://www.thingiverse.com/thing:2606458 Finally, a bit of warning, if you attempt this build, make sure you are following every precaution you can, and make sure you know what you are doing, you are dealing with High voltage and High temperatures, please be cautious, and if you are not sure please find somebody who can advise you. I am not responsible for any damage or injuries you could do to yourself or others. Please be safe. Thank you! Print Settings Printer: HicTop 3DP12 Rafts: No Supports: No Resolution: 0.2 mm Infill: 15-45 % Filament: Amz3d PETG and PLA Multi Notes: For the extruder you should use PETG because of the heat from the extruder, I used 45% grid infill and 30% part cooling fan. On the structural parts, I used 45% grid infill and 30% part cooling fan. On the rest you can use less infill. How I Designed This Category: 3D Printers
With this file you will be able to print Haribo Frank's 3D Shop Edition with your 3D printer. Click on the button and save the file on your computer to work, edit or customize your design. You can also find more 3D designs for printers on Haribo Frank's 3D Shop Edition.