Hanging Calendar
prusaprinters
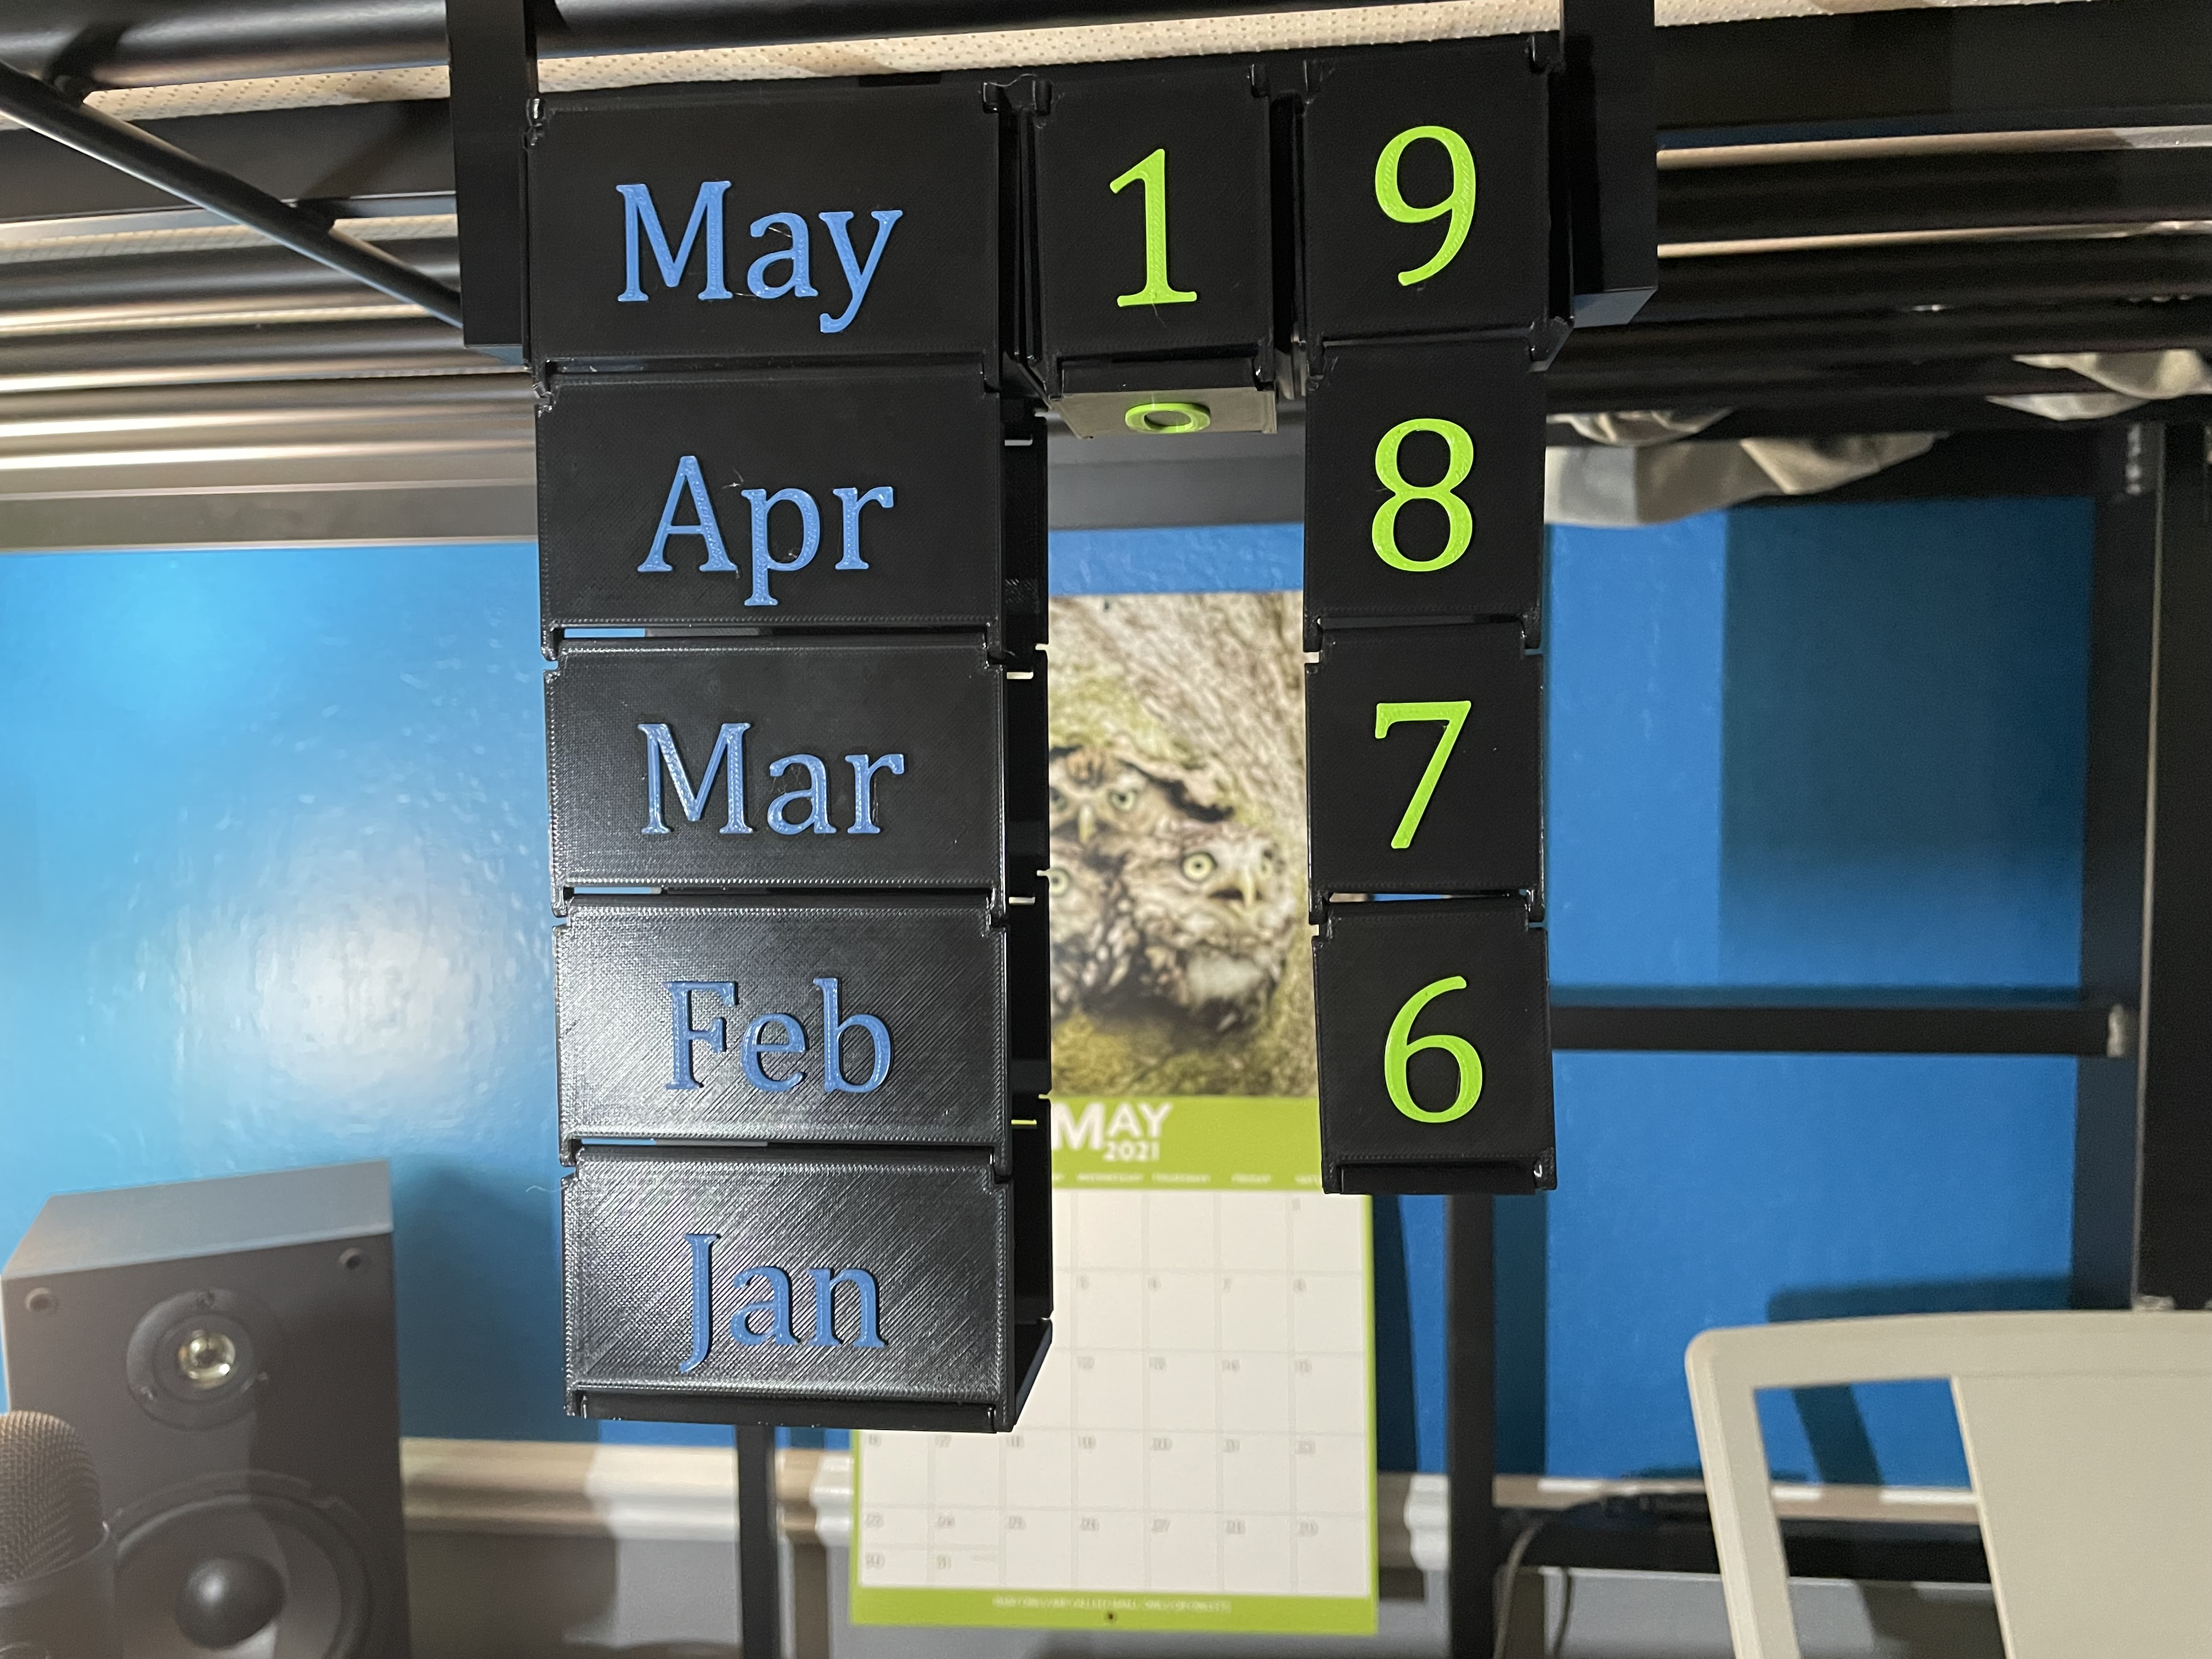
<h3>Modular Linking Calendar</h3><h4>Overview</h4><p>This calendar uses a modular system of tiles which link together to form a chain and display any list, such as a date, schedule, etc. Use the included Arabic numerals and English months, or use the customizable tiles and insert your own list on slips of paper to display anything you want.</p><h4>Uses</h4><h5>Calendar</h5><p>This calendar surprisingly can be used as a calendar! You can make a calendar with the month and number tiles to display any date, and pull the chain to switch to the next day.</p><figure class="image image_resized" style="width:50%;"><img src="https://media.prusaprinters.org/media/prints/68424/rich_content/80a20399-ba95-4011-afe3-e617333f3c18/img_0260.jpg#%7B%22uuid%22%3A%2253177e21-f631-44d1-aaac-6f74a8da492a%22%2C%22w%22%3A4032%2C%22h%22%3A3024%7D"></figure><figure class="image image_resized" style="width:50%;"><img src="https://media.prusaprinters.org/media/prints/68424/rich_content/5669ea3c-7543-47f4-8ea0-94f3d96b2971/img_0261.jpg#%7B%22uuid%22%3A%22039897d1-8051-4f4d-9c92-f90130697f73%22%2C%22w%22%3A4032%2C%22h%22%3A3024%7D"></figure><figure class="image image_resized" style="width:50%;"><img src="https://media.prusaprinters.org/media/prints/68424/rich_content/e79b0301-d868-454f-9b51-8e58302eae73/img_0262.jpg#%7B%22uuid%22%3A%228044bade-f601-4bf4-8932-264688f18c22%22%2C%22w%22%3A4032%2C%22h%22%3A3024%7D"></figure><h5>Customization</h5><p>The calendar includes pieces which can have slips of paper inserted in them to create endless combinations of lists, numbers, countdowns, and more. You can use this calendar to:</p><p>Keep track of whose turn it is to do the dishes, walk the dog, or any other task</p><figure class="image image_resized" style="width:50%;"><img src="https://media.prusaprinters.org/media/prints/68424/rich_content/a3351bfa-69fe-423d-8668-a068418dc932/img_0264.jpg#%7B%22uuid%22%3A%228489924f-2309-42ee-a994-2490e5f14a87%22%2C%22w%22%3A4032%2C%22h%22%3A3024%7D"></figure><p>Count down the days to your favorite event</p><figure class="image image_resized" style="width:50%;"><img src="https://media.prusaprinters.org/media/prints/68424/rich_content/329a2005-0545-456d-a091-e1b9ae5621f0/img_0265.jpg#%7B%22uuid%22%3A%227365197f-f636-46ce-b07a-f4784804831d%22%2C%22w%22%3A4032%2C%22h%22%3A3024%7D"></figure><p>Decide which tea to drink in the morning</p><figure class="image image_resized" style="width:50%;"><img src="https://media.prusaprinters.org/media/prints/68424/rich_content/1eaf3880-efb4-4dce-bbc9-ae03d9b2ccc9/img_0263.jpg#%7B%22uuid%22%3A%225d64a521-a9a3-42e3-aa80-9818fae5ed75%22%2C%22w%22%3A4032%2C%22h%22%3A3024%7D"></figure><p>And much more!</p><h4>Printing Instructions</h4><p>I printed each piece on a Prusa Mini using the 0.20mm QUALITY preset. It isn't necessary to use a layer height finer than 0.2 mm, because none of the pieces have much detail along the z axis. Supports are not necessary, they have been modeled in where they are needed. I printed my calendar in PLA, but it should print fine in other materials.</p><p>To print the month and number tiles, orient them in your slicer so the text is up. To achieve the multicolored effect, I used the change color option in PrusaSlicer. To do this, slice your model as normal and then slide the layer preview to the first layer of where you want the new color to be. Then, press the + icon next to the slider and a color change will be added automatically. Press “slice now” again and export the g-code as you normally would. If you are printing the custom paper tiles, orient the flat side down for the tile and the larger flat surface down for the insert. The overhang on these tiles is 45°, so they should be printable on almost any printer.</p><p>The connecter for between the pulleys is the most complicated piece to print. The piece consists of two boxes which can each rotate freely. The part is printed in place, and does not require assembly, although it does have some supports that need removed. It is important to use a 0.2 mm layer height for this piece, because there is a bridging support in the part's model which is 0.2 mm in height. Using too fine of a layer height will mean that this support is made of more than one layer, which can make the supports difficult to remove.</p><p>The pulleys, hooks, and end pieces are all oriented in the optimal printing position and print easily without any special settings or considerations.</p><h4>Assembly Instructions</h4><p>To assemble a regular calendar, you need two numbers 0 - 3, one number 4 - 9, one of each month, two end/hook pieces, two small pulleys, one large pulley, and four connecters.</p><figure class="image image_resized" style="width:50%;"><img src="https://media.prusaprinters.org/media/prints/68424/rich_content/a505996b-610d-47c0-b9c1-b8bb042a892c/img_0293.jpg#%7B%22uuid%22%3A%226b550b09-70ff-40c2-b781-1153bb87f56a%22%2C%22w%22%3A4032%2C%22h%22%3A3024%7D"></figure><h5>Step 1</h5><p>Make the chains by snapping tiles together. Snap one set of 0 - 9, one set of 0 - 3, and one set of Jan - Dec. I prefer to have higher numbers and months above lower tiles, but you can assemble them in any order you want. </p><figure class="image image-style-align-center image_resized" style="width:50%;"><img src="https://media.prusaprinters.org/media/prints/68424/rich_content/a7324644-bd32-4569-95b7-7d22e3ab8054/img_0267.jpg#%7B%22uuid%22%3A%22c2fe07e5-90df-428c-8c43-ffbe51816b99%22%2C%22w%22%3A2309%2C%22h%22%3A1732%7D"></figure><figure class="image image-style-align-center image_resized" style="width:50%;"><img src="https://media.prusaprinters.org/media/prints/68424/rich_content/077d9711-a98e-4cba-a65b-8f81d71d90d7/img_0268.jpg#%7B%22uuid%22%3A%2253d9c84a-cc90-43a9-bfb4-6f0812cf60ac%22%2C%22w%22%3A2309%2C%22h%22%3A1732%7D"></figure><figure class="image image-style-align-center image_resized" style="width:50%;"><img src="https://media.prusaprinters.org/media/prints/68424/rich_content/b08022f8-0069-4980-b5a6-bea5c96d7ac9/img_0269.jpg#%7B%22uuid%22%3A%227e5ad253-276c-413b-8236-19518332458d%22%2C%22w%22%3A4032%2C%22h%22%3A3024%7D"></figure><h5>Step 2</h5><p>Wrap any chains of length 4, such as the tens place on the calendar, around its pully and connect its ends, because these cannot be slid on after its ends are connected. Any chain with a length longer than 4 can be connected before being put on its pulley.</p><figure class="image image_resized" style="width:50%;"><img src="https://media.prusaprinters.org/media/prints/68424/rich_content/17f988b7-cb4b-4a22-9ca9-eb395362a451/img_0270.jpg#%7B%22uuid%22%3A%22ed9a9d6d-f1f8-41b5-b2ba-1acac44c485b%22%2C%22w%22%3A4032%2C%22h%22%3A3024%7D"></figure><h5>Step 3</h5><p>Remove the supports from the connecter pieces. These can be pulled of by hand. The two parts of the connecter may be stuck together, but can easily be separated by twisting the pieces.</p><figure class="image image_resized" style="width:50%;"><img src="https://media.prusaprinters.org/media/prints/68424/rich_content/fdffdbb0-c9f9-46b9-965b-6d4304dbbf5c/img_0287.jpg#%7B%22uuid%22%3A%22fb864b3b-209f-4639-8556-fd518d4c65d6%22%2C%22w%22%3A4032%2C%22h%22%3A3024%7D"></figure><figure class="image image_resized" style="width:50%;"><img src="https://media.prusaprinters.org/media/prints/68424/rich_content/03c38409-178f-4957-a829-c2099d8d5a6f/img_0288.jpg#%7B%22uuid%22%3A%2256293e75-54fc-460d-b527-71679086d11c%22%2C%22w%22%3A4032%2C%22h%22%3A3024%7D"></figure><figure class="image image_resized" style="width:50%;"><img src="https://media.prusaprinters.org/media/prints/68424/rich_content/5911c02e-7676-41fc-bca7-39e3bed92ddf/img_0289_1.gif#%7B%22uuid%22%3A%22753a6210-aace-472b-96f2-8f71c274cdc6%22%2C%22w%22%3A320%2C%22h%22%3A180%7D"></figure><h5>Step 4</h5><p>To assemble two pulleys together, insert one end of a connecter into a pulley. The connection should be a tight press fit, but if the connecter falls out too easily, wrap masking tape around the end of the connecter to increase its size. Once you put the first side of the connecter in, add another pully to the other end. To prevent the connecter from entering the pully more than it should, rotate the pieces about 45° before pressing together entirely.</p><figure class="image image_resized" style="width:50%;"><img src="https://media.prusaprinters.org/media/prints/68424/rich_content/0a4f10e1-7b95-46d0-93e3-89a65cfb6195/img_0271.jpg#%7B%22uuid%22%3A%229040c5f6-e625-4a97-88b3-ebf385a3d0a3%22%2C%22w%22%3A4032%2C%22h%22%3A3024%7D"></figure><figure class="image image_resized" style="width:50%;"><img src="https://media.prusaprinters.org/media/prints/68424/rich_content/5bd6fac7-1c3a-4ddb-b6ec-2d8701726d49/img_0272.jpg#%7B%22uuid%22%3A%22f14740aa-cae7-4765-9817-e4620bbd149a%22%2C%22w%22%3A4032%2C%22h%22%3A3024%7D"></figure><figure class="image image_resized" style="width:50%;"><img src="https://media.prusaprinters.org/media/prints/68424/rich_content/118890e8-10bc-41f7-88a1-329738c329b5/img_0273.jpg#%7B%22uuid%22%3A%222980e57b-1b12-40cc-b03f-18679e8c35f3%22%2C%22w%22%3A4032%2C%22h%22%3A3024%7D"></figure><p>Connect all the pulleys, hooks, and end pieces you need for your calendar. The image below shows the layout needed for a regular calendar.</p><figure class="image image_resized" style="width:50%;"><img src="https://media.prusaprinters.org/media/prints/68424/rich_content/f94e8d06-6c3a-4650-ad99-969fb4113353/img_0274.jpg#%7B%22uuid%22%3A%22f227a3f6-1bad-4738-82aa-581b66e97dbf%22%2C%22w%22%3A4031%2C%22h%22%3A3024%7D"></figure><h5>Step 5</h5><p>Connect the ends of any chains that are still separate, and drape them over their corresponding pulley. </p><figure class="image image_resized" style="width:50%;"><img src="https://media.prusaprinters.org/media/prints/68424/rich_content/bb9a9f0e-6e76-4d88-b162-8fa94b9d74e8/img_0275.jpg#%7B%22uuid%22%3A%22f8bfbb37-5bcf-44dc-b561-ed3420006143%22%2C%22w%22%3A4032%2C%22h%22%3A3024%7D"></figure><figure class="image image_resized" style="width:50%;"><img src="https://media.prusaprinters.org/media/prints/68424/rich_content/a3a596e1-44a8-46c9-8a48-d4965271ff41/img_0276.jpg#%7B%22uuid%22%3A%2262f923cb-543b-4517-acf6-6e1164f6a61b%22%2C%22w%22%3A4032%2C%22h%22%3A3024%7D"></figure><h4>Customization</h4><p>If you want to use text other than just the months or numbers, you can use the customization tiles to create your own tiles. Or, if the hook end pieces don't work for where you want your calendar, you can use the included end piece template and model your own mount for your calendar.</p><h5>Tile Customization</h5><p>To customize your own tiles, use a 3x5 index card cut into fourths or a piece of A7 paper cut into thirds. Write whatever you want on the slips of paper, but don't write too close to the edge or it will get covered up.</p><figure class="image image_resized" style="width:50%;"><img src="https://media.prusaprinters.org/media/prints/68424/rich_content/bf299e6b-6173-46ae-ab8d-d72b7af90979/img_0279.jpg#%7B%22uuid%22%3A%221f53acab-bf7d-4344-80dc-9ea9c605aaf2%22%2C%22w%22%3A4032%2C%22h%22%3A3024%7D"></figure><p>Print out as many customization tiles and inserts as you need for your design. You need one tile piece and one insert piece for every tile you want on your chain. Slide the slips of paper into the tiles, and put the insert on top of the paper to lock it in. If the insert slips out too easily, you can put a strip of tape on the back of the piece of paper to make it thicker. You can then link the tiles together to form a chain for your calendar.</p><h5>End Piece Customization</h5><p>If the included hooks don't allow you to mount your calendar in the way that you would want, you can model your own end piece to fit your needs. The end piece template will fit over a connecter piece just like the hooks and pulleys, and allows you to design an mounting method that works for your individual purpose. If you don't want to use the template to make a custom mount, the dimensions of the connecter is 20 mm x 20 mm x 15 mm, and I use a 0.2 mm offset for the end pieces.</p>
With this file you will be able to print Hanging Calendar with your 3D printer. Click on the button and save the file on your computer to work, edit or customize your design. You can also find more 3D designs for printers on Hanging Calendar.