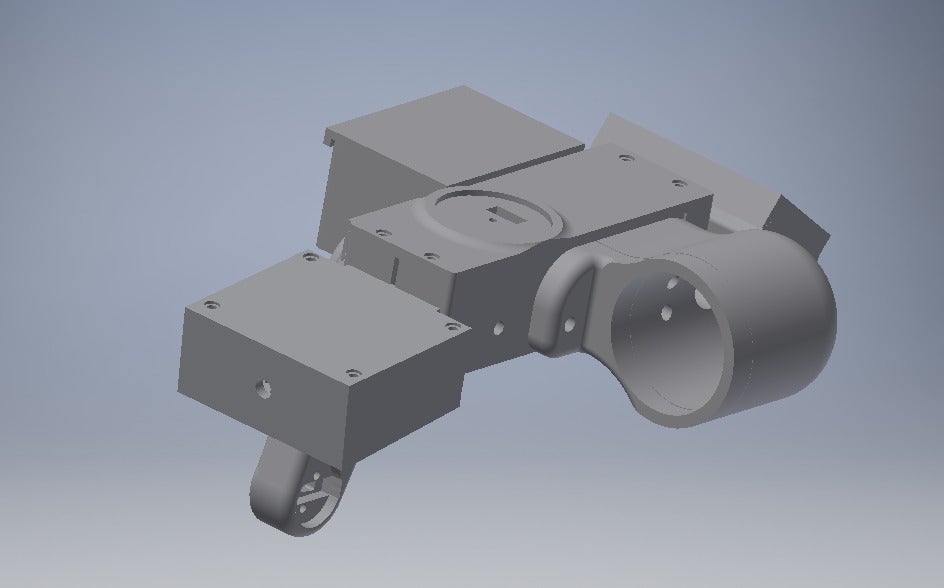
Handheld Configurable Milestag base unit parts
prusaprinters
<p>This is a collection of parts to make a housing for a miles tag Arduino laser tag core module. The parts as printed go together to form a wrist mounted laser blaster, intended to be less "gunlike" . This was a prototype unit I worked up to provide to a client for their own product based off of this (I can't post the files for the final unit they derived from this, but these are fine) As it was a prototype I don't actually have any pictures of the finished unit. But the parts do fit together and house the electronics. You could turn it into a more traditional laser blaster shape pretty easily. The electronics use a kit from this location:</p> <p><a href="http://www.lasertagparts.com/arduino.htm">http://www.lasertagparts.com/arduino.htm</a></p> <p>the "laser tube" is a piece of 2" PVC pipe cut to length. You'll want some sort of lens at the end for better range.</p> <p>I'm uploading these in the hope that someone may have a use for some of the parts. Chances are I won't work any further on this one, but it is functional as is.</p> <p>This is designed to go together with M3 bolts and M3 heat set inserts.<br/> <a href="https://www.mcmaster.com/#94180a331/=16wu4hr">https://www.mcmaster.com/#94180a331/=16wu4hr</a></p> <p>Basicallythe main board goes in the long recrangle, the sensor pokes up through the lid, the "laser" routes through the side pod into the "gun tube", the speaker goes out front. The LCD ends up in back on the LCD mount with the on off switch and the status buttons, and the trigger goes in the joystick looking bit mounted on the side arm plates. The cable for that one runs down the middle channel.</p> <p>The trigger switch is held in place by screws. I think. I don't remember entirely.</p> <h3>Print instructions</h3><h3>Category: Toys & Games Summary</h3> <p>This is a collection of parts to make a housing for a miles tag Arduino laser tag core module. The parts as printed go together to form a wrist mounted laser blaster, intended to be less "gunlike" . This was a prototype unit I worked up to provide to a client for their own product based off of this (I can't post the files for the final unit they derived from this, but these are fine) As it was a prototype I don't actually have any pictures of the finished unit. But the parts do fit together and house the electronics. You could turn it into a more traditional laser blaster shape pretty easily. The electronics use a kit from this location:</p> <p><a href="http://www.lasertagparts.com/arduino.htm">http://www.lasertagparts.com/arduino.htm</a></p> <p>the "laser tube" is a piece of 2" PVC pipe cut to length. You'll want some sort of lens at the end for better range.</p> <p>I'm uploading these in the hope that someone may have a use for some of the parts. Chances are I won't work any further on this one, but it is functional as is.</p> <p>This is designed to go together with M3 bolts and M3 heat set inserts.<br/> <a href="https://www.mcmaster.com/#94180a331/=16wu4hr">https://www.mcmaster.com/#94180a331/=16wu4hr</a></p> <p>Basicallythe main board goes in the long recrangle, the sensor pokes up through the lid, the "laser" routes through the side pod into the "gun tube", the speaker goes out front. The LCD ends up in back on the LCD mount with the on off switch and the status buttons, and the trigger goes in the joystick looking bit mounted on the side arm plates. The cable for that one runs down the middle channel.</p> <p>The trigger switch is held in place by screws. I think. I don't remember entirely.</p>
With this file you will be able to print Handheld Configurable Milestag base unit parts with your 3D printer. Click on the button and save the file on your computer to work, edit or customize your design. You can also find more 3D designs for printers on Handheld Configurable Milestag base unit parts.
