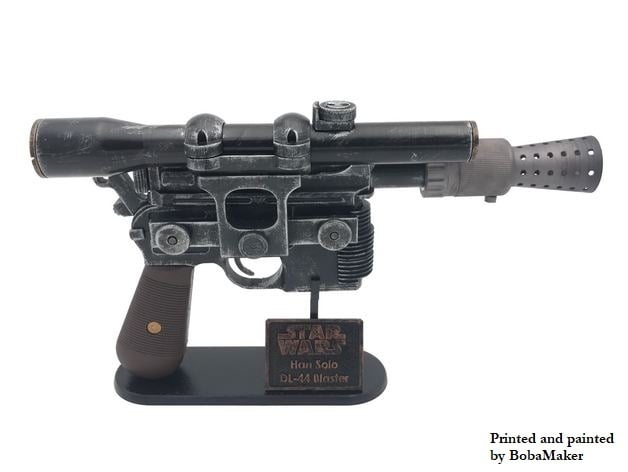
Han Solo Blaster DL-44
thingiverse
A small tip would be greatly appreciated for this FREE design: Donations Buy me a cup of coffee $3.00 USD Buy me cup of coffee and a donut $5.00 USD College fund $10.00 USD Thank you and enjoy! 12/18/2018 Over the past few months, many of you messaged me about the numerous listings (30+) on Etsy and Ebay selling my 3D modeled design for profit. I appreciate your diligence in bringing this to my attention. As a student, I was naive in thinking that we as a 3D printing community would share knowledge and designs without exploiting people's work for profit - it can't be changed now. However, I continue to believe that most of us in the 3D printing community will help each other out and respect each other's work. Thank you, and keep on printing! 4/5/2018 Updated pictures include a printed and painted DL-44 by BobaMaker. Check him out! https://www.thingiverse.com/BobaMaker/about 8/7/2017: Some users give useful tips in the comments. Printing handles vertically gives better finish. Support is recommended for Parts 20, 21, 29, and 32. Part 11 (grip pin) might be 4 mm too long. Part 18 (crossbar pin) may be too thin. A quick fix for these pins is sanding or adding tape. Introduction This is a 3D-printable replica of Han Solo’s DL-44 Heavy Blaster from Star Wars: A New Hope. Through extensive research and effort, this is the most accurate 3D-printable DL-44 replica designed for ease of print and fine detail. The images above compare this 3D printed design to one of the few existing reference materials for the screen-used DL-44. The stl files are already oriented correctly, but make sure to download and read the included ‘3Dprinted_dl44_assemblyGuide .pdf’ for all the print settings and assembly instructions. Test-fit before gluing. The assembly guide may have wrong steps order, so use it just to understand orientation and what goes where. Feel free to post and share your finished prints with the rest of us! Features: -Accurate replica of Han Solo’s DL-44 from Star Wars: A New Hope -Visual Assembly Guide PDF containing full print settings and assembly instructions IKEA-style -Designed for ease of printing and painting -Seamless design – no need for body filler or putty to cover up seam lines! -Working Trigger (rubberband mechanism) as seen in this gif: http://imgur.com/DbCOpMu -Interior space for embedded electronics Print Settings Printer Brand: Ultimaker Printer: Ultimaker 2 Rafts: No Supports: Yes Resolution: Most at 0.1 mm layer height Infill: 20% Notes: Default speed (60 mm/s) 205C hotend temperature, 60 bed temperature using Hatchbox PLA (Black) 37 files 80+ hours (on Ultimaker 2 200 x 200 x 200 mm bed) Some support for a few parts (check in assembly guide) Post-Printing Some acrylic paint and foam brush were used to give the final print some color. How I Designed This The screen-used DL-44 was built using many World War 2 components like the Mauser C96 “Bolo” variant, German Hensoldt & Wetzlar Ziel Dialyth 3x sniper scope, and MG81 aircraft-mounted machine gun flash hider. All of these real-world components are rare and cost thousands of dollars and inaccessible to many of us, so I poured hundreds of hours into capturing accurate details on Google, AskMisterScience’s extensive guide on Mauser C-96s, and the Replica Prop Forum. The parts press-fit together and are cleverly designed in Autodesk Fusion 360 to be seamless without the use of body filler. Superglue (cyanoacrylate) will ensure the prop stays in one piece, especially for cosplay purposes. This model also comes with a working trigger mechanism that uses a standard rubberband.
With this file you will be able to print Han Solo Blaster DL-44 with your 3D printer. Click on the button and save the file on your computer to work, edit or customize your design. You can also find more 3D designs for printers on Han Solo Blaster DL-44.
