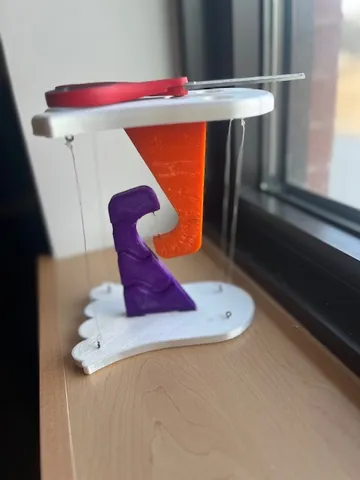
Halloween Themed Tensegrity Structure
prusaprinters
Summary Cont:Plates(ghosts) measure 12 x 15cm, and beams (triangles) measure 10.5 x 6. Beams have a unique design on each side, and plates have two variants. Fishingline, hooks, and other tools need to be bought outside of the print. Lesson Plan:With a partner, you will design and create a single custom Tensegrity StructureParts list:Jee_Ghost1 (Quantity: 1)Jee_Ghost2 (Quantity: 1)Jee_Boo (Quantity: 1)Jee_CandyCorn (Quantity: 1)Construction Instructions:Once printed, you should have four pieces that look roughly like this: If there are extra stringy pieces of filament, cut them off with cutters or just with your fingers.2. The original pieces will not fit in the holes. Use cutters and sandpaper to round off and narrow down along the edges of the pegs on the triangles. Use the same tools to round off the corners and remove excess filament to widen the holes in the ghost. Be sure to check the fit repeatedly to ensure that everything fits properly and the fit isn’t too loose. 3. Once the pieces are whittled down, wiggle and shove them together, don’t be afraid to add extra force! Pieces after being cut down:4. Next, identify the small, slightly darkened circles in all part pieces. There should be five in total, four on the plate and one on the beam. This is where the screws will be inserted.5. Use the smallest available punch and knock gently with a hammer until a hole is formed at each marking. Take it slow to avoid splitting. If the width of the hole is too small, use a small screwdriver to widen it. Use this technique for the baseplates and the triangles, but be extra careful with the triangles. They may be more prone to breaking. 6. Insert hooks in each hole, screwing them in carefully.7. Tie a simple knot to the face that will be the top of the structure using pliers to pull it tight. Do this to all of the screws on both the plates and triangles.Knots being tied to the bottom plate above) The string being lifted for attachment to the top plate (below)All plate knots tied (left)8. Have one person carefully hold the top face up with a level to ensure that it is evenly distributed and tie the strings to the bottom face using pliers once moreTIP: Tying knots with lengths of a string the size of the actual measurements is really hard. Instead, grab a length of string twice the length of the final measurement and pull it taught until it's the actual length. Use the excess string to tie an easy knot. The base string should be 1 cm, and the others should measure out to be about 16cm.9. Cut any extra strings off and tighten them, so all four sides are level!10. And that’s it! Now you have a fully functional tensegrity ghost structure. Design Choices: Our process started with the prompt to create a tensegrity structure of our own design. Our initial planning was on GoogleDraw and looked like this: After our concept was approved, we created rough sketches using our proposed dimensions as well as a plan for how to construct it on Solidworks. Using our proposed dimensions, we planned out the spacing of the triangles using to-size cutouts. Here, we planned out every measurement of the engravings as well as the pegs. We did the same for both triangles. As well as the facesHere, we had a planning sheet with every dimension and ideal design.Then, we began to build our design in Solidworks. While building, we had one major function change, which was upping the thickness of the beams and plates for better stability, and one major aesthetic change, which was adding differing designs on the triangles for more charm. On the back of the Boo triangle, we added some squiggles, and on the back of the CandyCorn triangle, we added the text “Aah” in the same style and font as the Boo. Finally, version 1.0 could be printed. Our initial pieces looked like this:However, there were two major design flaws. One, the triangle with the squiggles didn’t print properly since they were too deep and too close to the tip. And, more noticeably, number two, our structure could not hold tensegrity due to the design of the triangles. The center weight was unevenly balanced between the two triangles and had to be better distributed. So, we were back to the drawing board. First, we planned a new design on GoogleDraw with what we wanted the triangles to be and any other major changes. We also updated the design of the candy corn to match the new shape. Once approved, we created an accurate, dimensioned sketch. We printed a quick 1.5 design to double-check that the tension could hold, and it could! So now all of our functional changes were out of the way, and it was time for aesthetic ones. We used the filet tool to round and smooth out the faces and the engraved designs on the triangles. The same tool also allowed us to round out the eyes and mouth to give them depth. We also upped the depth of all of the engravings so they could be more visible. Here is a before and after of the ghosts and what the new candy corn design looks like: Finally, all of the proposed changes were added for the candy corn and stripes, and our version 2.0 was ready to print!
With this file you will be able to print Halloween Themed Tensegrity Structure with your 3D printer. Click on the button and save the file on your computer to work, edit or customize your design. You can also find more 3D designs for printers on Halloween Themed Tensegrity Structure.
