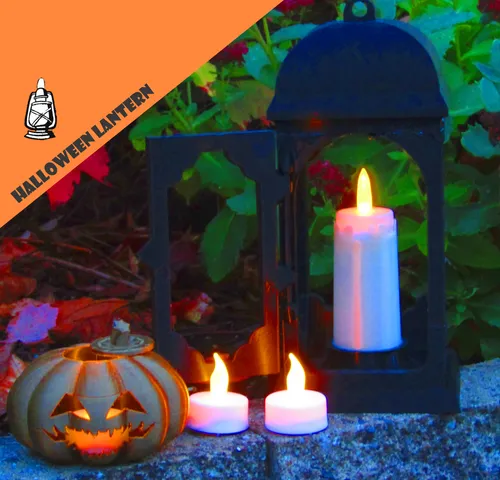
Halloween Spooky Lantern - LED Tea Light And Opening Door!
prusaprinters
Halloween is coming soon, and what's better than being able to print your own halloween decoration? I proudly present to you:The Spooky Halloween Lantern!The lantern is full sized and comes with a couple of nice features, so it isn't like all the boring static lanterns you can find. The lantern comes with skulls and cracks, giving it a spooky look. Perfect for your halloween party!With the lantern itself comes a candle that you can place easily inside the lantern. The candle is able to hold a LED tea light to give a nice ambience to its surroundings. The last two features are a door that you can open and close, and a small hole at the top so you can hang the lantern from a tree! Before I move on to the print instructions, I just want to say that I'm looking forward to seeing your lanterns and remixes!I wish you happy printing and a happy, but also very spooky Halloween!Print instructionsThough I tried my best to make this print as easy as possible, there are some spots that need some extra care.The Lantern - print instructionsAssuming that you have already loaded the model in your favorite slicer, lets start. I will be using prusaslicer to explain here.Step 1Lets turn on the basic settings you will need for this print. Print speed: print speed can be anything you like. If you are going more for the looks than for the speed, go for 0.15mm speed or 20mm speed, but if you dont care about the looks and just want a speedy print, go for 0.25mm draft (Print will overall take around 15 hours).Filament: Filaments are to your choice, but choose wisely. If your lantern will be inside your house constantly, I would choose for PLA to get more of the detail, but if your lantern will be outside constantly, I would choose for PETG to make it withstand the weather better.Printer: Anything, again. If you have a printer that fits the whole print, go for it. If you don't have a printer that fits it whole, try cutting the print somewhere at where the top of the lantern begins.Supports: In the support options dropdown, select ‘For support enforcers only’.Infill: Even though it is a print like a statue with only the door as a moving part, the lantern has some small and easily breakable parts so choosing for an infill of 20% or higher is recommended. I used something in between 25% and 30% infill.Step 2Now that you have the basic settings right, lets focus on supports. This print does need some support. In this step I am playing it save with some extra supports so that your print will definitely not fail, but if you are more daring, you could remove some.Lets start with the supports under the door. When using paint on supports, the bottom of the door should look something like this: The next part that needs some support is the arch just behind the door near the top of the model. It should look something like this:Please note that this is on the inside of the model.The rest of the print should be printable without any support, so put the brush away and lets get on to the next step!Step 3Turn on the settings you like most! Some other settings are important for your type of printer, but don't forget to check if the print still works and prints the same.Step 4Slice the model and check if you see any risks that could get you a failed print. Especially check the inside of the small tube of the hinge and make sure there is some infill inside to make it stronger. If that is not the case, please put the infill at a higher percentage.Please also check if the hinges from the door don't connect to the small tube. If they do, you have probably resized the model. Please make it bigger again, and try again untill the parts don't connect.Candle - print instructionsThe candle is fairly easy to print, but I'm adding this just in case you dont know how to change filaments mid-print.Step 1Slice the model with the settings you like. Step 2If you have not resized the model, go to layer 71, like shown in the pictureStep 3Press the orange plus sign to the right of the slider. This will create a filament change in the gcode on layer 71. Now you're done! Succes with your prints and again: Happy printing and a happy, but also very spooky Halloween!
With this file you will be able to print Halloween Spooky Lantern - LED Tea Light And Opening Door! with your 3D printer. Click on the button and save the file on your computer to work, edit or customize your design. You can also find more 3D designs for printers on Halloween Spooky Lantern - LED Tea Light And Opening Door!.
