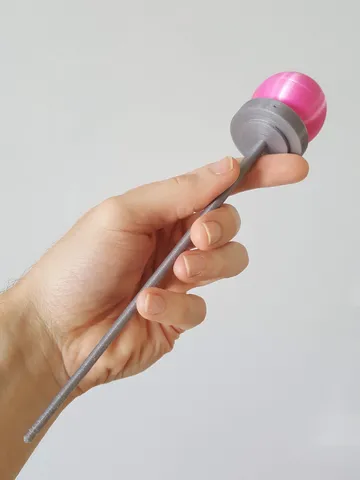
Hairpin
prusaprinters
No hardware is required! Just a Printer and a little bit of time for an awesome and distinctive accessory! You don't need an MMU for this print, either! The topper is an entirely different piece and can be printed in any color you want! This is a Hairpin I designed to be worn as an attractive hairpiece. I designed it to be modular and have some interesting interactive elements to it. The topper here is a ball, but I created the design to use an M15x2 thread to keep everything together using a mechanical connection. I plan to create more Toppers and trinkets that can modify this design's look and appeal in the future. Let me know your feedback! Thanks for browsing! Print instructionsPin One of the provided project files includes this assembly on its own, the pin, the spacer, and the spinner. In that project file, the models are properly oriented, and have the pin uses some supports to ensure the small overhang prints without issues. I've also placed a support blocker on the inside of the spacer to reduce the post-process time. Lastly, I used a concentric finish for aesthetic reasons. If you're not using the provided project file, then ensure that all of the parts are oriented correctly on the bed when printing. It should can be print without any support or brim, but it's a small price to pay for a bit of extra insurance. Ball Topper This should print as is without issues. I used a 0.10 mm layer height in the provided files and .gcode because I wanted to provide the best possible resolution. I have printed other versions at 0.20 mm layer heights, and it still looks great. No supports are needed, but if you're not using the project file, then ensure to re-orient the pieces, so the larger flat faces of the topper pieces face toward the build plate for best results. One last hint is not aligning the seams on this model, as it is pretty notable on the final results unless you plan to do some post-processing. Assembly All of the parts should screw together in order without issue if your tolerance is good enough. I've allowed for a 0.15 mm tolerance in the parts' fit to keep everything tight, but not too tight. Screw together the two half spheres and tighten them to a secure fit. Pay attention to the area where the two halves join, to ensure the seams line up. Place the spinner on the pin piece's collar. If you want, you can thread a small fishing wire through the pinhole on the spinner and use it to secure additional trinkets or accessories. Take the ball assembly that you just put together and screw it to the pin and spacer. Tighten everything securely. You can loosen the ball end a little bit and allow a bit of play on the spacer, to allow it to spin freely. Done! Tips You can use a small amount of glue to permanently fix the parts together if you want. I designed it with a mechanical connection in case I create additional toppers that could be exchanged depending on the color or look the person is going for. You can print it much faster at 0.20 mm. I chose 0.10 mm for the best quality pictures and print. Don't screw the topper all the way! Leave a small gap at the top and ensure the correct alignment of the half spheres for the best look.
With this file you will be able to print Hairpin with your 3D printer. Click on the button and save the file on your computer to work, edit or customize your design. You can also find more 3D designs for printers on Hairpin.
