Guy-Manuel de Homem-Christo Daft Punk Helmet with Programmable LED Lighting
thingiverse
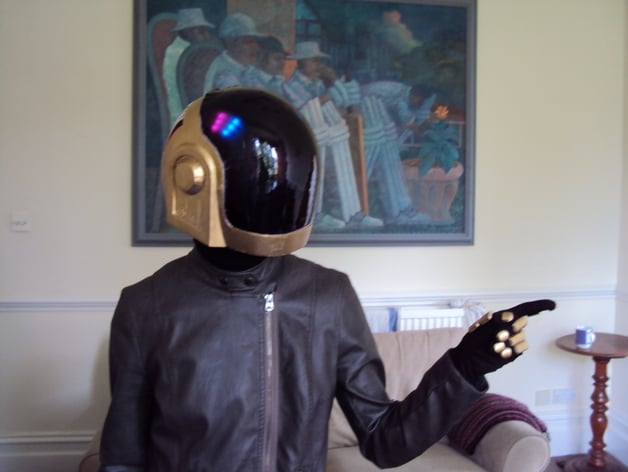
A Daft Punk Guy-Manuel helmet split into pieces printable on a Prusa i3 is adapted from Ivan Spasic's blog model. It pairs well with gloves (http://www.thingiverse.com/thing:177614). Assembly instructions can be found in this YouTube video (http://www.youtube.com/watch?v=GpiyT2DBLSM), while Ivan's original model is at this blogspot URL (http://cad-unigraphics-projects.blogspot.co.uk/2011/08/daft-punk-helmet-design-tutorial.html). Instructions are available here (http://projecttimbo.blogspot.co.uk/2013/11/daft-punk-helmet.html) and here (http://www.instructables.com/id/Guy-Manuel-Daft-Punk-Helmet-with-Programmable-LED-/), with the latter providing more detailed instructions. To assemble, print these STL files: HelmetTop.stl, HelmetBack.stl, HelmetFront.stl, HelmetWireplate.stl, HelmetLeftTop.stl, HelmetLeftBottom.stl, HelmetRightTop.stl, and HelmetRightBottom.stl. Join the pieces using M3 nuts, bolts, and hot-melt glue. Fill with car body filler, sand, paint gold. For the visor, use VisorMould.stl for a CNC mill or sliced MDF for a mould, then vacuum form thin PETG over it and tint the inside with VHT Niteshades. Translucent filament printed LEDDiffuserRight.stl and LEDDiffuserLeft.stl can be used for lighting, while LEDBank.stl helps mount LEDs and hot-melt glue to diffusers. An Arduino controls lights using FullControl.ino, with 8 AA batteries as power. Case.stl and Caselid.stl hold the electronics.
With this file you will be able to print Guy-Manuel de Homem-Christo Daft Punk Helmet with Programmable LED Lighting with your 3D printer. Click on the button and save the file on your computer to work, edit or customize your design. You can also find more 3D designs for printers on Guy-Manuel de Homem-Christo Daft Punk Helmet with Programmable LED Lighting.