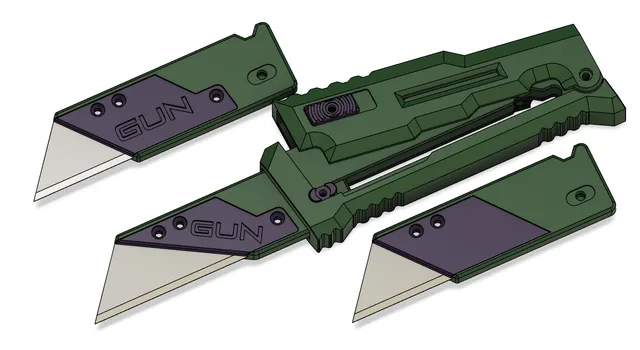
GUN - Gravity Utility Knife V1.1
prusaprinters
Inspired by the Reate Exo-U i did my own attempt on a grivity knife. This might be work in progress, so possible that there will be further versions. My original Design is for use with M2x2 heat inserts, but i also added a version for M2 nuts (untested)Prints without any support.For the stopper of the bladeholder its possible to use a M2x4 heat insert instead of 2x M2x2.All holes facing the buildplate but dont touch it having a 0.2mm layer to bridge the hole before printing on it. These has to be drilled/cut out afterwards.Recommended to print with strong material. Printed mine with PETG-CF.Handle parts printing upright. Inner handle facing bottom to buildplate, outer handle facing top to buildplateUse at your own risk! I'm not responsible if you hurt yourself with this.STEP included, feel free to remix.Update V1.1:Added some BladeCover and also a BladeHolder with a longer cutting edge. Rest of the parts are the same. Update 16.06.24:Just added some short instruction for assembly. BOM:- Heat Insert Version -6x/7x M2x2(L)x3(OD) or 4x/5x M2(L)x2(OD) + 1x M2x4(L)x4(OD) Heat Inserts like this one:https://de.aliexpress.com/item/1005006071488810.html1x M2x14 Screw3x M2x5 or M2x4 Screw 2x M2x3 Cylinder Head Screw- Nut Version -5x/6x M2 Nut1x M2x14 Screw1x M2x12 Screw1x M2x5 or M2x4 Screw2x M2x3 Cylinder Head Screw Instructions:Parts you need to print: 1x InnerHandle1x OuterHandle1x HandleTube1x Button You have to choose if you want the M2x5 Version or the M2x4. Original design is the x51x LockBlock 1x Bladeholder There are different Versions – Bladholder.stl/.obj is the classic one, which you can also use without the BladecoverBladeHolderV2.stl/.obj has a third Screw for the Bladecover.Bladeholder-Long-Edge.stl/.obj is like the V2, but with a longer cutting edge of the blade.1x BladeCoverThere are different Versions, corresponding to the choosen BladeHolder. Each of them also as “clean” Version without the “GUN” imprint.2x SlideStopperHere you can choose again between M2x4 or M2x5 for the heat insert version. For nut version you need 1x M2x5 and 1x M2x12_Nut Assembly:The parts with holes facing the buildplate but dont touch it have a 0.2mm layer for bridging the hole. This has to be drilled or removed in some other way first. But this is only the case for all versions of the BladHolder and the LockBlock_Nut.stl/.objAfter that, if you printed the heat insert version, you have to insert them now. 1x M2x2 for the OuterHandle1x M2x2 for the LockBlock4x M2x2 for the classic Bladeholder or 5x M2x2 for V2 and Long_EdgeYou can also replace those 2x M2x2 hert insert for screwing in the SliderStoppers with 1x M2x4Put the parts together:Insert the LockBlock to the slot from the inside of the OuterHandle and screw the button to it.Insert the HandleTube in the hole in the bottom of the InnerHandleSlide the InnerHandle and OuterHandle together and insert the screw at the bottom. This might need a bit of force, because there are some extrusions to the inside of the InnerHandle to prevent it from opening more then needed. Also make sure the lock is in open position.Open the Handle, insert the BladeHolder and screw the SlideStopper to it. Now you just have to screw the Blade and BladeCover to it.
With this file you will be able to print GUN - Gravity Utility Knife V1.1 with your 3D printer. Click on the button and save the file on your computer to work, edit or customize your design. You can also find more 3D designs for printers on GUN - Gravity Utility Knife V1.1.
