Greek Hoplite Shield
thingiverse
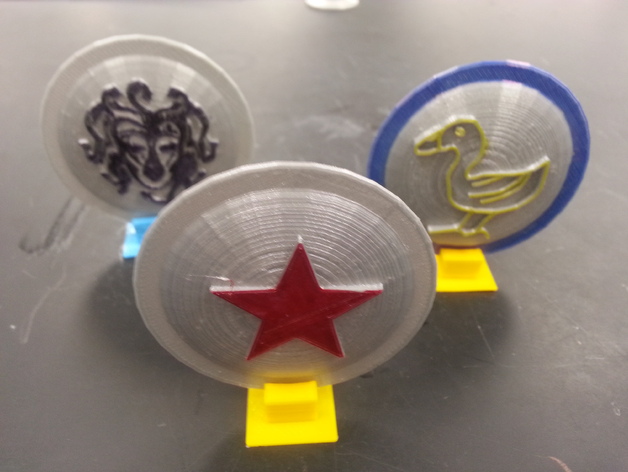
This is a replica of a hoplite shield (hoplon, or aspis) modeled on the ones used in ancient Greece. The shields were constructed from wood with a thin layer of bronze, measuring about 3 feet in diameter. In battle, the shield rested against the shoulder and provided protection within the phalanx formation. The shields often featured decorations. The Spartans painted theirs with a capital Lambda symbol. This project is for a 5th-grade social studies unit on ancient Greece, where students will design their own shield. Pictures and models of student-designed shields will be added after the project is completed. Standards NGSS Overview and Background This is a replica of a hoplite shield (hoplon, or aspis) modeled on the ones used in ancient Greece. The shields were constructed from wood with a thin layer of bronze, measuring about 3 feet in diameter. In battle, the shield rested against the shoulder and provided protection within the phalanx formation. The shields often featured decorations. The Spartans painted theirs with a capital Lambda symbol. This project is for a 5th-grade social studies unit on ancient Greece, where students will design their own shield. Lesson Plan and Activity Students will decide on the design they want to display on their shield. Shields can be decorated in several ways: A. Blank shields can be 3D printed and painted, providing an authentic method. B. Shields can be designed in 3D by adding raised surfaces in a CAD program like Tinkercad. Students can create their design using geometric shapes or draw it and convert it into SVG, then import it into Tinkercad. Alternatively, they can find a monochrome image online and convert it to SVG or trace and modify the design before converting it to SVG and importing it into Tinkercad. After printing the shields, students can color them with paint or markers. Students will share their completed shields with their classmates and explain why they chose their design. An optional stand is provided that can be printed and used to hold the shield upright. Project: Hoplite Shield Objective Students will decorate a hoplite shield. Audience This project is designed for 5th-grade students. Preparation This project will be completed near the end of a unit on ancient Greece, so students will be familiar with the history and culture of that civilization. Steps 1. Students will decide on the design they want to display on their shield. Shields can be decorated in several ways: A. Blank shields can be 3D printed and painted, providing an authentic method. B. Shields can be designed in 3D by adding raised surfaces in a CAD program like Tinkercad. Students can create their design using geometric shapes or draw it and convert it into SVG, then import it into Tinkercad. Alternatively, they can find a monochrome image online and convert it to SVG or trace and modify the design before converting it to SVG and importing it into Tinkercad. After printing the shields, students can color them with paint or markers. 2. Print the shields. 3. Students will share their completed shields with their classmates and explain why they chose their design. An optional stand is provided that can be printed and used to hold the shield upright. Results This project has not been tested with students yet. Three example shields are included: a star designed using geometric shapes from Tinkercad, a gorgon adapted from clip art, and a ducky created from an original drawing.
With this file you will be able to print Greek Hoplite Shield with your 3D printer. Click on the button and save the file on your computer to work, edit or customize your design. You can also find more 3D designs for printers on Greek Hoplite Shield.
