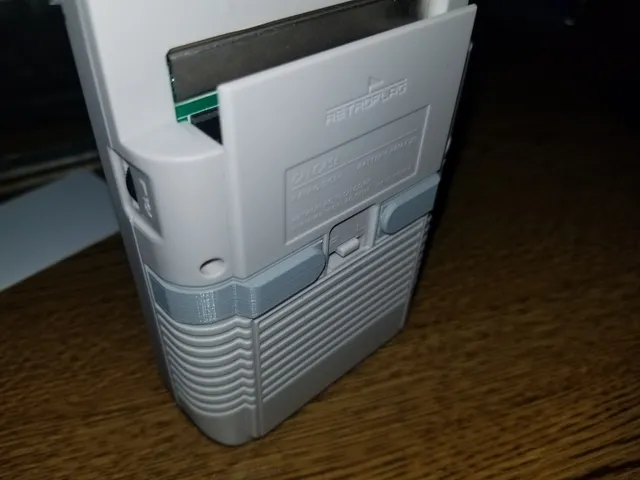
GPi Case Custom Shoulder Button - Basic SNES Style
prusaprinters
This is a basic SNES-style version of the shoulder buttons as part of my custom button series for the GPi case. This replaces the L and R buttons on the back of the case with a profile modeled after an 8BitDo SNES controller making it easier to find and press but not changing the feel of the case as a whole much. This design works for both sides so only one model is included for the button, as well as the peg that gets glued into the slot of the button. I would suggest when you print however to flip one button to the other side in your slicer, this keeps the "printed side" down for each when you put them in the case. I've designed this a direct replacement piece, pop out the old shoulder buttons, glue the peg into the slot on the button, and pop these ones in once the glue dries. If it becomes apparent this isn't self explanatory I can get a video made up at some time and throw it up on YouTube. As with my previous entries I'm still not a pro in Fusion 360. I feel like I've gotten a bit better but this is still not a perfect design in my opinion. See the paddle shoulder buttons here: https://www.thingiverse.com/thing:3812331 If you end up selling this design or a remix of it, please don't forget about little old me lol, I can't make you pay me but no one else has decided to do this yet so I'm the only one that's cared enough to do it so far. If you want to use this for yourself by all means please do, that's why I'm putting it up here, I've benefited from many other people's efforts in the Pi space so it's only natural to want to give back in what limited ways that I can. That being said, I've bought things for multiple Pi based projects that are the labors of someone else's work. We're all a community here, lets try not to screw each-other for a quick buck. ----------------------V3 - Update!! 8-13-2019---------------------- New design is ready and prints off MUCH better looking, so much so that I've deleted V2 models and pictures. The new model is a two part process so the button can be printed on it's side and look much cleaner while the peg prints fat part down. This removes all supports and brims from the equation and makes a much cleaner final product. See pictures for the updated results. Again, this is a large step over V2 so I deleted that model and everything associated with it, if you downloaded on day one please do so again to get the better model. Print Settings Printer Brand: Prusa Printer: I3 MK3S Rafts: No Supports: No Resolution: 0.1 Infill: 30 Filament: Hatchbox PLA Grey Notes: I did this at .1 mm resolution, 3 walls. Button is on it's side and the pegs are base down / skinny up. I used Hatchbox Grey PLA using generic stock PLA settings but you can do whatever plastics you want. I would suggest printing both buttons and 4-5 pegs all at the same time. The buttons print on their side and you'll need two of the same model since it fits both sides. Strongly suggest printing one button on the opposite side from the other. The design works in the case either way but this way your print surface faces the same direction on each side when you put them in the case. Post-Printing Print a few more pegs than you need! Once printed, I hit mine with an air gun for a few seconds to clean up any strings. Take the nicest pegs you can and using one tiny drop of super glue put the peg in the slot and hold it snug in there for a few seconds. It's designed to line up perfectly but depending on how well your printer does .1mm there may be play, if so center it as best you can or VERY LIGHTLY sand around the whole base to fit. I suggest when you put it in your case that you do printed surface down towards the bottom of the case, you can barely see any of the top of the profile once in use but the sliver you can see looks nicer this way in my opinion. I tried to mitigate elephant foot on the pegs because this is a very precise piece. It's a perfect fit for me with no wiggle on my side. There will be a little of this effect on the button, clean it up with an exacto but I put that face down on each of my buttons so you cant see it unless you look up her skirt. Category: Video Games
With this file you will be able to print GPi Case Custom Shoulder Button - Basic SNES Style with your 3D printer. Click on the button and save the file on your computer to work, edit or customize your design. You can also find more 3D designs for printers on GPi Case Custom Shoulder Button - Basic SNES Style.
