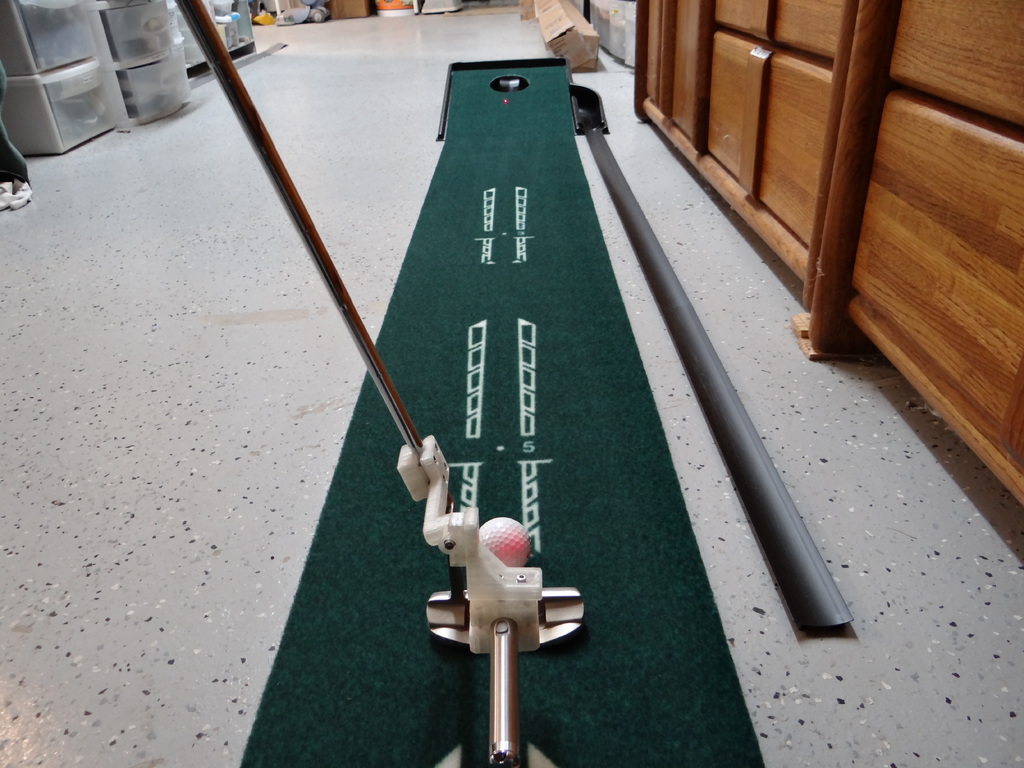
Golf Putter Laser Sighting Mount
thingiverse
This is a device that attaches to your putter shaft near the club head, holding a commercial off-the-shelf laser. Once aligned with the club head, it's amazing how much difference it makes in sinking your putt. It teaches you exactly how far off your stance and hands are. This device only helps with aligning the club head with the hole, not putting force. If you and your friends all have one, you can play on the course together. However, if your friends don't have one, they might get upset. To learn more about assembly and calibration, check out my YouTube video on the Griffes Channel. There are some of these devices available in the market priced around $100. Alternatively, you can print this device using a $5 cat-chasing laser or purchase a gun sight laser for $15 if you want to use it outside. This device works with two lasers: 1) Innozon laser pointer chaser for cats, which costs two for $8, and 2) WORD GX Tactical Green Hunting Rifle Scope Sight Laser Pen for $15. The cat-chasing laser is said to be safe for kids. The cat-chasing laser has an on/off switch, allowing you to mount it to your putter and turn it on when needed. In contrast, the hunting laser features a push-button switch and a key lock. To use the hunting laser, mount it so that the push-button switch is always depressed, then use the key lock to turn it on and off. The device has five degrees of adjustment for alignment; my video explains how to calibrate the laser. This process takes only a few minutes and can be accomplished by eye-balling it. The adjustments include: 1) Putter Shaft - this bracket allows the putter shaft to rotate around the shaft, which is an artifact of the design and requires consideration. Use it to align the mount perpendicular to the putter head face and tighten securely. 2) Shaft Angle - to get the laser vertical to the ground, this adjustment compensates for the shaft angle to the putter head, typically about 18 degrees. 3) Vertical Sight or Y axis - this moves the laser up and down to the target. You'll want to experiment with this adjustment when practicing because it will give you the line to the hole. If the laser points down too much, you'll have a hard time aligning with the hole. 4) Club Head Center - this allows you to get the laser beam directly over the center of your club head, usually indicated by a mark on the putter. 5) Horizontal Direction or X axis - this moves the laser side to side. This is an important adjustment and tricky to make. I designed this device to be as small and unobtrusive as possible. When I first started working on it, it was quite large. I print with clear PLA because it complements chrome well, but gold also works nicely. In the past, I experimented with a laser mount that used a circular level; you could use two levels, one on the club head and one on the laser mount to get a perfect match in X and Y planes. However, I found this didn't make much of a difference in the outcome and it was bulky and expensive. This project requires nuts and bolts for which I have attached a bill of materials. I used metric M3 hardware with hex driver heads because the M3 hardware is slightly smaller than 4-40 (washers and nuts), but 4-40 should also work (you might need to do some drilling). The prints are fine-tuned to the M3 hex head hardware with small washers. If you get the right sizes, the nuts will snap into place and the washers will slide in (sometimes you'll need to trim them with a knife or drill bit or pull them into place with a screw due to the elephant-feet effect). I tried to standardize on common M3 screw lengths so some pieces are larger than they need to be as to fit a common length, such as 20mm. Nothing beats a hex head screw for tightening; there's no slipping and the stainless steel hardware never wears. And why use nuts that will loosen on their own? It's the only way to go. While working on this project, I developed a list of hole sizes for screws, washers, and nuts that I used in SketchUp and verified in the 3D print. The list is attached; hopefully, you'll find it useful. The total time to print all six pieces is about 4 hours. I've been wanting to make one of these devices for 20 years, and I did once but it was a metal monstrosity that didn't really work well. I hope you enjoy this device; it's a lot of fun to play with and the kids love playing with it too.
With this file you will be able to print Golf Putter Laser Sighting Mount with your 3D printer. Click on the button and save the file on your computer to work, edit or customize your design. You can also find more 3D designs for printers on Golf Putter Laser Sighting Mount.
